In this post we will walk you through a more sophisticated method of exploiting CVE-2019-12750. This is a local privilege escalation vulnerability that affects Symantec Endpoint Protection. The method of exploitation described in this post works, at the time of writing, on all versions of Windows.
Products Affected
- Symantec Endpoint Protection v14.x < v14.2 (RU1)
- Symantec Endpoint Protection v12.x < 12.1 (RU6 MP10)
- Symantec Endpoint Protection Small Business Edition v12.x < 12.1 (RU6 MP10c)
Introduction
Following Part One of our CVE-2019-12750 Write Up on exploiting a vulnerability in Symantec Endpoint Protection up to Windows 10 version 1803, we will now focus on the latest Windows, version 1909.
Here we will go through a more sophisticated approach to exploitation. It requires further analysis of the vulnerable products due to the newly introduced Low Fragmentation Heap (LFH) for kernel mode pool allocations in Windows 10 v1809 and onward, which prevents our original exploitation method from working.
This new approach is necessary in order to obtain code execution in kernel mode while bypassing additional exploitation mitigation such as SMEP and KASLR.
The Impact of LFH (Win 10 v1809+)
In the latest versions of Windows 10, due to kernel mode LFH, leaking Token Objects through this specific vulnerability was not possible, or at least not consistent enough. We therefore had to find another exploitation approach in order to successfully perform a local privilege escalation attack on the affected host.
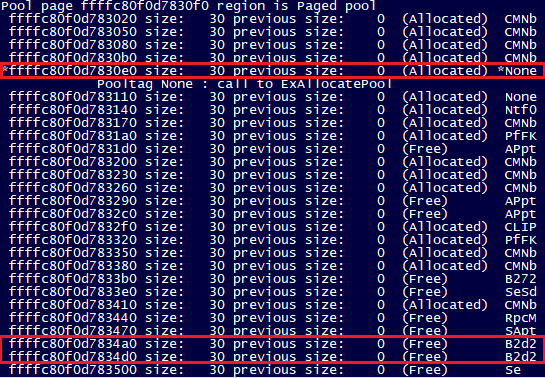
While a leaked kernel memory page up to Windows 10 v1803 would normally contain kernel objects of various sizes, in newer versions the kernel pool allocator fits as many objects as possible of the same size in each memory page, thus lowering memory fragmentation. Especially, when we have to deal with small allocations, like in our case (0x30 bytes chunk – Figure 1), we noticed that all allocations in the same memory page were basically of the same size.

Figure 1 – Chunks of same size grouped together
As shown in the figure above, the leaked kernel pool memory page will only contain chunks of that size, and so we cannot leak Token Objects by using the same method as we described in our previous post. There is a chance that with the right pool grooming a few of those could be leaked, but we decided to use a different approach.
First Things First
It can clearly be seen that there is a variety of allocations of the same size that belong to different objects. At this point, we need to have a closer look at these pool chunks to find out what sort of information we can leak back to userland and what sort of allocations we can control from userland.
Various drivers of the software under attack allocate chunks of 0x30 bytes of size upon specific conditions, so we started looking first at those proprietary objects.
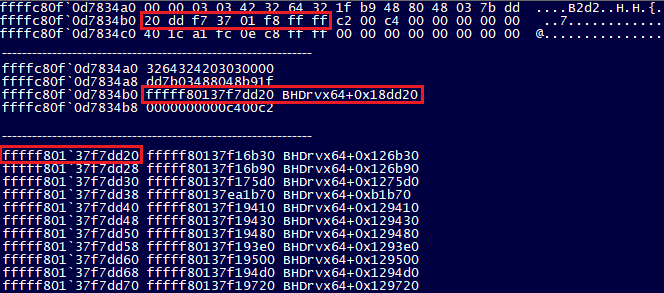
We found out that objects tagged ‘B2d2’ were of particular interest because they contained a pointer to another driver named ‘BHDrvx64.sys’. In addition that was a pointer to a table of function pointers, which made it even more interesting.

Figure 2 – B2d2 Chunk (BHDrvx64.sys)
There are two important points to mention at this stage.
First of all we have an object of the same size as the vulnerability-related chunk, which means that it can be easily placed in the same memory page.
Second, we have a pointer to a function table of another driver of the software target. This means that we have also leaked information that can help us later find its kernel mode base address and look for a set of instructions gadgets to execute.
This is a good start, but it is not enough. We also need to know what level of control we have over this type of objects.
In particular:
- When the object is allocated.
- When the object is freed.
- How the function table pointer is used.
Analysis on ‘B2d2’ Objects
We can easily find the function of ‘BHDrvx64.sys’ that allocates this type of objects with a simple search for that specific pool tag.

Figure 3 – B2d2 Object Allocation
Once the object is allocated, the function table pointer is written at the beginning of its data buffer, and the rest is initialised with zero bytes.

Figure 4 – Initialise B2d2 Object
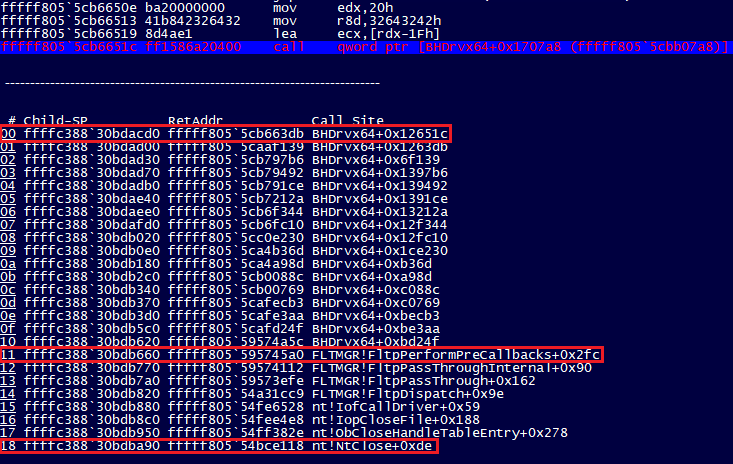
If we take a look at the call stack whenever this object is allocated, we can retrieve information about the execution path that leads to this function and what type of event triggers its creation.
We found out that various registered callback functions may be responsible for triggering the allocation of this object such as:
- Registry Keys (NtCreateKey, NtSetValueKey, etc…)
- Process Handles (NtOpenProcess)
- Process Termination (NtTerminateProcess)
- Executable Image Loading (exe, dll, etc…)
- CreateFiles (NtCreateFile)
- Closing Handles (NtClose)
However, closing file handles was the root cause that we decided to stick with, and we will provide further details about this decision shortly.

Figure 5 – B2d2 Object Creation
We know at this point that the first 8 bytes of the object are filled with the address of a function pointers table, and the rest is initially sanitized with zeroes. There is, however, an extra detail that is very important to the exploitation of this vulnerability. In fact, there is going to be some extra information added inside this object.

Figure 6 – B2d2 Object Extra Information
By monitoring access to the rest of the object data through hardware breakpoints, and by examining the call stack we found out that there was a call to the nt!RtlAppendUnicodeStringToString function taking place before this extra data was added inside the object. That helped us trace back the execution flow, and find out that the extra data was the length and maximum length fields of a UNICODE_STRING structure, followed by a pointer to the actual Unicode string buffer.
Consequently, we created a testing application that would create a file and then close the handle to it. Since we knew the full path length (in bytes), we used a conditional break-point to break at the right time.

Figure 7 – B2d2 Object Extra Information #2
Note that the driver pre-allocates buffers tagged ‘B2d3’ that can fit a maximum of 0x802 bytes. This means that when the file path information is written in the ‘B2d2’ object, the maximum length field will be set to that amount of bytes as now it refers to another buffer and not the one where the path was copied from.
![]()
Figure 8 – Maximum Length Updated
If the full path exceeds 0x800 bytes, the rest of the characters will be discarded and the length field will be set to that number.
That being said, we used long path names to create a file in order to have the length set to 0x800 and the maximum length to 0x802. In this way, we managed to distinguish our ‘B2d2’ objects from the rest that are created through other processes.
You may be asking why we are actually interested in finding out what that extra data is all about.
As we discussed in the first part of this write-up, the vulnerability allows each process to leak one memory page of paged pool kernel data, but not always a different one. However, since the objects on a leaked page could be associated with any running process, we needed a way to identify which ‘B2d2’ objects our exploit should target.
Clearly, corrupting the function table pointer of an object that we don’t control will result in crashing the host once another process will try to access it.
Let’s sum up latest findings:
- Process Creates a File.
- Process Closes Handle to the File -> B2d2 Object Created.
- Function Table Pointer is added In B2d2 Object.
- File Path Length, Maximum Length, and pointer to string buffer are added in B2d2 Object.
In other words, if our process creates a file and closes the handle to it, for as long as the process is running, we have a ‘B2d2’ object associated to that file. When the process terminates, the driver will use the pointer to the functions table from the object to call the appropriate clean up functions.
Armed with this information, we are now able to proceed with the next stage.
Taking Control of Execution
We know enough to hijack the execution flow, and so we can create a simple proof of concept by manually modifying the function table pointer in our ‘B2d2’ object.
![]()
Figure 9 – Setting a dummy pointer

Figure 10 – Execution Control PoC
We replaced it with a dummy pointer (0xF8F8F8F8F8F8F8F8) and killed the process to confirm we can control the execution flow when this object is freed.
Dealing with KASLR
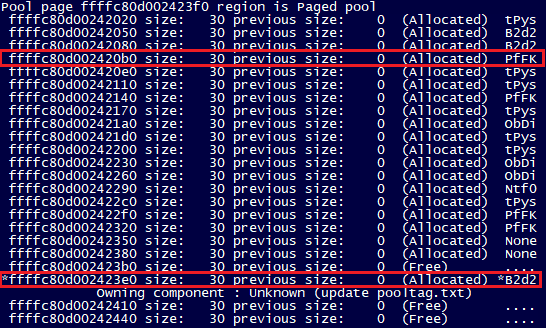
We can leak a pointer to the kernel module via ‘PfFk’ allocations. These are of the same size as the bug-related pool chunk (0x30 bytes) so we find them quite frequently sharing the same memory page.

Figure 11 – PfFk Allocation
And so here’s our leaked kernel module pointer.

Figure 12 – Leaked NtosKrnl Pointer
At this point we need to mention a couple of things. These allocations do not always contain this specific pointer, but an arbitrary kernel mode address. There is, however, a way to distinguish when this type of chunk is of interest.
The ‘nt!PfGlobals’ symbol is always located at an address that is 16-bytes aligned, and so this specific pointer will always be that address + 0x299, which means that the pointer value will always end with digit ‘9’. We examined this in different builds of Windows 10 v1809 to v1909, partially and fully updated, and it never failed. By leaking this address, we can easily find the address of ‘nt!PfGlobals’, but there’s a catch.
This symbol is not exported by ntoskrnl, and since its relative virtual address (RVA) is different between different builds, we need to find a way to locate it in order to calculate the kernel module image base.
That being said, we can’t use the usual LoadLibraryEx/GetProcAddress functions combination for this symbol to get its RVA. Instead, we managed to achieve this through a different method.
By examining the kernel module with IDA Pro we found a couple of references to that symbol from code located in the ‘PAGE’ section of ntoskrnl.

Figure 13 – Ntoskrnl Code Reference to PfGlobals
What we need to do is to load the ntoskrnl in userland with LoadLibraryEx, parse the PE header to get information about the ‘PAGE’ section and then search for this code pattern. We can then extract the address of ‘PfGlobals’ (in x64 the ‘LEA’ instruction will have a relative reference to it) and then subtract the user-mode image base to get the RVA of this symbol. Once we have the RVA of this symbol, we can subtract it from its kernel-mode address that we obtained through the memory leak and finally calculate the image base of ntoskrnl.
We will be needing this information in the next stage in order calculate the kernel-mode address of our SMEP disabling gadget.
Disable SMEP
Going back to figures 9 and 10, we see that the pointer we control to take over execution control is located at address of ‘B2d2’ chunk + 0x10. At that point this is were ‘RCX’ register is pointing at.
However, with SMEP enabled we can’t just use this to directly jump to our payload in userland, so we have to use it as a redirector to kernel-mode code.
Since we have full control over the contents of the object, we can use the next 8 bytes to store a pointer to a set of instructions that will allow us to redirect the execution flow further in order to disable SMEP temporarily.
The original pointer at object address + 0x10 refers to a table of function pointers stored in BHDriver64.sys (Figure 2). Since we have an instruction referencing that address (Figure 4), we can use the same method to calculate the kernel-mode image base of that module as well.
Next, we found the appropriate set of instructions to execute in order to redirect the execution flow further.

Figure 14 – BHDriverx64 Gadget
So, the first hijacked pointer in the object (at offset 0x10) will be used to send the execution to this set of instructions (Figure 14), which will extract a pointer at offset 0x18 (RCX is pointing already at object allocation address + 0x10), and will dereference it to get a function pointer. Since we are only reading from that pointer, we can use a userland pointer at offset 0x18 to read from and get the kernel address to jump to. This pointer can be used for both reading and for CR4 overwriting to disable SMEP.
For example, the value of CR4 in our VMWare based Windows 10 v1909 guest OS is 0x3506f8 and in Windows 10 v1809 is 0x1506f8.
Note that in this case (v1909) SMAP bit is also set, however it is compensated through the EFLAGS.AC flag (Alignment Check flag) and still not really used.
Note that SMEP and SMAP are controlled by 20th and 21st bits of CR4 register respectively.
Since we need to change the value of that register to 0x506f8, thus disable SMEP (unset SMAP bit too), we can allocate a user mode page at address 0x50000 and set the SMEP disable gadget at address 0x506f8, so when we jump at the SMEP disabling gadget (Figure 15) by dereferencing RCX, then this register will have that value and effectively disable SMEP, while keeping the rest of the bits intact.
![]()
Figure 15 – NtosKrnl SMEP Enable/Disable Gadget
Payload Execution
With SMEP out of our way, we can leak and modify another ‘B2d2’ object using the same method we have described and jump directly to our payload in userland which will use all previous information leaked to elevate the exploit process.
To be more specific, we use PsLookupProcessByProcessId to get the address of the system process (PID 4) object and then PsReferencePrimaryToken to get the address of its primary token.
Next, we use PsLookupProcessByProcessId in order to get the address of the exploit process object and overwrite the token pointer with the one used by the system process.
Finally, the payload will jump back to our SMEP gadget in kernel mode address space in order to restore the original value and return the execution flow back to normal.
Conclusion
In the second part of exploiting this vulnerability, we focused on the latest Windows 10 v1909 in order to appreciate how kernel pool LFH addition forced us to look for other ways of exploitation, as the memory leak was not enough anymore. Even though this required a lot more work to put all the missing pieces together, in the end we managed to create a working exploit to have fun with.
Timeline
- Date of discovery: April 2019
- Vendor informed: 18 April 2019
- Vendor Acknowledged: 19 April 2019
- Vendor Requested Extra Time: 19 April 2019
- Advisory: 31 July 2019
- Nettitude blog: 12 December 2019


