Note: These vulnerabilities remain unpatched at the point of publication. We have been working with Symantec to try and help them to fix this since our initial private disclosure in July 2017 (full timeline at the end of this article), however no patch has yet been released. Consequently, we are at the point of publishing the findings publicly. We will continue to work with Symantec to help them to produce an effective patch.
Update – Thursday 20 June 2019Symantec assigned this CVE-2019-9702. |
In this article we discuss various approaches to exploiting a vulnerability in a kernel driver, PGPwded.sys, which is part of Symantec Encryption Desktop [1]. These vulnerabilities allow an attacker to attain arbitrary hard disk read and write access at sector level, and subsequently infect the target and gain low level persistence (MBR/VBR). They also allow the attacker to execute code in the context of the built-in SYSTEM user account, without requiring a reboot.
Since many of the exploitation techniques that we come across rely on memory corruption, we thought that demonstrating exploitation of this type of flaw would be interesting and informative.
We will provide a short overview of the discovery and nature of the vulnerability. We will then discuss how access control to file and directory objects is enforced by NTFS, attack methods, problems, possible solutions to complete the exploit, and their limitations.
But first, here is a video demonstration of the vulnerability being exploited in the latest Windows 10 v1709 64-bit.
Affected products
- Symantec Encryption Desktop suite version 10.4.1 MP2HF1 and earlier.
- Module:
PGPwded.sysv10.4.1
- Module:
- Symantec Endpoint Encryption version v11.1.3 MP1 and earlier.
- Module:
eedDiskEncryptionDriver.sysv11.1.3
- Module:
Vulnerability discovery
Before discussing the two interesting input/output control requests (IOCTLs) and some associated code snippets, we need to focus on the practice that ultimately allows any user to take advantage of the disk read/write capabilities of the kernel driver under examination.
While we were going through the exposed named device objects by the kernel drivers installed, we noticed something interesting. To start with, by using DeviceTree by OSR [2], we could see that PGPwded.sys exposed a device object named PGPwdef.
According to its security attributes, all users should be able to access that object.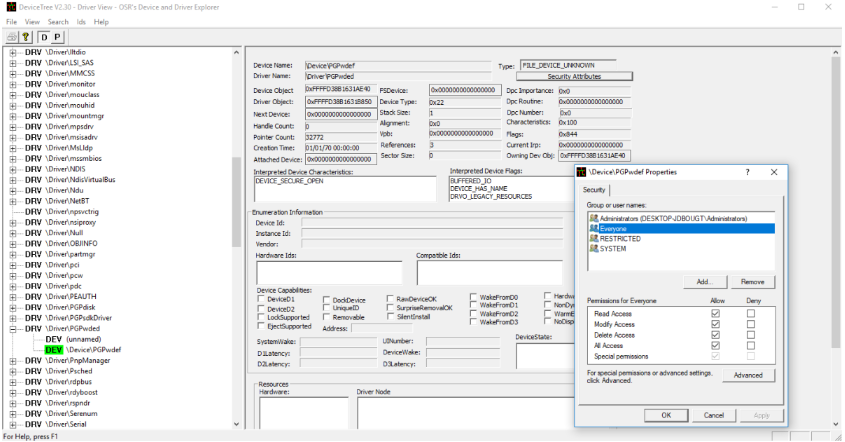
However, by using WinObj from Sysinternals [3], even with full administrative privileges, we were immediately receiving an access denied error. In other words, even an administrator was blocked from accessing that device object. That was interesting enough by itself to make us start digging a bit deeper.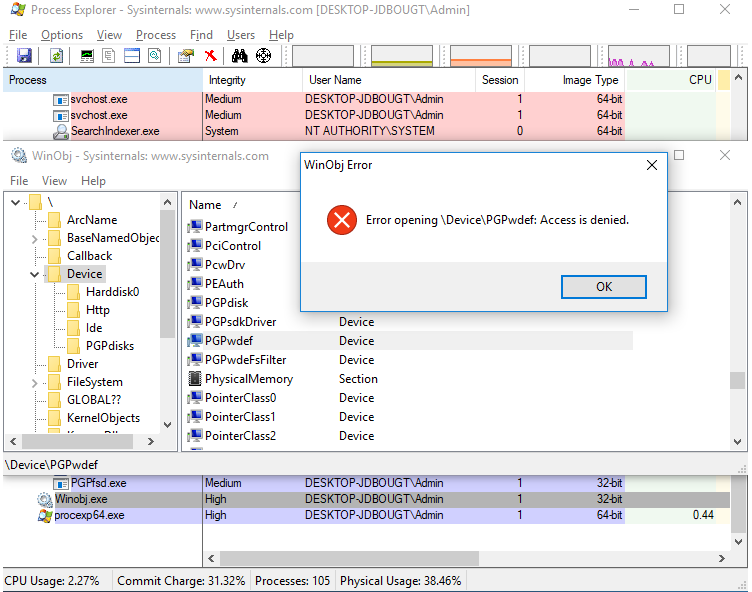
Before opening Windbg, we decided to perform a fast check over all running processes, in order to find out if at that point there was any process with an open handle to that device object. The results of that check were even more interesting. In fact, there was a process called PGPtray.exe that had an open handle to the aforementioned device object. That process was running with Medium Integrity Level [4], though.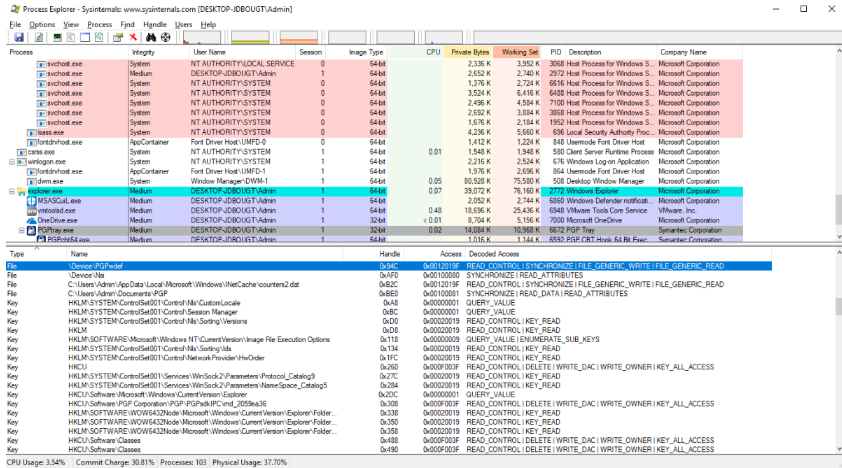
Our attempts to access that device object were blocked, even with full administrative privileges (High Integrity Level), but at the same time a process running with medium integrity had managed to obtain a handle with Read/Write access, and thus it was able to send I/O requests to the driver under examination.
It was about time to bring in Windbg and start examining that kernel driver further.
Our first target was the function that handles the IRP_MJ_CREATE [5] request, because that IRP is normally sent when attempting to access a named device object via the CreateFile function.
Shortly after we started stepping through the code, we found the check that was blocking our attempts to access that device object.
So let’s see what those two unicode strings are all about…
In other words, if the application that attempts to access that device object resides in the installation directory (the first one) then access is granted. Otherwise, access is denied. Of course, that directory is only writable by administrators.
However, there is nothing that stops us from either injecting code into another process of an executable that is already placed there, such as PGPtray.exe, or just starting a new process of one of the executables installed there by default, and inject our DLL module which will run the exploit code.
At this point, we had managed to start interacting with this driver of the target application and we just had to start digging deeper.
The fact that the developers of this application had tried to block access to that device object, albeit in an ineffective manner, made the associated driver immediately a lot more attractive.
Getting raw read/write access to the hard disk
With the assumption that this driver might have some interesting functionality that a normal user shouldn’t be allowed to access, we started looking at the various IOCTL handlers.
The first interesting IOCTL code was 0x8002206C, which allowed us to obtain raw read access to the hard disk. This by itself can have an interesting impact in the context of security, as it allows a user to access data that they normally wouldn’t be allowed to. In other words, a standard user could use that IOCTL to read the contents of a file that they normally cannot access, or obtain other sensitive data from portions of kernel memory that have been paged out.
The second interesting and even more dangerous IOCTL code was 0x80022070, which allowed us to perform arbitrary raw writes on the hard disk. This, of course, has an even more serious impact.
Combined, these two IOCTLs permit the attacker to parse and modify data at will. The impact ranges from abusing the MBR [6] to install a bootkit, to destroying and/or altering data, and finally – as we are about to demonstrate – to elevating privileges on runtime and executing code as the SYSTEM user account.
In order to read and write to the hard disk, the driver calls the following two functions in the same order:
nt!IoBuildSynchronousFsdRequestnt!IofCallDriver
The following two images show the read and write operations respectively.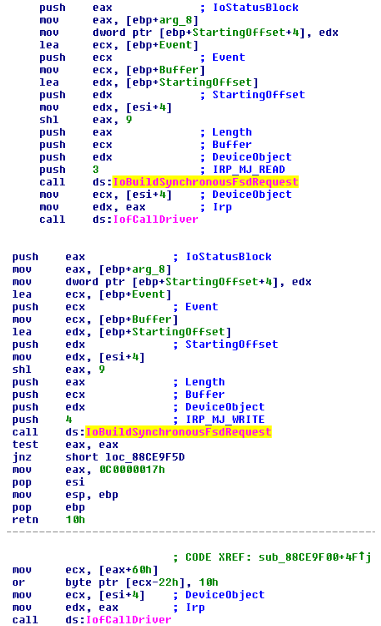
The StartingOffset parameter is a pointer to a LARGE_INTEGER structure (this provides a 64-bit signed integer) that specifies the starting disk offset for the read/write operations.
In both cases, all the parameters are fully controlled by the user. This means that we can access any offset of the disk and read/write arbitrary data at will. The Length parameter must be a multiple of the size of the sector of the disk we interact with.
At this point we knew we had full access to the main hard disk, so we had to do something meaningful with it.
Of course, obtaining disk access at that level opens many doors for attacking the affected host, but since we wanted something with immediate effect, without requiring a reboot of the system, we went for the privilege escalation on run-time attack vector.
In this case, we can’t manipulate any objects or data in memory, but we can do so for anything on disk, and for that reason the idea was to manipulate a file or a directory in a way that will allow us to perform some actions that will result to privilege escalation.
NTFS – objects security model
We will now provide a high level overview of how NTFS object security is enforced in order to assist the reader with understanding the concepts upon which our exploitation approaches were based.
In earlier versions of NTFS, and more specifically from version 1.2, each file record entry of the Master File Table (MFT) [7], or in other words each file (directories are stored as file record entries as well), had its own copy of the $SECURITY_DESCRIPTOR attribute [8] which contained the access control list (ACL) that is required in order to enforce the security permissions for each object.
Recent versions of NTFS, version 3.0 upwards, make use of a metadata file called $Secure (MFT Record number 9) [9] which has a named data stream called Security Descriptor Stream ($SDS) that contains a list of all the security descriptors on the volume with the associated ACL.
That being said, each file no longer has its own $SECURITY_DESCRIPTOR attribute. Instead, security descriptors are shared among files that require the same access permissions.
In other words, each MFT file record references a Security Id through its $STANDARD_INFORMATION attribute [10]. That Security Id is a unique ‘key’ reference to another table, the Security Id Index ($SII), of which the corresponding entry contains information for the associated Security Descriptor entry in the $SDS.
By using the Security Id to locate the associated entry in the $SII, the filesystem can then locate the correct Security Descriptor in the $SDS by extracting its relative offset in that data stream from the $SII entry, and perform the security check.
Since many files in a system require the same access permissions, it is more efficient to have a unique copy of a Security Descriptor for each group of files that have the same security enforcement requirements.
When a new file or folder is created, a 32-bit hash of the required Security Descriptor is calculated and is used as an index for another table called Security Descriptor Hash index which, similarly to the $SII, is used to map those hashes instead to security descriptors in the $SDS stream. If a match is found, which means that there is already a Security Descriptor that satisfies the security requirements for the new object, then the Security Id is extracted and stored in the $STANDARD_INFORMATION attribute of the corresponding MFT record.
On the other hand, if a matching Security Descriptor does not exist, then a unique Security Id will be assigned and new entries will be added to the $SDS stream, and the $SII and $SDH tables.
Note that, during the aforementioned checks, both the 32-bit hash and the security descriptors have to match in order to use the same Security Id for the new file as well. This is done in order to avoid collisions where different security descriptors could result in the same 32-bit hash identifier.
A closer look at a $Secure file
In this section we will examine an instance of a $Secure file in order to manually look up the information that we mentioned in the previous section.
Each MFT Record contains a set of attributes and each one of those provides information about the associated file on disk. Here we provide some information about a few of those.
For example, the $STANDARD_INFORMATION (0x10) attribute provides information about file creation, modification, access times, Security Id etc.
On the other hand, the $FILE_NAME (0x30) attribute [11] provides information about the parent directory, file flags (directory, hidden, read-only etc…), filename length, filename namespace, file name in Unicode, etc.
In addition, the $DATA (0x80) attribute [12] contains the data of the file or information on where to find the data of the file if it doesn’t fit inside the MFT record itself, as usually happens.
Another example of an attribute that we are about to meet is the $INDEX_ALLOCATION (0xA0) [13] which provides information about the storage location of an index table, such as the $SII and $SDH tables that we mentioned earlier.
In the following image we have highlighted some interesting parts of the MFT record under examination.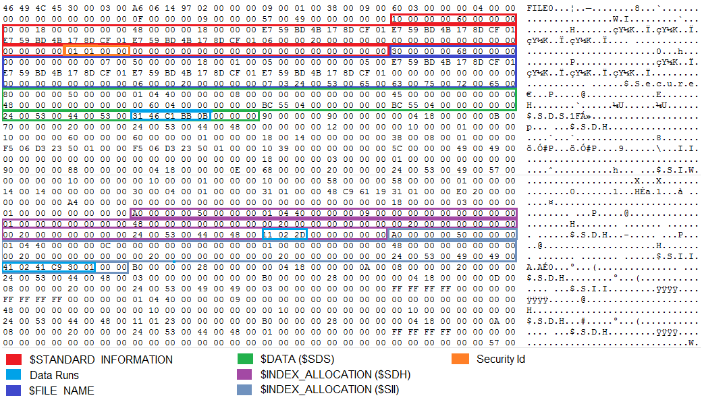 Apart from the highlighted areas related to Data Runs [14] which are part of a different attribute in each case and the
 Security Id that belongs to the $STANDARD_INFORMATION attribute, you’ll notice that the first 4 bytes (DWORD) represent the id of an attribute, while the second DWORD refers to the size of the attribute, including its header.
In order to understand how to find the associated data, we need to explain how Data Runs are interpreted.
The low nibble of the first byte refers to the number of bytes used to represent the amount of clusters reserved for this run of data. The high nibble refers to the number of bytes used to represent the cluster number where the associated data starts from, passed the number of bytes previously discussed.
Example for $SDS Data Run: 0x31 0x46 0xC1 0xBB 0x0B
0x31- 1 byte to represent amount of clusters –
0x46clusters reserved - 3 bytes to represent the cluster number –
0xBBBC1
- 1 byte to represent amount of clusters –
In our case, each cluster consists of 8 sectors, and each sector occupies 0x200 (512) bytes. This information is taken from the BIOS parameter block (BPB) of the boot sector of the volume [15].
Furthermore, in this example we see only one data run sequence. If there were more, because the data might be fragmented, then the rules change a bit in order to find the next data sequence. In practice, the next sequence, instead of having the starting cluster number, would have an offset (signed number) relative to the previous run, and so on.
Also, note that since the vulnerability gives raw access to the hard disk, it means that in our calculations for the exploit we also need to take into consideration the space between the very first sector of the disk and the boot sector of the partition of the running instance of the OS.
In this case the boot sector is located at offset 0x100000. So, whatever calculations we do, we need to add that number in order to get the raw offset of the data on disk.
Offset of the $SDS data = (0xBBBC1 * 8 * 0x200) + 0x100000 = 0xBBCC1000.
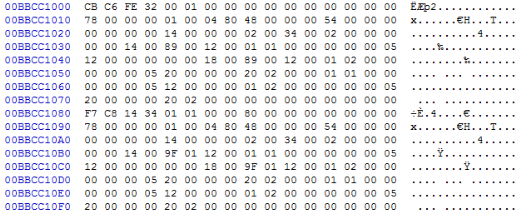 Decoding a security descriptor
In the image above we show the first two security descriptors. Keep in mind that these are always 16 bytes aligned. So, even though the first Security Descriptor [16] reports to be 0x78 bytes long, the next one starts at relative offset 0x80 (0xBBCC1080).
Let’s decode the first one in order to understand their layout.
Header
- Security Descriptor’s Hash:
0xCBC6FE32 - Security Id:
0x100 - Security Descriptor’s offset in the SDS stream:
0x00 - Size of Security Descriptor:
0x78 - Revision:
0x01 - Padding:
0x00 - ACL control flags:
0x8004 - Offset to User SID:
0x48 - Offet to Group SID:
0x54 - Offset to SACL:
0x00(not present) - Offset to DACL:
0x14
ACL
- Revision:
0x02 - Padding:
0x00 - ACL size:
0x34 - ACE count:
0x02 - Padding:
0x00
ACE #1
- ACE Access Allowed type:
0x00 - ACE Flags:
0x00 - ACE Size:
0x14 - Access Mask:
0x00120089 - SID:
S-1-5-18
ACE #2
- ACE Access Allowed type:
0x00 - ACE Flags:
0x00 - ACE Size:
0x18 - Access Mask:
0x00120089 - SID:
S-1-5-32-544
User SID
S-1-5-18
Group SID
S-1-5-32-544
From Security Id to Security Descriptor
In this section we will locate the Security Descriptor that is associated with the Security Id of an MFT file record by using the $INDEX_ALLOCATION attribute corresponding to the $SII.
We can use the MFT entry for the $Secure file as shown in the image above.
The Security Id in this case is 0x101, and the data runs correspond to the sequence: 0x41 0x02 0x41 0xC9 0x30 0x01.
In other words, we have two clusters reserved starting at cluster 0x130C941.
Disk offset of the $SII table = (0x130C941 * 8 * 0x200) + 0x100000 = 0x130CA41000
We can see the corresponding entry for this Security Id, which gives us the offset (0x80) of the Security Descriptor inside the $SDS stream. In this case it’s the second entry. Notice also that the hash of the Security Descriptor taken from the $SII entry matches the hash in the $SDS entry.
Exploitation approaches
Approach A
Search the disk for a registry key associated with a service that we can start as a standard user and point it to our own binary by directly modifying the data.
This was our first approach. It looked quite straight forward, although it could take several seconds to locate the correct data on disk. It seems that registry hives are cached and for a non-admin user, this is a problem. We didn’t find a straight forward way to flush the cache without doing some really resource-intensive stuff that would normally result in freezing the host for several seconds. This method worked well from any user account level, but it required a reboot of the host.
Approach B
Parse the $SDS stream, find all interesting Security Descriptors and modify them to give full access to everyone on the protected file objects.
However, caching kicks in again. According to Windows Internals, the 32 most recently accessed Security Descriptors are cached. Now, by remembering the fact that these are shared among files with the same security access requirements and that the OS by itself keeps accessing interesting files in Windows and System32 directories, this failed again to work on run-time. However, as in the previous case, it worked perfectly after reboot.
Approach C
Instead of trying to corrupt Security Descriptors, locate the MFT record of the target binary, such as a Service DLL, and change the Security Id to a new one. This is also the method we used in our exploit.
However, there are a few details to take care of.
First, we need to know which Security Id to use to replace the original one. Of course, we need one that corresponds to a Security Descriptor that allows us to do whatever we want.
We can solve this problem by creating a new file and setting up a custom Security Descriptor for it, which will cause the system to either create a new Security Id for it, or assign an existing one that corresponds to a Security Descriptor that allows us to have full access to that object. We can then do a quick search for our file per MFT record, extract the Security Id and use it to replace the one of an interesting binary.
This approach worked quite well, giving us the ability to overwrite a system service DLL and elevate our privileges on run-time.
We noticed that this method doesn’t have an immediate effect for any system binary. For example, if we attempt to do this for a binary in use, again the security settings will not change until reboot. However, there are plenty of options and we did find various DLLs that we could use for privilege escalation. These were DLLs that were not loaded or recently accessed by another process.
Finally, another important detail that we need to address is to ensure that the MFT record of a file with the same name it actually corresponds to the file we are targeting.
In other words, only taking into consideration the file name entry of the $FILE_NAME (0x30) attribute is not enough for the obvious reason that we might be looking into the wrong file.
For example, in 64-bit Windows it is common to have duplicates of the same system files in the System32 and SysWOW64 directories, with those in the latter being the 32-bit builds that we are not interested in.
To solve this problem, we can take into consideration the reference to the MFT record of the parent directory, again through the $FILE_NAME (0x30) attribute, and parse the tree backwards to the MFT record of the root directory named as . (dot).
In other words, we know that if it’s the right target file, then the first parent directory reference (going backwards) is System32, the following is Windows, and the third and final is a reference to the MFT record of the root directory, which by default corresponds to the MFT record number 5 [17].
Approach D
Since you managed to arrive at this point we would like to share another experimental idea with you, which we haven’t tried.
The concept behind this one is around allocating some kernel paged pool objects, waiting for them to be paged out, and then corrupting them on disk before attempting to re-use them from the exploit process.
This might not be even possible, or at least practical, but if you are adventurous enough to try this out, please do let us know if you get any interesting results.
Exploitation Steps
So, let’s sum up the various stages of the exploit by using the third method as described above.
- Locate Boot Sector and read physical parameters of the volume from
BPB. - Create a new file with a custom
Security Descriptor. - Search the disk for our file using information from step 1 and extract the
Security Idfrom theMFT recordthat corresponds to the file that we created in step 2. - Search the disk for the target binary file to overwrite and replace the
Security Idin itsMFT record. - Save its original contents and overwrite or patch the binary with our code.
- Trigger the system Service/Task to elevate privileges.
- Restore original binary.
- w00t!
Limitations
If the disk is fully encrypted, then by attempting to perform raw disk access we will just read back encrypted data that will make no sense. That being said, the File Share Encryption and Desktop Email Encryption products of the Symantec Encryption Desktop suite are the main targets of this vulnerability for direct privilege escalation, without requiring a reboot.
Regarding the case of Symantec Endpoint Encryption, the driver is still affected by the same security issue, but it does not allow the attacker to set arbitrary disk offset to read/write from. The offset has to be in the range of the first two disk sectors with regards to IOCTLs 0x8002206C and 0x80022070. However, we can still control the size of the data and so it can potentially be abused in the same way. By digging a bit further, we also discovered that IOCTL 0x8002208C for the same driver would allow us to perform fully controlled read operations starting from any disk offset. However, since this product is used to fully encrypt the disk, we would still read junk data if we tried to to access the disk in that way to read arbitrary data.
What is important to mention is that for all the aforementioned products, the vulnerability allows the attacker to perform further low level attacks on the disk, such as modifying the MBR, which is not encrypted, and can be used to install a bootkit and thus become abused by an APT that will be then able to execute itself with highest privileges, or a Ransomware threat (Petya) [18] as we have seen happening a lot recently.
Of course, destroying data is also an attack scenario, and it’s possible both with encryption being present or not.
Conclusion
Exploiting a vulnerability that is different from a memory corruption bug was a really interesting journey. One of the most interesting parts of this process was trying to trick and bypass the caching behavior that caused our first exploitation methods to fail on runtime.
At one point we actually thought that we had to stick with rebooting the host to complete the exploitation process, but then the idea of modifying the Security Id of a target MFT record came up and we managed to win this battle.
If you have more ideas about exploiting this or similar vulnerabilities on run-time and/or in other ways, then please share them with the community and let us know your thoughts.
Disclosure Timeline
- Vendor contacted – 12 July 2017.
- Vendor assigned a Tracking ID – 12 July 2017.
- Asked vendor for patch release confirmation – 11 October 2017.
- Vendor replied all issues under same Tracking ID are fixed – 11 October 2017.
- Contacted vendor to report the vulnerability is still there in the latest version – 11 October 2017.
- Vendor sent new builds that include latest hotfixes for various issues – 12 October 2017.
- Vendor reported the vulnerability is still not fixed and postponed – 12 October 2017.
- Contacted vendor to confirm that the vulnerability is still not fixed – 13 October 2017.
- Public Disclosure – 28 November 2017.
- Vendor (as a CNA) Assigns CVE Number CVE-2019-9702 – 20 June 2019.
- Vendor patches Symantec Endpoint Encryption in version 11.3.0. No plans to patch Symantec Desktop Encryption at this time – 20 June 2019.
References
1. https://www.symantec.com/products/desktop-email-encryption
2. https://www.osronline.com/article.cfm?article=97
3. https://docs.microsoft.com/en-us/sysinternals/downloads/winobj
4. https://msdn.microsoft.com/en-us/library/bb625963.aspx
5. https://msdn.microsoft.com/en-us/library/windows/hardware/ff548630(v=vs.85).aspx
6. http://www.dewassoc.com/kbase/hard_drives/master_boot_record.htm
7. http://www.c-jump.com/bcc/t256t/Week04NtfsReview/Week04NtfsReview.html#W01_0150_master_file_table
8. http://www.c-jump.com/bcc/t256t/Week04NtfsReview/Week04NtfsReview.html#W01_0380_the_securitydescrip
9. http://www.c-jump.com/bcc/t256t/Week04NtfsReview/Week04NtfsReview.html#W01_0630_the_secure
10. http://www.c-jump.com/bcc/t256t/Week04NtfsReview/Week04NtfsReview.html#W01_0320_the_standardinforma
11. http://www.c-jump.com/bcc/t256t/Week04NtfsReview/Week04NtfsReview.html#W01_0360_the_filename_attrib
12. http://www.c-jump.com/bcc/t256t/Week04NtfsReview/Week04NtfsReview.html#W01_0410_the_data_attribute
13. http://www.c-jump.com/bcc/t256t/Week04NtfsReview/Week04NtfsReview.html#W01_0440_the_indexallocation
14. http://www.c-jump.com/bcc/t256t/Week04NtfsReview/Week04NtfsReview.html#W01_0420_runlists
15. http://www.ntfs.com/ntfs-partition-boot-sector.htm
16. http://www.ntfs.com/ntfs-permissions-security-descriptor.htm
17. http://www.ntfs.com/ntfs-system-files.htm
18. https://www.us-cert.gov/ncas/alerts/TA17-181A


